

How to Create Perfect Wedding DVD Slideshow with Your Photos
A wedding is a big cultural ceremony where two couple will be united in a relationship. The couples will be endured in picking up the right plans to make their day catchier. Still out, some plans may cost money but the some will make you realize the true love towards your pair. It sounds simple. And it’s true obviously! Present the most memorable gift to your loved one by gifting them a wedding slideshow template, forever they like most. This simplistic idea is not only for the couples but even for the close relatives or friends who can gift a wedding slideshow with music and relive the memories when they feel like.
If you are busy in identifying the best wedding slideshow maker, do not worry, we are here to help you with the top and the best wedding slideshow makers. Just read the article below and make a list of all the things you want to add in a DVD photo slideshow.
Part 1. How to Burn Wedding Photos to DVD
In this part, we are going to introduce the all-in-one DVD slideshow maker. It’s time to start and create the DVD slideshow maker with Wondershare DVD Creator. Using this wedding slideshow software, you can compile various amazing effects that enhance photo slides view. It makes the burning time consumption less when compared to the other photo to DVD software. The developers have concentrated more on the quality when it comes to input as well as the output. The interface is designed by segmenting the main menus for easy navigation to create wedding slideshow. The conversion process is very simple and the rate of speed is pretty terrific. Wondershare DVD creator will get you into perfect wedding slideshow template where you can convert slides to DVD easily. The user can create wedding slideshow, edit the image, crop, trim, animate and use other features to make it unique.
Wondershare DVD Creator
- Burn wedding pictures and videos to DVD/Blu-ray/Data Disc/BDMV/ISO File.
- Support any image files, include .bmp, .jpg, .jpeg, .png, .gif and .tif.
- Edit your wedding photo slideshow easily with different effects, transition, text, music and more.
- Make a special wedding photo slideshow with fast burning speed and high-quality output.
- 100+ free static and dynamic DVD menu templates from Movie, Family life to Holiday theme.
- Customize wedding DVD menu by changing background image and music, adding text or thumbnail, and more.
- Additional built-in tools like Data Disc, ISO to DVD, Video Editor, DVD to DVD/Video, One-click to burn Blu-ray Disc/DVD Disc, etc.
- Supported OS: Mac OS 10.14 (Mojave), 10.13 (High Sierra), 10.12, 10.11, 10.10, 10.9, 10.8, 10.7, 10.6, Windows 10/8/7/XP/Vista.
 Security Verified. 5,150,814 people have downloaded it.
Video Tutorial to Burn Wedding Photos to DVD with Wondershare DVD Slideshow Maker
How to create wedding slideshow with Wondershare DVD Creator step by step:
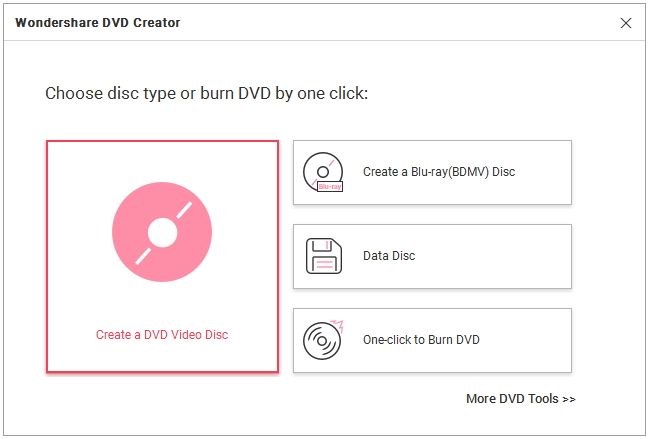
Step 1 Launch Wondershare DVD Creator
First of all, download the Wondershare DVD creator and install it properly as mentioned in DVD guidance from the authorized website. When the installation completes, open it and you will get a window below, choose Create a DVD Video Disc option to continue.
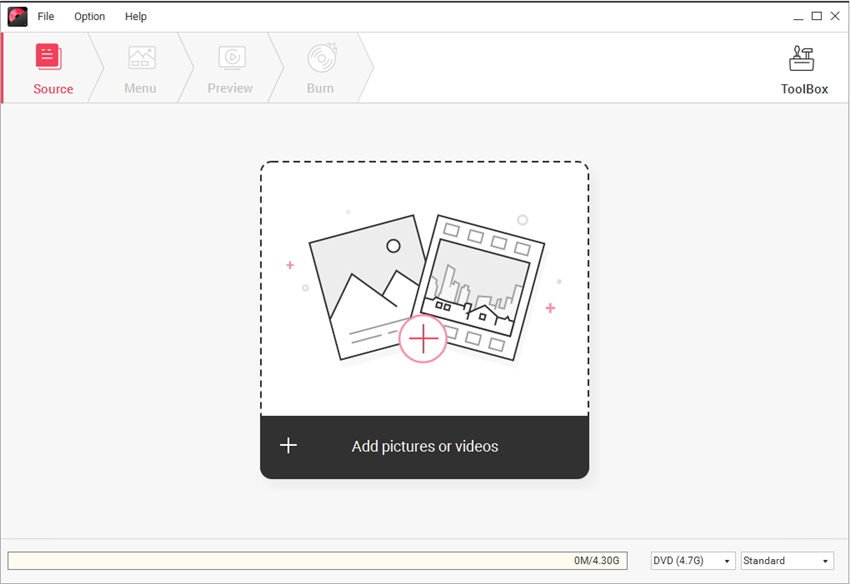
Step 2 Add Wedding Photos or Videos
Click on the + button under the source tab to import wedding images or videos on your PC. You can also simply drag and drop files to the interface.

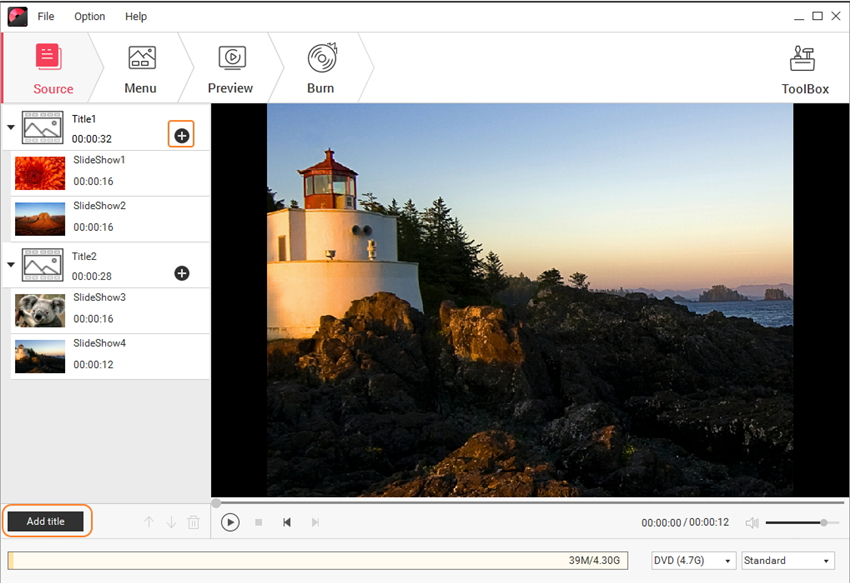
The loaded picture will be displayed as thumbnails on the left side, click "+" icon to add more images to the title. The Add title button at the left-bottom allows you to add new title pages for the wedding photo slideshow.
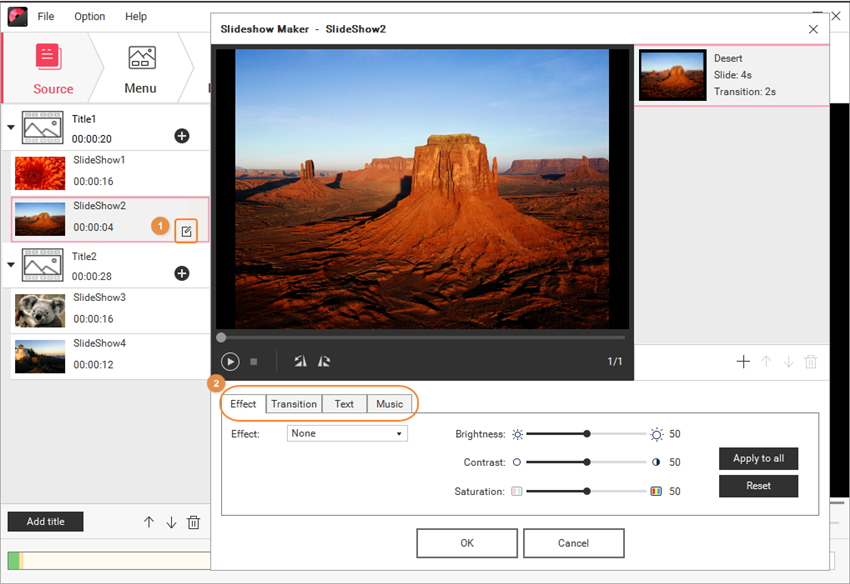
Step 3 Edit Wedding Photos (Optional)
By clicking the pencil-like icon on the thumbnail, a Slideshow Maker window will appear. You can edit the slides in terms of effect, text, music or the transitions, make changes to let your wedding photo slideshow more attractive.
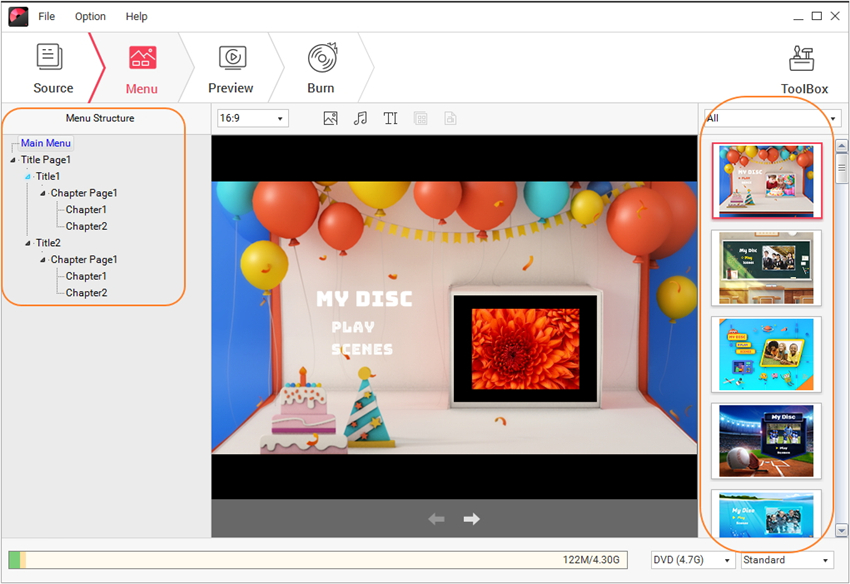
Step 4 Customize Wedding Photo Slideshow Menu
Move to the Menu tab and make some customizations for your wedding photo slideshow DVD menu. Choose the most suitable template design from the list on the right column and double click to apply. For further adjustments, you can change background pictures and music, add text, create chapters and more by clicking the icons on the interface.
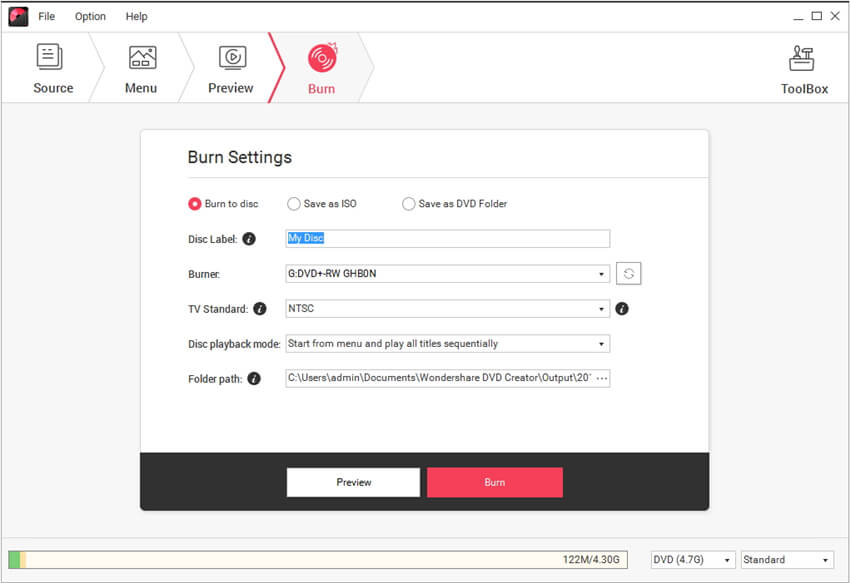
Step 5 Preview and Burn Photos to DVD Slideshow
Now after making all these changes, use the Preview tab to see all changes you have made to the slides. If you're not that satisfied, just go back to make adjustments. Click on Burn tab where you can save your work to disc or DVD directly, complete the DVD presetting including disc label, burner, TV standard, etc. Finally, hit the Burn button to start burning wedding photos to DVD slideshow right away.
Part 2. Create Wedding Slideshow Online with Templates
If you need to create a wedding slideshow without any software download, Wondershare VidAir is the right choice. You can create your sweet wedding slideshow with the preset template. Just change the pictures or video clips with your local files. Or you can find some beautiful background pictures and music for your slideshow. You can add text effects and stickers to make your wedding slideshow more attractive. Try it online now with the following steps.
How to Make Wedding Slideshow Online
Step 1: Open Wondershare VidAir templates page from your browser: https://vidair.wondershare.com/templates.html, and choose the wedding category, then select one template and click on the Use This Template button to continue.
Step 2: Add text and stickers to your wedding slideshow, and search your desired video or image resource.
Step 3: Preview the whole slideshow you have created, and click on the Export button to generate and download the slideshow.

Part 3. Tips for A Great Wedding Slideshow
“Somewhere, something incredible is waiting to be known” said by Carl Sagan. As foremost said, the guest has a chance to attend the mid-reception breather when they see somewhere, something incredible is waiting to be known in wedding slideshow template. Let’s figure out few tips for creating the wedding slideshow with music.
Generally, a wedding photo slideshow should be very brief and precious. One should complete the slideshow within the 10 minutes and moreover, there should be two songs. One has to dedicate to groom and bride’s relationship and another should be lovely images of the couples. Choose the right music and make it more meaningful in creating wedding slideshow.
Relate everything in proper order in wedding slideshow software. Start from the childhood, nursery school, girls/boys scout and college. It depends upon your wish! You may assign it chronologically.
No more promotional wedding photo slideshow should exist. Simply explain the couple pets and add equal counting number of images. Don’t do any partiality in adding the images. You may be a friend of groom or bride, but don’t mark up specific instances to engage the one who you are friendlier.
You can add the shots of couple relations like the sister, father and mother images. Then you will hit the sweet spot! This type of cheeriness will make the unforgettable moment for all your surroundings.
Do not scrunch up eyes when viewing it blurred. The developer has to use only highly qualified pictures to express their love. Ignore the blurred images even if the picture visual is good.
Before presenting the wedding slideshow template by using the best wedding slideshow maker – just run the presentation twice before the big day of the couples. You will be embraced when it stuck in middle.
You can add the other images such as home videos or function which could help you in presenting and convert slides to DVD.
We have listed out a few tips for creating and presenting the wedding photo slideshow. This will be very useful in all instances and will make your friend’s marriage more entertaining. Hereby! The above content is true and assured with practical experience. So, we have got a straight dealing with the best photo to DVD software, isn’t it? Yes of course! Above all, Wondershare DVD Creator is a wonderful software which is rated as the best wedding slideshow maker. So go ahead and use this DVD creator from Wondershare right away!


Christine Smith
staff Editor
Comment(s)