How to Burn Files to DVD Easily on Windows 10/Mac
Cloud storage and USBs have definitely become the most preferred way of storing important data, but the importance of DVDs cannot be ignored. In addition to safe storage, burning files to DVD gives a physical belonging of a disc and also allows enjoying your videos and other files on a DVD player. Videos and photos are the most important file types that you may want to burn to a DVD and here comes the role of a good file burner. Using a professional DVD file converter, you can also combine videos along with photos and music to create a professional yet customized disc. To deal with all queries on how to burn files to DVD, read below.
Part 1. Best DVD File Burner: How to Burn Files to DVD Windows 10/8/7
A simple yet professional file burner that comes packed with all needed and advanced features is Wondershare DVD Creator . Using the software you can burn files to DVD on Windows10/8 and other OS versions. Mac version of the program is also available. Wondershare DVD Creator supports all major video, picture and music formats for burning them to DVD or Blu-ray disc. You can also create DVD folder and ISO image of your files for the future burning of the disc. There are over 40 beautiful DVD templates available to make your disc look interesting. Once a template design is selected, you can even customize it by adding background image or music, creating chapters, editing thumbnail and other functions. For video personalization before DVD burning, a complete video editor is present. Rotate, trim, crop or add special effects to your videos. A photo slideshow can also be created, combining videos and music to make a special gift for someone special. The real-time preview feature gives you the freedom to check the created disc before it is burned.
Supported File Formats:
- Videos- Support almost all types of video formats. SD supported formats include AVI, MP4, RM, RMVB, MOV, and others. HD supported videos include MTS, M2TS, HD MKV, HD WMV, and others.
- Image – Supports all types of picture formats including JPEG, BMP, PNG, GIF, TIFF, and others.
Wondershare DVD Creator
- · Burn videos and images in any format to DVD/ISO/DVD Folder/Blu-ray DVD.
- · Create photo slideshow, video editing, DVD/Blu-ray disc to video, burn Data Disc, ISO to DVD, and more additional functions are also supported.
- · Customize files to DVD menu with adding text, changing background picture or music, creating chapters, etc.
- · Edit your menu template with different styles such as Sport, Movie, Family life, Holiday, even No Menu.
- · Built-in editor to make your video files personalized, rotate, crop, trim your videos easily and adding effects or subtitles on them.
- · Burn kinds of files to DVD with super fast burning speed and high-quality output on Windows/Mac.
Solution 1: Steps on how to burn video files to DVD on Windows 10 using Wondershare DVD Creator:
Step 1 Open Wondershare video file to DVD burner.
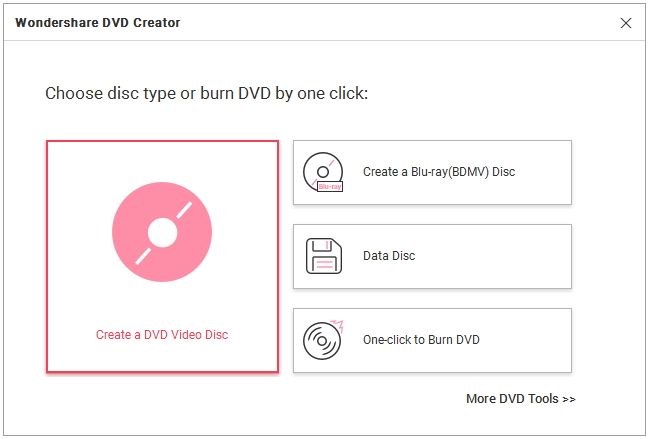
Launch Wondershare DVD Creator on your Windows 10 PC. A window will appear showing 3 different options. Select the option Create a DVD Video Disc.
Step 2 Import videos to file burner.
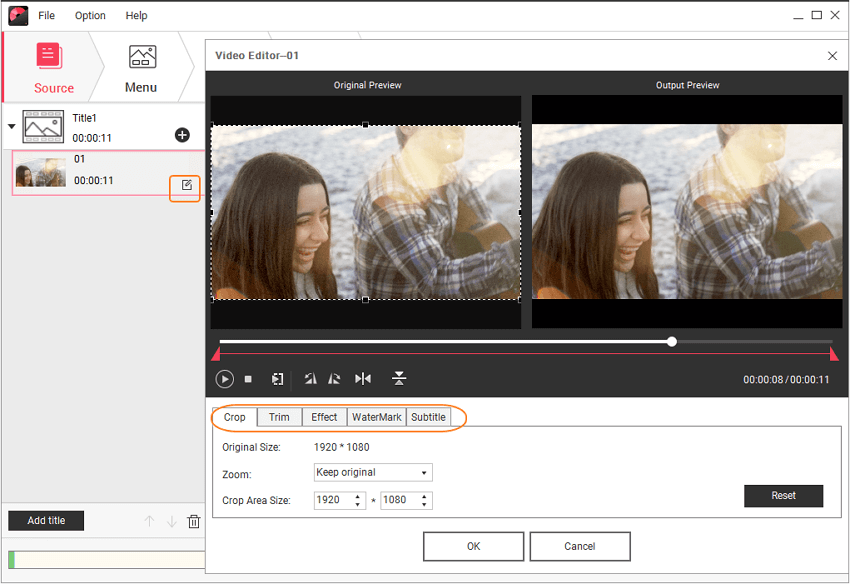
Select the Source tab. Hit the + button to add the video files on your PC. Taking a simple route, you can also drag and drop the files. Add multiple videos, and the added videos will appear as thumbnails on the left side of the screen.
If you want to trim, crop, add watermark or perform other editing functions to the videos before burning, click the edit icon on the thumbnail. A Video Editor window will appear. Make changes and click OK to confirm.
Step 3 Choose DVD menu template to a video file to DVD converter.
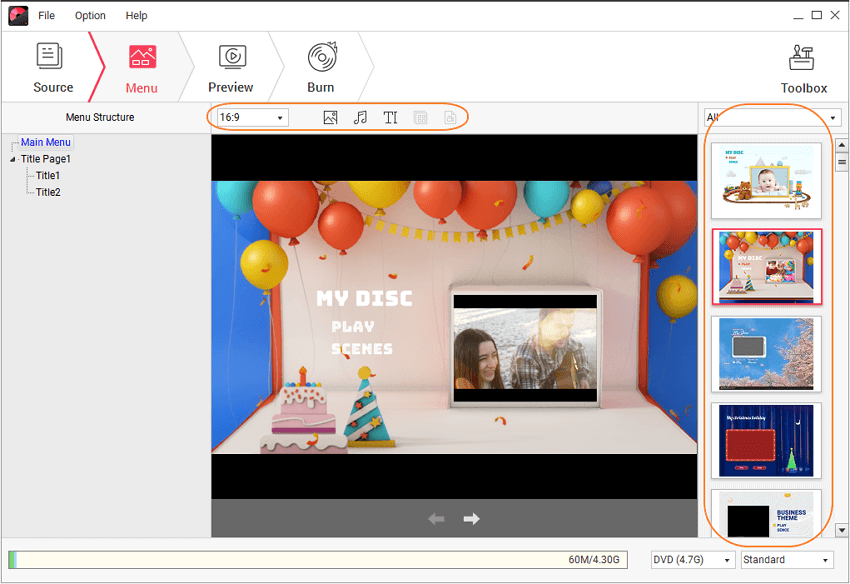
Move to the Menu tab. A list of template designs will appear on the right side of the panel. To download more designs, click the download icon. Once the template is selected, you can customize its buttons, frames, and text; add DVD chapters, set aspect ratio, add background music or an image. The icons for all the listed functions are present at the top of the preview screen.
Step 4 Preview and burn video files to DVD.
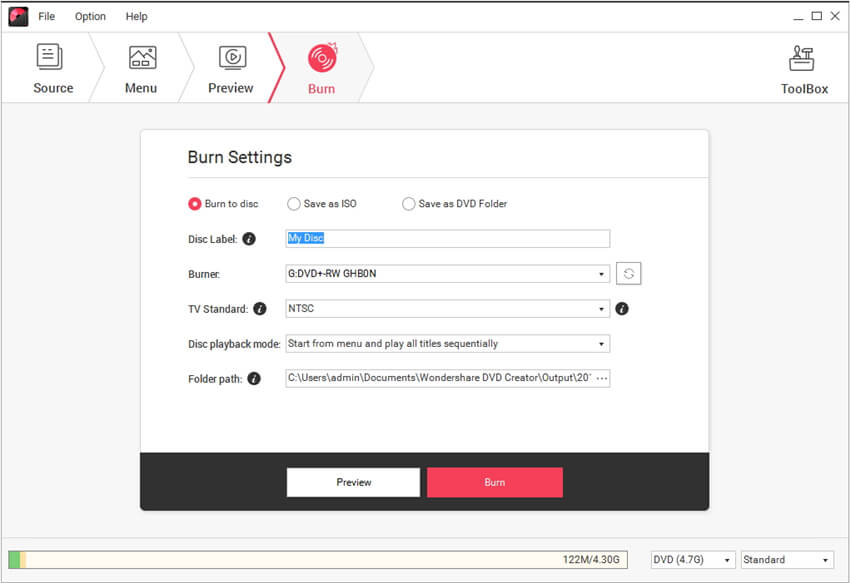
To check the created disc, click the Preview tab. Here you can also go back and make any more changes if needed. Move to the Burn tab to create a DVD disc, select the Burn to disc option. Give a disc label and finish other settings on the pop-up window. Hit Burn to convert video files to DVD.
Solution 2: Steps to Convert Photo Files to DVD on Windows 10:
Step 1 Open Windows 8 burn files to DVD tool.
Launch Wondershare DVD Creator on your PC and select the Create a DVD Video Disc option.
Step 2 Load photo files to the file burner.
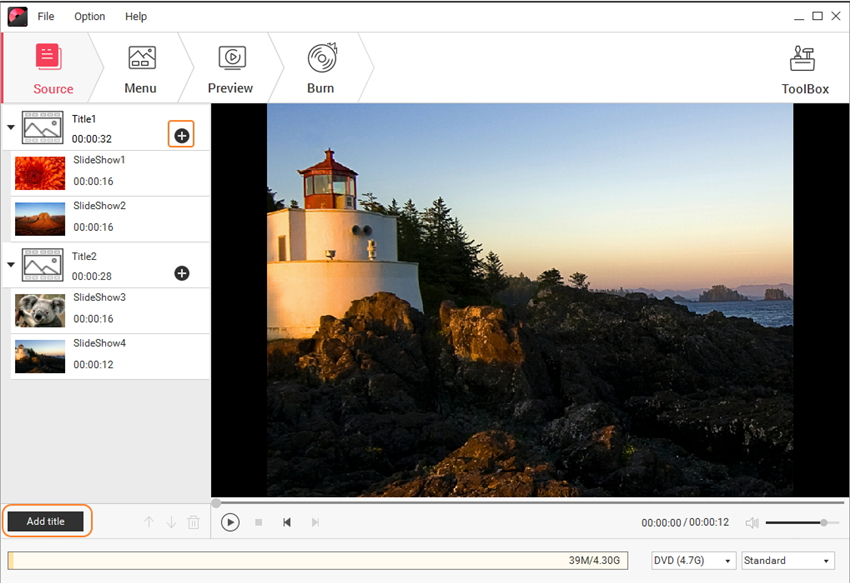
From the Source tab, click + button to browse and add images from your PC. All the added photos will appear as thumbnails on the left side of the screen as SlideShow 1, SlideShow 2… and so on. Hit Add title button at the left-bottom interface to add new title pages for the photo slideshow.
Step 3 Edit added photos (Optional).
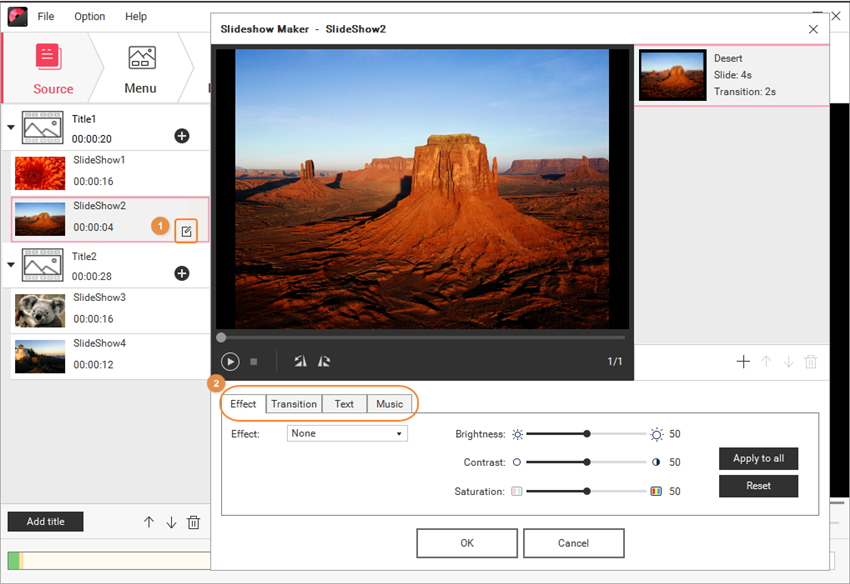
If you want to edit the added pictures before burning them to a DVD, either click the edit icon on the thumbnail or right click the image and select Edit option. A SlideShow Maker window will open from where you can perform multiple functions like rotating the picture, adding text, changing background music, and transition effect. Once all editing is done, click OK to confirm.
Step 4 Choose DVD template at Windows 8 files to DVD converter.
Next, select the Menu tab. From the available DVD template designs, select the most appropriate one and double-click to apply. The options to customize template are present at the head of the interface, from where you can change background pictures and music, adding text to your DVD menu, creating chapters and more.
Step 5 Preview and convert files to DVD.
Click the Preview tab to check the DVD creation. Back to previous tabs to make changes if something here you're not satisfied. At the Burn tab, select Burn to disc option, give DVD label and choose other parameters. Finally, hit Burn to start burning Windows media files to DVD.
Watch Video Tutorial to Learn How to Burn Photo to DVD on Windows 10/8/7 with Wondershare DVD Creator
Part 2. Free DVD File Converter: How to Convert Video File to DVD Format Free
In addition to paid professional programs, a number of free DVD file converters are also available. One such decent software is DVDVideoSoft Free Video to DVD Converter. Compatible with Windows 10/8/7/Vista/XP SP3, this free dvd file converter contains no adware or spyware and can be thus installed safely on your PC. All major video formats are supported for DVD burning. This video file to DVD converter allows creating functional DVD menu and can burn a number of videos on a single disc. There is also a feature to detect the size of the DVD folder or video which is to be created.
Supported File formats: All common and popularly used video formats like MP4, M4V, AVI, DIVX, MPG, MOV, MTS, and others.
Steps on how to convert files into DVD format using DVDVideoSoft Free DVD Video Converter:
Step 1: Download, install and launch DVDVideoSoft Free DVD Video Converter on your PC. The download link is available on https://www.dvdvideosoft.com/products/DVD/Free-Video-to-DVD-Converter.htm.
Step 2: Under the Input files: tab, click the Browse button to select and add video files from your PC. The bar at the bottom of the interface will show the total space which will be occupied by the video on a disc.
Step 3: Next, under Output folder:, click Browse and select the location where you want to save the converted DVD video.
Step 4: Choose the desired option under the Presets: tab.
Step 5: Finally, click the Create DVD button at the bottom-right corner. "Choose an action", a pop-up window will open from where select the desired action and click Continue.

The steps above will successfully convert video files to DVD.
Part 3. DVD File Converter: How to Convert ISO/DVD Folder File to DVD
Have earlier created ISO image or a DVD folder file and now want to burn them to a DVD?
Supported file formats:
The software supports more than 1000 video formats. Some of the hot supported formats include the following:
Video: MP4, MPEG-2, Xvid, AVI, MKV, WMV, YouTube, , DivX.
Wondershare Video Converter Ultimate
- . Burn and customize videos to your DVD or Blu-ray disc with free DVD menu templates.
- . Convert any video file to other 1000 formats.
- . Convert multiple files to other format in batch without any quality loss.
- . Convert files to optimized preset for almost all of the devices, like iPhone, iPad, HuaWei phone etc.
- . 30X faster conversion speed than common converters with unique APEXTRANS technology.
- . Powerful editing tools help customize your videos, like trimming, cropping, adding watermark, subtitles etc.
- . Download or record videos from YouTube and other 10,000+ video sharing sites.
- . Transfer videos from computer to iPhone, iPad and other devices directly and vice versa.
- . Versatile toolbox: Add video metadata, GIF maker, cast video to TV, VR converter and screen recorder.
- . Supported OS: Windows 10/8/7/XP/Vista, Mac OS X 10.14 (Mojave), 10.13 (High Sierra), 10.12, 10.11, 10.10, 10.9, 10.8, 10.7, 10.6
Steps to Burn ISO Files to DVD using Wondershare Video Converter Ultimate:
Step 1 Launch Wondershare ISO to DVD creator and add ISO file.
Download, install, and open Wondershare Video Converter Ultimate on your PC. From the main interface, chose the Burn tab. Click drop-down menu at Load DVD and select Load ISO Files. Browse for the ISO image files on your PC and add them. A pop-up DVD Load Model window will open. Select desired option from Main Movie or All Movies and click OK.

Step 2 Choose DVD template.
Once ISO file is added to the interface, select DVD template design from the available option on the right side of the screen. To add background image or music to the template click edit icon the left corner to open DVD Template pop-up window.

Step 3 Enter DVD Label and other parameters.
Next, give a label to the disc to be created and choose other parameters like Menu Type, Aspect Ratio, TV Standard, and Quality.

Step 4 Burn ISO to DVD.
At the Burn video to: tab on the top-right corner, select DVD disc as the location for the burned file. Finally, click the Burn button to start burning ISO image files to DVD disc.


Christine Smith
staff Editor
Comment(s)