Why Can't I Find iTunes CD Burner
While using Mac computers the iTunes CD burner not found is a very common issue. This error can occur due to so many reasons. You can hire a professional to solve out the problem without any effort but it costs you too much. So instead of hiring a professional to get rid of iTunes CD burner not found you can also solve out the problem by yourself. There are so many ways available to solve out the issue which we are going to share in this article. So let’s start to solve out the issue quickly.
- Tip 1: iTunes CD Burner cancel the burning process automatically
- Tip 2: How to Use iTunes CD Burner
- Tip 3: Check before updating the iTunes:
- Tip 4: Make sure to songs are ticked while burring:
- Tip 5: Make sure to check songs are authorized to play on computer:
- Tip 6: A Better Alternative to iTunes CD Burner
- Tip 7: Comparison
Wondershare DVD Creator
- • Wondershare DVD Creator is super easy to use software and burns any kind of disk.
- • The program is also offered for windows computers including Mac.
- • It comes with inbuilt over 100 free DVD menu templates.
- • Compatible in burning all types of data to disks.
- • You can make photo slideshows of photos with the software.
Tip 1: iTunes CD Burner cancel the burning process automatically
Reason and solution why iTunes cancels the burning process:
This is very common but there is not any specific reason of this error. You can get this error after updating your iTunes to latest version or anything changes in your system software. The problem is with iTunes only so you can fix it by troubleshooting iTunes itself. The main reason of cancelling the burning process is faster burning speed. Make sure to burn your disk in slow speed and if it is in faster speed then you need slow down the CD burning speed in the iTunes setting.
How to slow down the iTunes burning speed:
Steps to Follow: This is very simple and you can select the burning speed at the time of burning disk.
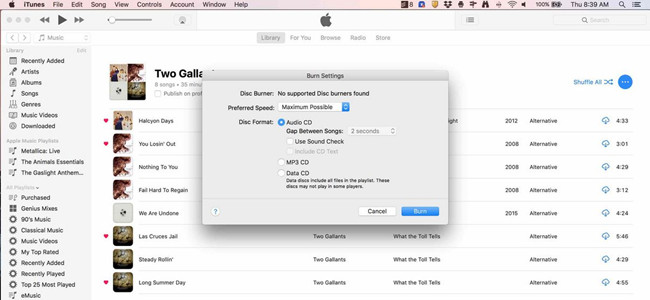
- Step 1: First of all click the Burn Setting and then a popup will open on your screen.
- Step 2: In the next to “Preferred Speed” option select slow speed. Now try to burn your CD with music again.
Tip 2: How to Use iTunes CD Burner
iTunes allows users to burn iTunes playlists directly to a CD or DVD disk with just few clicks on your system. You can easily burn the files without any installation of third party software. There is one issue that you can only burn playlists to the CD using the iTunes because it is not possible to directly browse songs from your computer. So, let’s start how to use iTunes to burn CD’s on the Mac or windows computer. Mac and windows both versions have same process to burn disks while using iTunes.
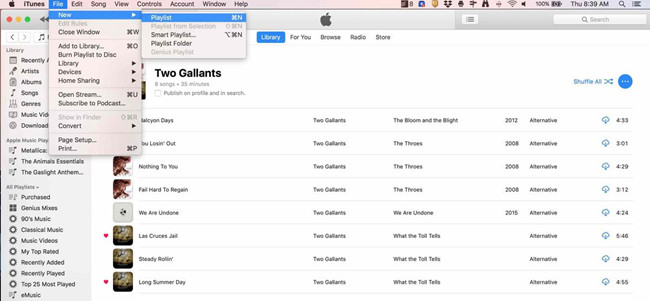
Step 1. First of all make sure to create a playlist in the iTunes to burn in CD. To create new playlist click the “File > New > Playlist” option. You will see playlist in the left side; now simply give a name to this playlist.
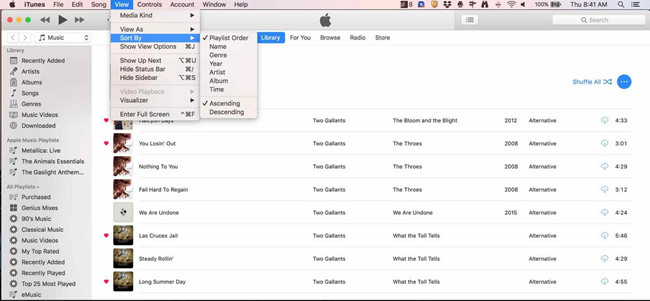
Step 2. If you have already created a playlist then you can simply add more songs to that playlist which you want to burn in the disk. You can add music to playlist by clicking the library tab. Select the songs and the right click on it and hit “Add to Playlist” option. After adding songs you can put them in the order in which you want to burn in the CD. You can sort the songs by going in “View > Sort By” option. You will see Playlist order, name, genre, year, artist, albums and time from the list.
Step 3. Now insert the blank CD in the DVD ROM of your computer. Once the CD is loaded you need to click the “File > Burn Playlist to Disk”. If you are using iTunes 11 or later version then a popup box will open to check the settings for burning CD. Choose the appropriate settings as per your need and then hit “Burn” button to start disk burning.
Tip 3: Check before updating the iTunes
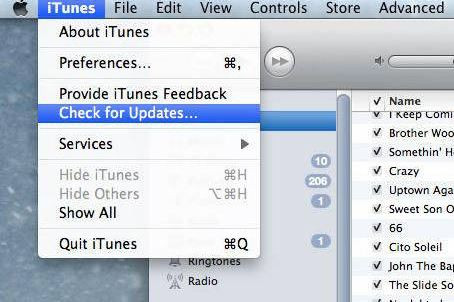
Updating the iTunes to latest version is really necessary for you to get latest features and bug fixes but sometimes things can go wrong. You may face other issues after updating the iTunes such as iTunes CD burner not found. To get rid of these issues you always check the reviews of newer version over internet posted by other users. If they are facing any problem with the new version then it is recommended not to update the iTunes so wait for Apple to fix the issues first before updating.
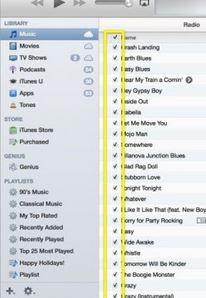
Tip 4: Tick Songs before Burning
Sometimes people face issue that the wrong songs are burned to disk. This problem can occur due to the non-checked songs. So, before burning disk make sure the songs you are burning to disk have a tick beside them.
Tip 5:Check Whether the Songs Can be Played
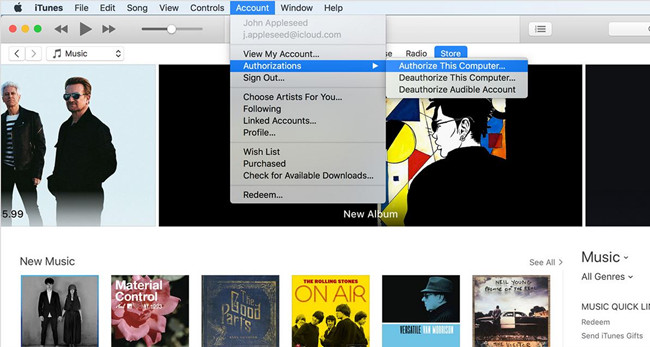
Sometimes you may face issue of not burning a single song to disk. This can happen because the iTunes store has not authorized that song to play on your computer and you are trying to burn that song in disk. So, you need to authorize the computer first to burn that song to disk. Make sure that you have not authorized more than 5 computers because apple only allows you to authorize up to 5 computers.
Tip 6: A Better Alternative to iTunes CD Burner
If you are still unable to get rid of iTunes CD burner not found, then Wondershare DVD Creator is the end of your search. This software is third party software from Wondershare that allows you to burn all kinds of data with advanced options on the Mac. This software allows users to quickly burn all kinds of disks. You can easily use this software without worrying about the iTunes error because it works separately. Once you start using this software then you will forget thinking about using iTunes for all your burning needs.
Wondershare DVD Creator
- • Wondershare DVD Creator is super easy to use software and burns any kind of disk.
- • The program is also offered for windows computers including Mac.
- • It comes with inbuilt over 100 free DVD menu templates.
- • Compatible in burning all types of data to disks.
- • You can make photo slideshows of photos with the software.
How to Burn CD with Wondershare DVD Creator
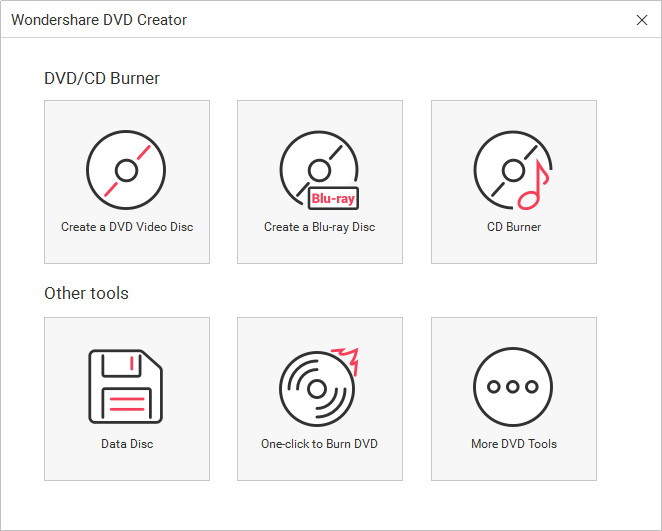
Step 1. Choose CD Burner Option
Start Wondershare DVD Creator on your computer, and you'll see the welcome screenlike the screenshot below. Now you'll need to choose the CD Burner option if you're going to burn CD.
Step 2. Add Audio Files to Program
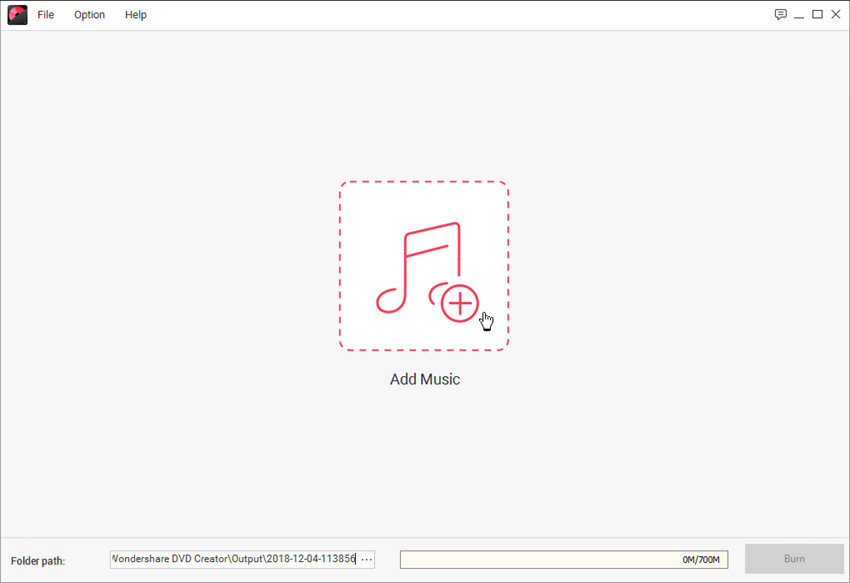
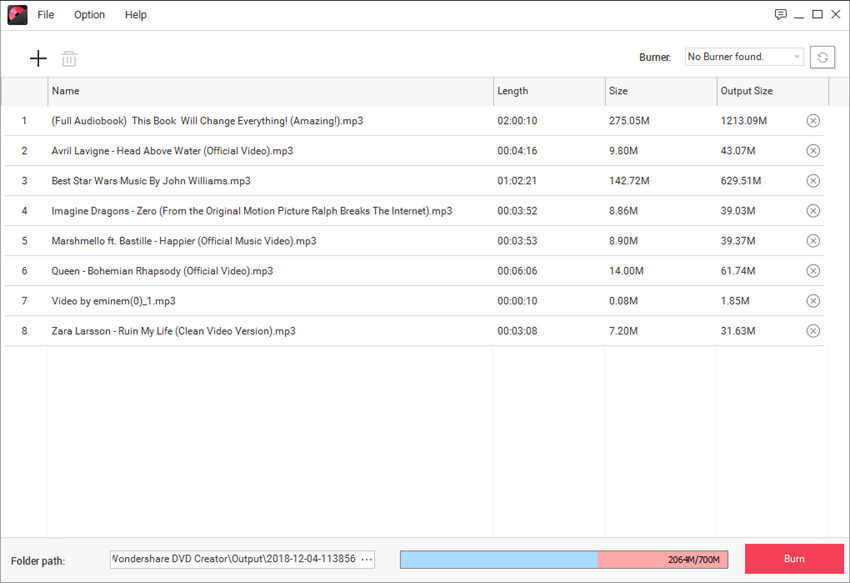
You have two options to add audio files into the program, one is dragging and dropping the files into the program, and the other is by clicking the Add Music icon in the middle of the program window.
Step 3. Start Burning Music to CD
When you've added all the music files into the program window, you can click the Burn button at the lower right bottom to start burning music to CD immediately. If you want to arrange the order of the music files, you can drag the music files to the place you want.
Tip 7: Comparison
| iTunes CD Burner | Wondershare DVD Creator | |
|---|---|---|
| Burning speed | Slow | Faster |
| Quality of Output | Low | Original |
| Personalized Settings | Yes | Yes |
| Supported Format | Popular Audio Files | All Audio, Video & Data |
| Burn DVD | No | Yes |
| Burn Blu-ray | No | Yes |
| Burn ISO | No | Yes |
| Burn Data Disc | No | Yes |
| Audio Editing Tool | No | Yes |
| Ease of Use | No | Yes |
Conclusion:
These are few tips if you are facing iTunes CD burner not found error on your system. We hope you have solved out the issue now using the tips above. We would like you to use the Wondershare DVD Creator software instead of iTunes if you are still unable to solve out the problem. If offers you many advanced features which you can read in the program details and comparison table which is not possible to do in the iTunes. The choice is yours.


Christine Smith
staff Editor
Comment(s)