Burn Data Disc with 3 Simple Steps
The technology might be advancing at a very fast pace, but some storage techniques are still present as if they are going to last forever. The DVDs are one of them. Even though the DVDs have been almost replaced by online streaming video services but the DVDs is still a very popular form of storage. Sometimes, you might get confused with the terms data DVD disc and Video DVD. Both of these terms sound almost the same but there is a little bit of difference between them. In the article, we will discuss what these terms exactly means and how to burn a data disc to have a backup of your files. At the end, you will have a proper knowledge of these terms and the most reliable way to burn the files to a data disc.
Part 1. What's the Difference between Data DVD and Video DVD?
Before we get to discuss the process of burning a Data Disc, we must have a brief knowledge of Data DVD and Video DVD. Although these terms have some similarities they are also different in many aspects. So, we will discuss what exactly are a Data DVD Disc and a Video DVD and the difference between them.
1. What is a Data DVD Disc?
A Data DVD disc is a hard drive that is used to store files like photos, videos, music files, and another type of files. The Data Disc usually has a capacity of 4.2 GB and is a great way for keeping a backup of files on an external storage media. This type of DVD only works with a computer.
2. What is a Video DVD?
The Video DVD, as its name signifies clearly, is a disc that can only store video files. The Video DVD can be played on a DVD player and is generally used for the exhibition purpose. This DVD disc contains menus and chapters that can be used to customize the video to fit the specific needs of the user.
3. Data DVD vs. Video DVD:
Now, the time has come when we specify the main difference between a data DVD disc and a Video DVD. At first, look at the name, the name is enough to clear the doubts of the users. The data DVD stores all kind of data whereas the Video DVD only stores the video files.
Using the Data DVD is like using a thumb drive in which files can only be added and it can’t be rewritten. To understand how to create a data DVD, you must choose effective software that will allow the burning of files to the disk. Once you burn some files into the Data Disc that data will be stored permanently on the disc unless you are using a re-writable DVD. The data disc will justify your requirement of having an external drive where you can store data for future use.
The Video DVD is more like a Vinyl record. The information is written in the form of streams that are decoded by the DVD player. The Video DVD won’t play on a computer and will only display a strange collection of files. The Video DVD is usually played in the living room, or at a convention or conference.
Another difference is that on a data DVD disc you can store the files of any format and resolutions, but on a Video DVD you can only burn a standard size resolution file. So, it is better that you learn how to burn a data disc instead of a video DVD because the data DVD offers more features and customization.
So, now we are going to explain how to make a data disc that can store your videos for a long time. With the data disc, you will be able to copy those files to a different system and keep a backup of those files.
Part 2. How to Make a Data Disc within 3 Steps
Making a data disc is not that much complicated. Once you know which software is efficient enough to ease up the process, you can do it with just 3 simple steps.
Undoubtedly, Wondershare DVD Creator is the software which is the complete solution for your DVD requirements. It offers a variety of features allowing you to burn files to a data disc, Blu-ray DVD, and other storage spaces. It supports more than 150 formats which can be burned to all the popular disc types including DVD-9 and DVD-5. Burning the files to a data DVD will help you to save space on your system and share the files with your friends and family. An additional feature of the software is that it can also edit the files before you burn them to data disc.
Wondershare DVD Creator
- · Convert videos to DVD/Blu-ray Disc/ISO File/DVD Folder/Data Disc with fast speed and high-quality output.
- · Edit videos with features of cropping/trimming/rotating videos, add subtitle, apply effects, and others.
- · Select to DVD menu with 100+ template design from Movie, Memory, to Travel theme.
- · Customize DVD menu with parameters such as background image, music, text, and others.
- · Additional functions including ISO to DVD, Data Disc, Video Editor, Slideshow Maker, DVD to Video, DVD to DVD, One-click to Burn DVD, etc.
- · Both DVD5 and DVD9 disc are available.
- · Supported OS: Windows 10/8/7/XP/Vista, Mac OS 10.14 (Mojave), 10.13 (High Sierra), 10.12, 10.11, 10.10, 10.9, 10.8, 10.7, 10.6.
Watch Video Tutorial to Learn How to Burn Audio to DVD with Wondershare DVD Creator
The various features offered by the software are listed below:
- • The software can burn photos and videos of any format including .bmp, .jpg, .jpeg, .png, .gif, .tif, .mp4, .mpeg, .wmv, .mkv, and more.
- • It also consists of an editor which can efficiently edit photos and videos and add effects, filter, transitions, text, and music to them.
- • This is a complete toolbox which has the function of burning a data disc, ISO to DVD, DVD to DVD, one click burn to DVD/ Blu-ray disc, Slideshow maker and a Video editor.
- • The software has a fats burning speed with no quality loss of the data files.
- • It has several DVD menus and over 100 free templates along with pictures, music, texts, chapter, and some other features.
How to Burn Data Disc with Wondershare DVD Creator
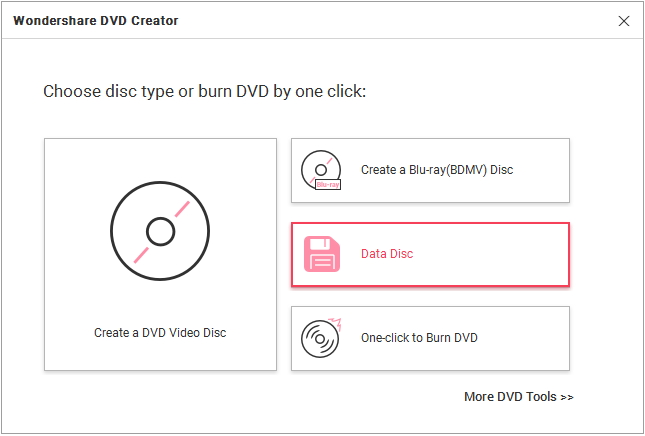
Step 1. Download the DVD Creator software from the official website and install it on your device. Launch the software and select the Data Disc option from the main menu.
Note: You can also click on the more DVD tools and then choose the Data Disc to access the quick burning window.

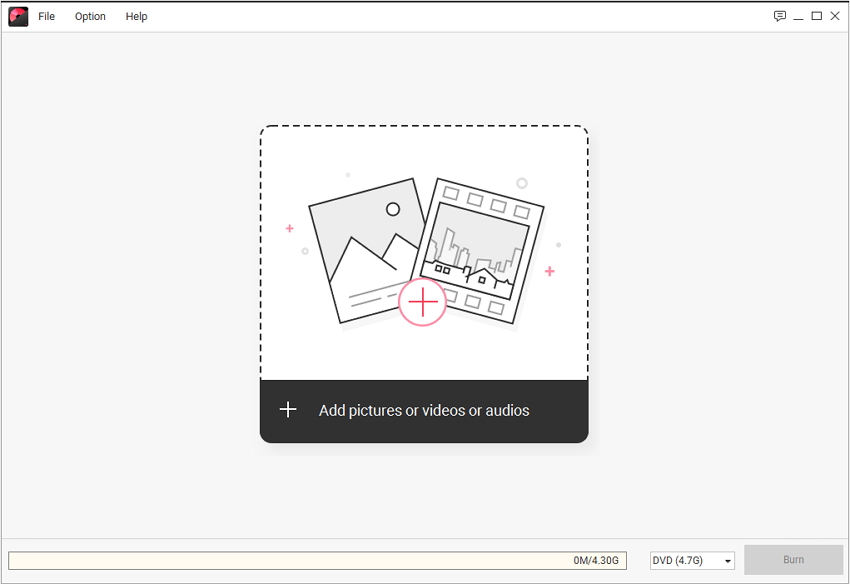
Step 2. Now add the data file that you want to burn by clicking on “+” icon. You can choose any file from the storage as the software supports a wide array of formats. You can choose music files, photos and videos and documents all at once and it will be added in the software interface to be ready for the burning process. Add as many files that can be added in the disc and delete if some extra files are added by mistake. When you have finalized the list, move on to the next step.

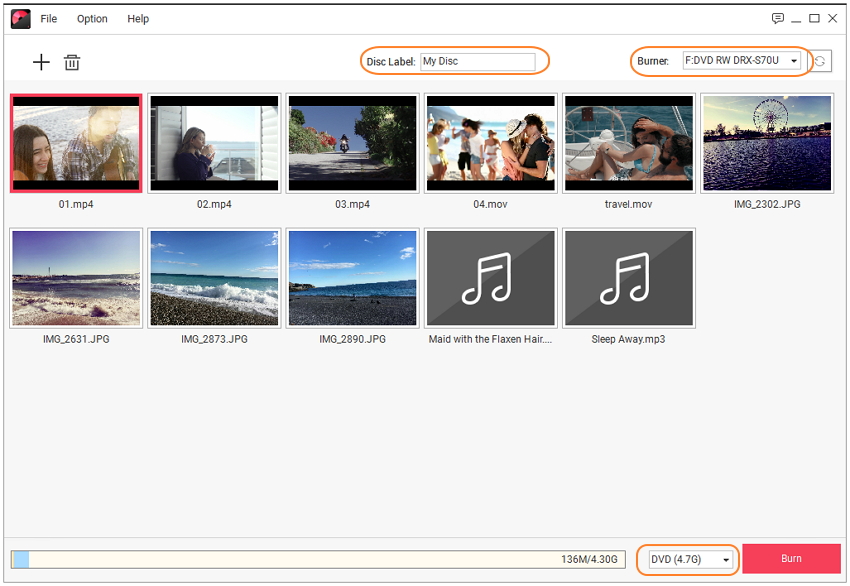
Step 3. Now the only thing left to do is to choose a Disc label and select the Burner. Add the storage info and choose the disc type. Finally, tap on the Burn option and burn your files to the data disc.

There you have successfully burned a file to a data disc with 3 steps only. Remember that before you burn the files, you have to insert a data disc in the computer.
Conclusion:
Creating a backup in the data disc used to be a hard process but the advanced technology has made it easy. As now you know how to create a data DVD, you can easily keep a backup of all your files to an external storage space where the data will stay permanently. The Wondershare DVD Creator is the software you can always rely upon if you want to burn files to data disc or any other storage disc. It is a very powerful utility tool that will make the burning process simple and easy. You can also try out 8 other useful tools present within the software.


Christine Smith
staff Editor
Comment(s)