Best Camcorder to DVD Converter: How to Transfer Camcorder Video to DVD Directly
Digital Camcorder is one of the most popular home products of all time. Camcorders have made shooting videos a simple, quick and fun activity. Maybe get some great camcorder footage of your kids, dogs and Harley Davidson. And now want to get this footage on to your PC or even convert camcorder video to DVD so that you can watch the files on a DVD player or on TV. Additionally, most of the latest camcorders use the highly compressed AVCHD format, a variant of the used in Blu-ray and HD DVDs, which means you can't watch HD camcorder videos using SD home DVD player. To play HD camcorder videos on normal home DVD player, you need convert and burn video from HD camcorder to DVD.
Part 1. How to Burn Camcorder Videos to DVD Directly and Easily
Here we recommend a camcorder to DVD converter - Wondershare DVD Creator (Windows 10 supported) for your reference. With it, you'll find it pretty easy to transfer camcorder videos to DVD so that you can enjoy a quality time watching movies with your family at home. Wondershare DVD Creator provides you many customization features to make your DVD more attractive and creative. It also has many additional functions related to DVD such as burning data disc, burning ISO to DVD, editing videos, making photo slideshow, and more others.
Free download camcorder to DVD burner:
Wondershare DVD Creator
- · Burn camcorder videos in any format directly to DVD/Blu-ray Disc/Data Disc/ISO File/DVD Folder.
- · Built-in editor to personalize camcorder videos by Trim, Crop, Rotate, Add effects, etc.
- · Offer 100+ different style of menu templates including Holiday, Family life, Memory, even No Menu.
- · DVD menu can be customized by changing background music or picture, adding text, creating chapters, and others.
- · Toolbox allows you to burn data disc, convert ISO to DVD, create photo slideshow, edit video easily, copy DVD, convert DVD to video, etc.
- · Burn camcorder video to DVD with super fast burning speed and high-quality output.
- · Supported OS: Mac OS 10.14 (Mojave), 10.13 (High Sierra), 10.12, 10.11, 10.10, 10.9, 10.8, 10.7, 10.6, Windows 10/8/7/XP/Vista.
Watch Video Tutorial to Learn How to Burn Camcorder Videos to DVD on Windows
Note: If you want to create DVD from camcorder videos in Mac running Mac OS X Mojave, High Sierra, Sierra, El Captin, etc., turn to Wondershare DVD Creator for Mac. Below are the steps to burn camcorder video to DVD on PC. The steps to burn camcorder video to DVD for Mac is similar, the only thing different is that you should copy files you want to burn from the camcorder to your Mac in advance.
How to convert camcorder video to DVD step by step on Windows:
Step 1 Launch Wondershare camcorder videos to DVD Burner.
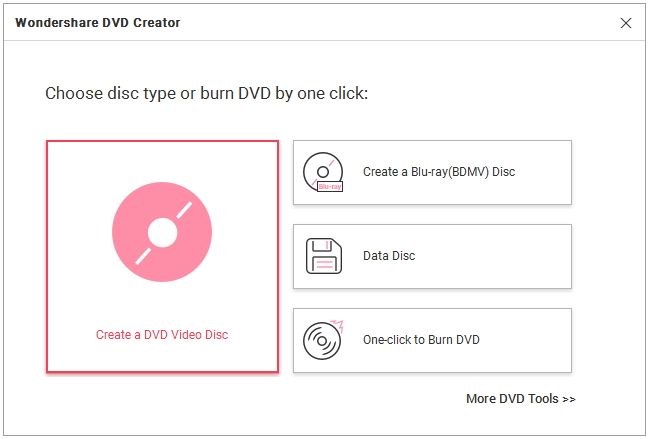
Download, install and launch Wondershare DVD Creator on your PC. Then choose Create a DVD Video Disc option from the interface.
Step 2 Load camcorder videos to DVD directly.
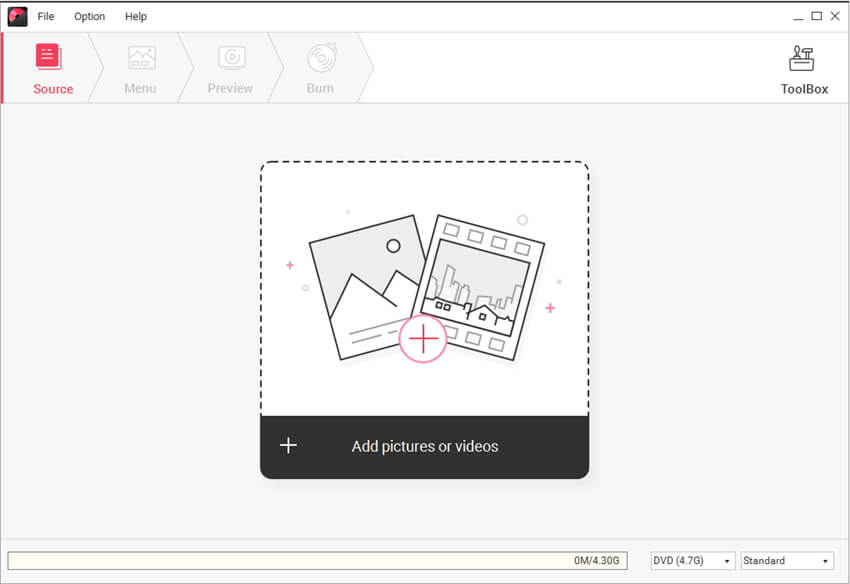
Use the USB/Fireware cable to connect your camcorder to computer. Then click + icon on the interface to open the search window, your camcorder files will be displayed at the removable computer disk. Select and add the camcorder videos you want to burn to DVD. You can also add camcorder files to DVD by simply drag-and-drop.
Step 3 Edit camcorder videos to DVD. (Optional)
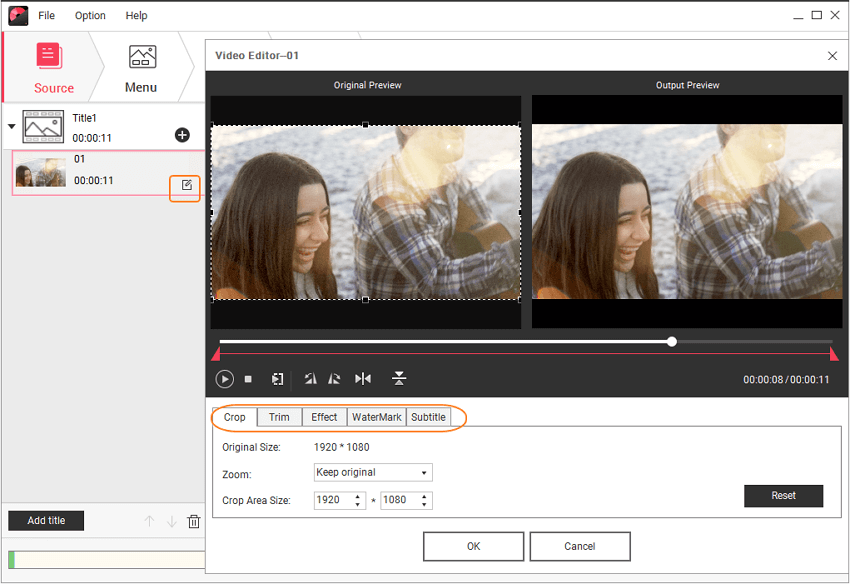
After loading all the files, they will display as thumbnails on the left interface. Wondershare DVD Creator allows you to edit your camcorder videos quickly and easily. Click the pencil-like icon on the thumbnail and a Video Editor window will appear. You can rotate, trim, crop your videos and adding effects, subtitles or watermarks as you like. Just hit the OK button to save your changes.
Step 4 Select and customize DVD menu.
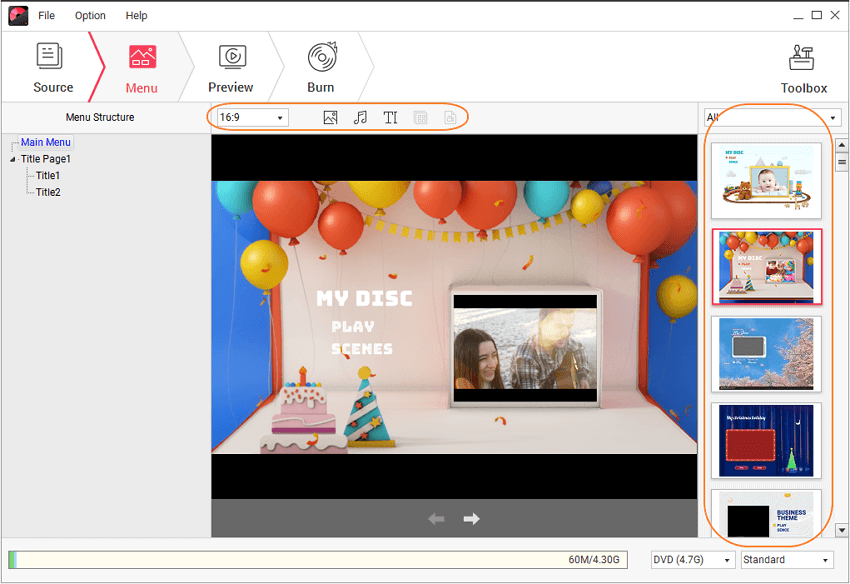
More than 100 built-in free DVD menu templates are provided. Move to Menu tab and double click to apply a template you like for your camcorder video to DVD menu. Click icons at the top of the interface to customize the DVD menu thumbnails, background images, buttons, etc. Use your favorite music and photo as the background music and image of the DVD menu to make it more personalized and meaningful.
Step 5 Preview and burn camcorder videos to DVD.
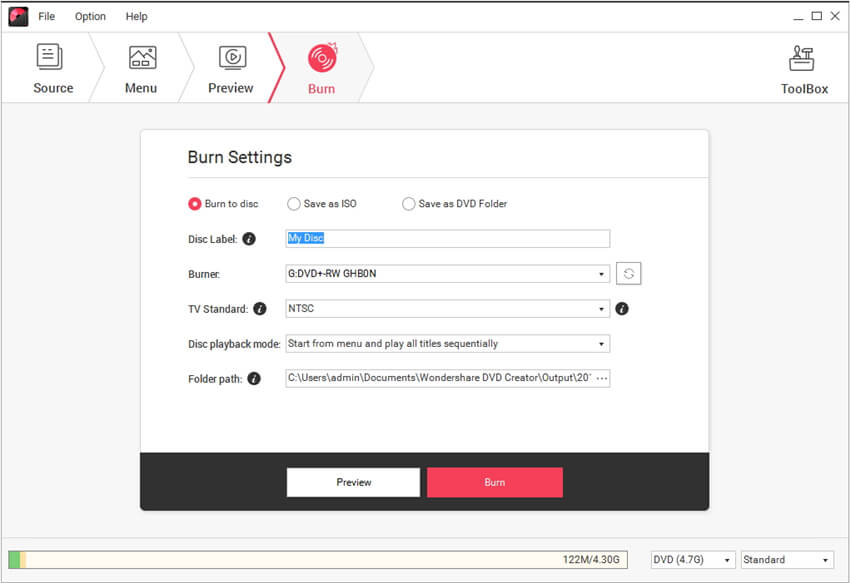
Hit the Preview tab and watch the DVD project to make sure everything goes right. If you want to make changes, back to previous steps to make adjustments. Next, insert a blank disc into your computer and click the Burn tab. Choose Burn to disc option and finish Brun Settings. Finally, click the Burn button to start burning camcorder videos to DVD.
The burning time depends on the size of your videos. After finished, you can put camcorder tapes on DVD player and enjoy your videos on your TV with family and friends.
Part 2. Camcorder to DVD Burning Tips
What you need to burn HD camcorder videos to DVD:
- 1. A powerful PC (or Mac with similar workflow).
- 2. USB, fireware, or card reader to move camcorder video to computer.
- 3. DVD burning software (free and commercial recommended).
- 4. DVD drive and a blank DVD.
Burning camcorder video to DVD tips:
- The left space of the disc is shown on the disc space bar at the bottom. You can choose the size of burning DVD between "DVD(4.7G)" and "DVD DL(8.5G)" and the size of burning Blu-ray DVD among "BD(25g)", "BD DL(50G)" and "BD XL(100G)". Also, the output quality is up to your choice, you may choose any one from the three options: "Fit to Disc", "Standard" or "High Quality".
- If your camcorder is a MP4 camcorder like Sony MHSPM1 Webbie and Sony Bloggie Touch Pocket Camcorder, you may record and store lots of MP4 videos on your computer. If so, you can also go there to learn how to burn MP4 to DVD. However, if your camcorder records AVI videos, such as Canon G9 and Nikon Coolpix cameras, you can also learn how to burn AVI to DVD.
- For converting HD camcorder videos or DVD to desired formats, try Video Converter, all popular formats are supported, such as AVI, WMV, MP4, MOV, etc.


Christine Smith
staff Editor
Comment(s)