

How to Burn WAV to CD with All Helpful Methods
Want to learn how to burn WAV to CD? WAV, after all, is the file extension most favored for audio to be transferred to a CD. It’s uncompressed and is more often used to keep the quality of system and game sounds. In general, it’s a great file to use if you’re looking to create really crisp CD-quality audio. Fortunately, burning WAV to CD is not all that difficult — if you have the right tool for the job. Continue reading down below to learn more about how you can go about burning your own CD filled with WAV audio.
Part 1. Best Way to Burn WAV to CD
The first part of our breakdown of WAV to CD helpful solutions is an introduction to the Wondershare DVD Creator. It is, out of the other programs on this list, the best for the job. Why? Well, with Wondershare, you can burn your WAV audio without needing to convert it. Ensuring that there is no quality loss and further speeding up the process. You’ll get to enjoy a lot of conveniences as well. Conveniences that can only be brought by a program that is made for the job. For example:
Wondershare DVD Creator
- ● One-Click DVD Burn made for ultimate ease-of-use and beginner-friendliness
- ● Built-in Video editor for personal customization of media content
- ● Multi-media processing in the form of audio, video, and images
- ● Smart Slideshow Creator through built-in slideshow maker
- ● An intuitive design perfected and maintained for maximum efficiency
How to Burn WAV to CD with Wondershare DVD Creator
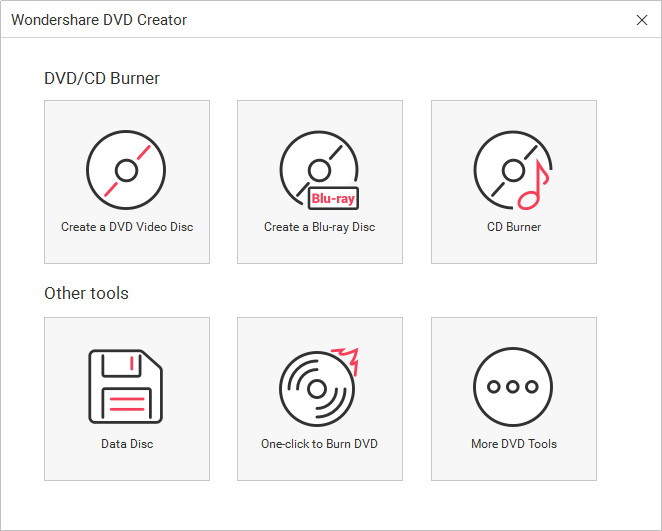
Step One: CD Burner
Once the Wondershare DVD Creator is launched. You will be greeted by the following menu screen. This is where you can decide what project you want to work on. For our purpose — burning WAV to CD, we’ve chosen CD Burner option. Do the same and move forward to the next step.
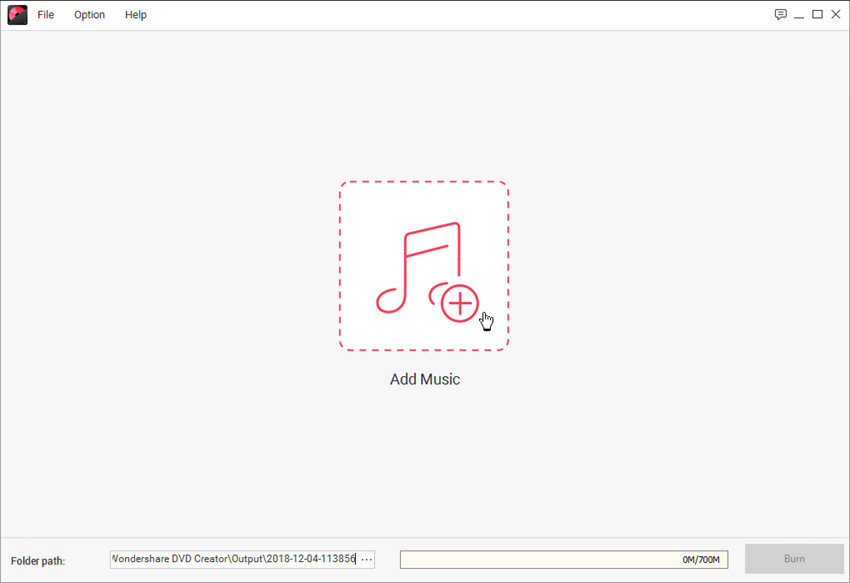
Step Two: Add WAV audio to Burn to CD
Unlike other WAV to CD burners, you won’t have to work on or wait for any fancy conversion with Wondershare. It processes audio file extensions in a variety of different formats — including WAV, so what you upload now is what you will get on your CD.
- ● Add WAV audio by dragging and dropping it onto the screen
- ● OR you can also select the “+” option and manually browse for WAV audio on your computer
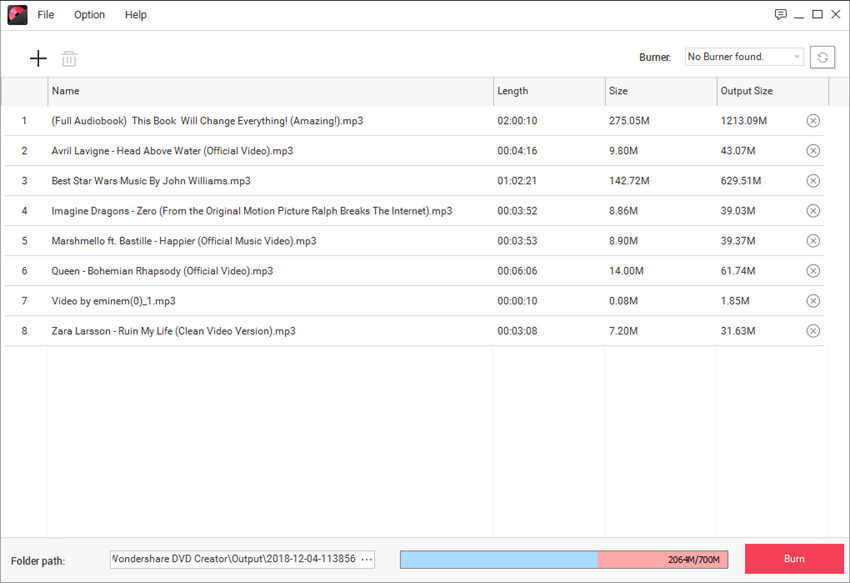
Step Three: Start Burning WAV to CD
If you've added all the music files you want to burn into the program window, you can arrange the order of the program by dragging the files to the place you want. After that, you can click the Burn button at the lower right bottom to start burning WAV files to CD with Wondershare DVD Creator.
Part 2. Helpful Solution to Burn WAV to CD on Mac
This second part of our WAV to CD Helpful solutions is targeted more towards people who prefer to use Mac computers. You don’t need to download or install anything for this, but it would be best if you had some knowledge on how to use Mac computers. The process itself will also be different from the first — less structured and based more on a sequence of actions that can be muddled about as needed — it will still lead to the same end. That is, creating a CD from WAV audio.
How to Burn WAV to CD on Mac
Step One: Creating a New Folder
If you do not already have your WAV audio in a separate folder. Then that is what you will have to do first. You can name this folder whatever you wish — our sample is named ‘Music.’ Create a New Folder on Mac by right-clicking a blank area on the desktop. The following drop-down menu will appear, select the “New Folder” option, give your folder a name, and you are free to move onto the next step.

Step Two: Insert Blank Disc to your DVD/CD Driver
Once you have your folder ready with your WAV audio, it is time to insert a blank disc to a DVD/CD Driver connected to your computer. Doing so will prompt the following menu to appear on your screen (refer to the image below.) You can ignore everything else on this menu, simply click “Ignore” and move onto the next step.

Step Three: Select your WAV Folder
We go back to your pre-made Folder now. All you have to do is select said folder and right-click. That will prompt the following drop-down menu (refer to the image below.) On the drop-down menu, choose the following option: Burn “_(Folder Name)_” to Disc… and move onto the next step.

Step Four: Burn
Another pop-up window should appear on your screen (refer to the image below.)
- ● Disc Name: Appropriately fill in the box to name your disc.
- ● Burn Speed: Choose a speed that suits your needs — knowing that faster speeds could result in a loss of quality.
Click “Burn” when you are ready to permanently copy your WAV audio onto your CD.

Part 3. How to Burn WAV to CD with iTunes
For the last part of this WAV to CD Helpful solutions, we’re going to be teaching you how to Burn WAV to CD with iTunes. iTunes, despite primarily being a media player. Does offer services that will allow you to easily Burn WAV to CD. It is, fortunately, also one of its accepted file extensions. So, you won’t need to convert it into audio format prior to burning it onto a CD.
How to Burn WAV to CD with iTunes
Step One: Create a Playlist
Similar to creating a folder (like what we did in the previous demonstration), we’re going to need to create a playlist before we can burn our audio with iTunes. Drag and Drop WAV audio onto your iTunes library and wait for the program to process the file extension. Next, select the audio, right-click, and click the following options: Add to Playlist > New Playlist.

Step Two: Burn WAV Playlist to Disc
Once you have your WAV playlist all set up — you can rename it if needed and organize the audio as you would prefer them to be read by your CD player, it is time to begin the burning process. To burn WAV to CD with iTunes, select the following options and move onto the next step: File tab > Burn Playlist to Disc.

Step Three: Burn Settings Window
The following window should appear onto your screen — Burn Settings.
- ● Preferred Speed: Choose how fast you want iTunes to copy you WAV files onto your CD — noting that faster speeds could result in a loss of quality.
- ● Disc Format: Select Audio CD to burn WAV to CD.
Once you’re ready to permanently copy your WAV files to a CD, simply click the “Burn” button.

Conclusion:
That concludes our WAV to CD helpful solutions. Hopefully, you were able to find a method that works for you. If you’re still unsure, we recommend checking out the Wondershare DVD Creator first. After all, out of the three that we discussed today, it is arguably the best suited for the job. It is created for this purpose. Try it out for yourself and see just how easy burning WAV to CD can be.
Wondershare DVD Creator
- ● One-Click DVD Burn made for ultimate ease-of-use and beginner-friendliness
- ● Built-in Video editor for personal customization of media content
- ● Multi-media processing in the form of audio, video, and images
- ● Smart Slideshow Creator through built-in slideshow maker
- ● An intuitive design perfected and maintained for maximum efficiency


Christine Smith
staff Editor
Comment(s)