Easily Burn Files to CD in Windows 8 with All Ways
Want to learn how to burn files to a CD on a Windows 8 computer? Down below, we’re going to introduce you to three of the most common methods to do so. Starting out with a DVD Creator, a default CD burner, and a little trick that can be done using the VLC video player! Give it a scroll and see which method will work best for you!
Part 1. Most Helpful Way to Burn Audio Files to CD on Windows 8
As mentioned, we’re going to be starting out with a DVD Creator program that can be used on your Windows 8 computer. The one that we’re going to be using for our demonstration is called the Wondershare DVD Creator. It’s an intuitive DVD creator that you can use to learn how to burn audio to CDs easily. Along with an easy-to-navigate interface, Wondershare also offers the following features:
Wondershare DVD Creator
- · Convert videos to DVD/Blu-ray Disc/ISO File/DVD Folder/Data Disc with fast speed and high-quality output.
- · Edit videos with features of cropping/trimming/rotating videos, add subtitle, apply effects, and others.
- · Select to DVD menu with 100+ template design from Movie, Memory, to Travel theme.
- · Customize DVD menu with parameters such as background image, music, text, and others.
- · Additional functions including ISO to DVD, Data Disc, Video Editor, Slideshow Maker, DVD to Video, DVD to DVD, One-click to Burn DVD, etc.
- · Both DVD5 and DVD9 disc are available.
- · Supported OS: Windows 10/8/7/XP/Vista, Mac OS 10.14 (Mojave), 10.13 (High Sierra), 10.12, 10.11, 10.10, 10.9, 10.8, 10.7, 10.6.
Key features of Wondershare DVD Creator
- ● One-Click burn feature for easy DVD creation
- ● Allows for multi-media processing in various of image, video, and audio formats
- ● Media can be quickly edited and customized using a built-in Video Editor
- ● Smart Slideshow built-in editor
- ● Data Discs Creation is available for storing files without losing quality
How to Burn Audio Files to CD on Windows 8
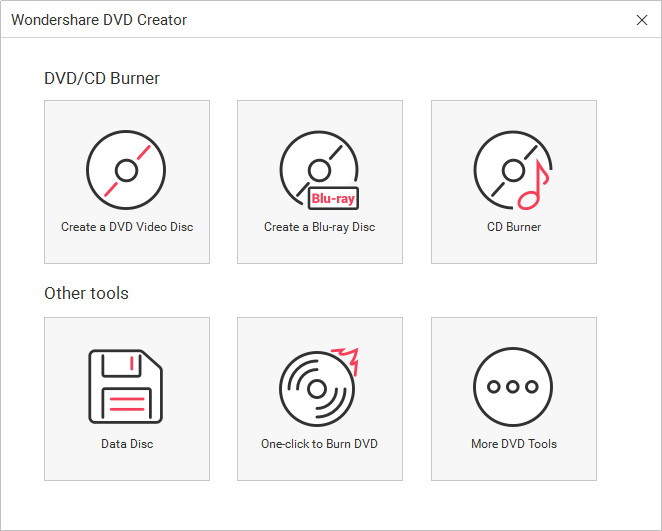
Step One: Select CD Burner
The first step in using the Wondershare DVD Creator to burn files to a CD is to select the CD Burner option on the welcome menu. There are other options available, but the CD Burner option is the one that will allow you to burn audio files into a CD.

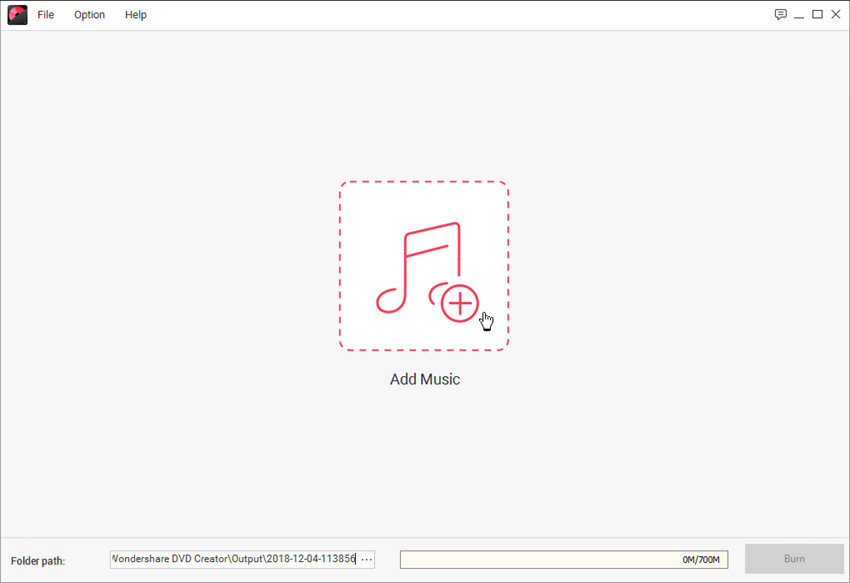
Step Two: Add Files to Burn
Next, you can drag and drop the files you want to burn onto the screen. OR select the “+” / “Add Music” options to manually browse your Windows 8 computer for the files you need.

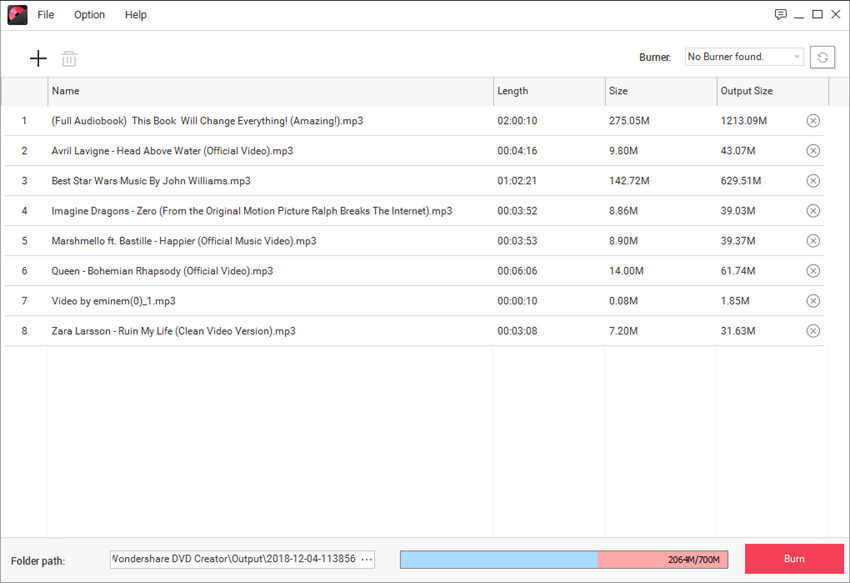
Step Three: Burn
Finally, and this part is fairly simple, you only need to click the Burn button at the lower right bottom of the program window to start burning audio files to CD immediately.

Part 2. How to Burn Audio to CD on Windows 8 with Default Way
On the other hand, if you’re looking to burn audio to a CD using only a Windows 8 PC, then there’s a way of doing that as well! For this, all you’ll really need is an empty disc and a DVD driver that will read, and process said discs for you. Of course, it’s not going to be as clean-cut and easy as using the Wondershare DVD Creator, but it will do in a pinch. Especially if you don’t mind a slightly longer wait time during the burning stage.
How to Burn Audio to CD on Windows 8 with Default Way
Step One: Blank Disc
Insert a blank disc into a DVD driver connected to your computer to start the process! Then, you need to navigate your computer and search for the DVD drive (it should be under This PC.)
- ● Once discovered, double-click on the DVD drive and a pop-up menu will appear (shown in the image below.) There, you’ll be asked to name your disc and choose whether you want a re-writeable data disc or to burn files permanently onto the disc.
For our purposes, we chose the latter — which is the with a CD/DVD Player option.

Step Two: Drag Audio Files
If you clicked next to finalize your choice, you’ll be led to a folder (like the one shown below.) Here, you can drag and drop the audio files that you want to burn into your disc.

Step Three: Manage and Burn
Once you’re done moving the audio files onto the folder, click the Manage tab at the top toolbar. There, you’ll be given the option to “Burn” your files onto the CD. Click the “Burn” option and wait for your CD to finish processing.

Part 3. Burn Audio Files to CD with VLC
As an extra little tip, we’ve also included a third demonstration for how you can use the VLC media player to burn audio files onto a CD. VLC is a popular media player that is FREE and just so happens to be more advanced than other programs that do not offer as many features! This tutorial will be a little different than the rest, but not so much that it will be a hardship for you! Just follow along with the step-by-step down below and make sure that you have a blank disc and a DVD driver handy.
How to Burn Audio Files to CD with VLC
Step One: Make a Playlist
After launching the VLC media player, you will need to create a Playlist for the audio you want to burn. This can be done on the Playlist tab. There, you can simply drag and drop media files onto the screen to create your playlist.

Step Two: Media > Convert/Save
Once you have your media all organized in a playlist, it is time to burn it into the blank CD. To do that, simply click the Media tab and then select the “Convert/Save” option from the drop-down menu.

Step Three: Disc > Convert/Save
An Open Media will pop-up on your screen (as shown below.) Follow the instructions below in order to permanently burn your files onto the CD.
- ● Click the Disc tab, select the “Audio CD” option under Disc Selection, and make sure that you have the blank CD selected under the Disc Device field.
- ● Finish up by clicking “Convert/Save”!

Conclusion:
That does it for our quick tutorials on how to burn files to a CD in Windows 8! As you’ve learned, there are a lot of ways to do it. All of which are surprisingly really easy! Of course, we recommend trying it out yourself, using a trustworthy program like the Wondershare DVD Creator. You’ll find that it really isn’t as hard as it might appear at first!
Wondershare DVD Creator
- · Convert videos to DVD/Blu-ray Disc/ISO File/DVD Folder/Data Disc with fast speed and high-quality output.
- · Edit videos with features of cropping/trimming/rotating videos, add subtitle, apply effects, and others.
- · Select to DVD menu with 100+ template design from Movie, Memory, to Travel theme.
- · Customize DVD menu with parameters such as background image, music, text, and others.
- · Additional functions including ISO to DVD, Data Disc, Video Editor, Slideshow Maker, DVD to Video, DVD to DVD, One-click to Burn DVD, etc.
- · Both DVD5 and DVD9 disc are available.
- · Supported OS: Windows 10/8/7/XP/Vista, Mac OS 10.14 (Mojave), 10.13 (High Sierra), 10.12, 10.11, 10.10, 10.9, 10.8, 10.7, 10.6.


Christine Smith
staff Editor
Comment(s)