All Helpful Methods to Burn FLAC to CD
Looking to learn about how to burn FLAC to CD? FLAC files, unlike the more common MP3 format, are lossless Which basically means, you won’t be hurting the quality of the audio that you’re converting or moving — no matter how many times you do it. The catch here is that the format is not as accepted as the more popular MP3 format. You’ll find, that it might be necessary to convert FLAC audio in order to burn it using certain programs, but we’ll be introducing you to at least one that will help you burn FLAC to CD with no problem at all. Continue reading to learn more.
Part 1. Best Solution to Burn FLAC to CD
The first thing that you really have to worry about is finding a program that will work for you (some CD burning programs refuse to burn audio outside of the more common formats.) Fortunately. There's a helpful program called Wondershare DVD Creator. With Wondershare, you will be able to burn a variety of different files onto your CD. Including the elusive FLAC. It’s a premium DVD/CD Burner, and it definitely offers a lot more than your usual DVD programs. Like, for example:
Wondershare DVD Creator
- ● CD Conversion of audio files — from MP3, FLAC, AIFF, APE, WMA, and so much more
- ● Media in the form of videos, images, and audio can be processed easily
- ● One-Click DVD Burn for converting FLAC files to CD in an instant
- ● Intuitive programming — to be used by beginners and professionals alike
- ● Built-in Video Editor for media processing and Smart Slideshow Creation available
How to Burn FLAC to CD
Step One: CD Burner
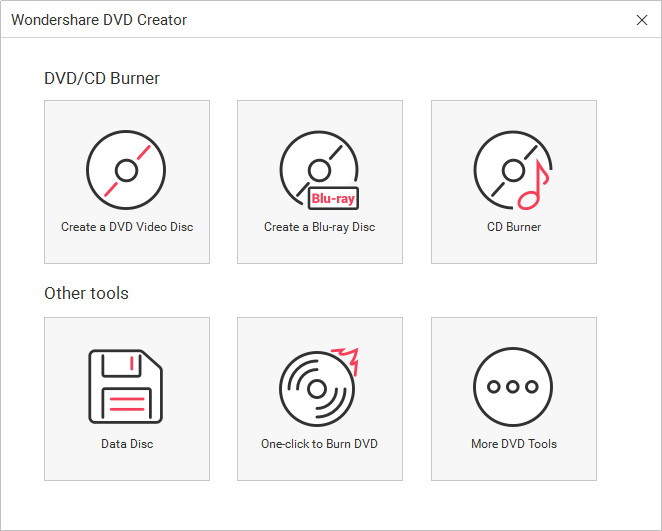
Firstly, start Wondershare DVD Creator after the installation, and you'll see a menu. Select CD Burner option as we're going to burn audion files to CD.

Step Two: Add FLAC Files to Burn
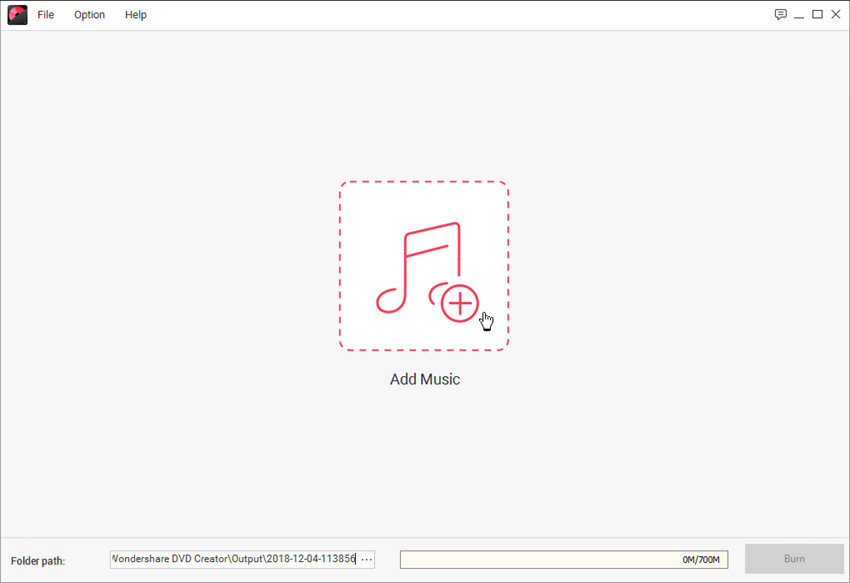
Next, we’re going to be uploading the FLAC files onto the program. For this, you can either:
- ● Drag and Drop FLAC files onto the screen
- ● or select the “+” options to manually browse your computer for FLAC files to upload

Step Three: Start Burning
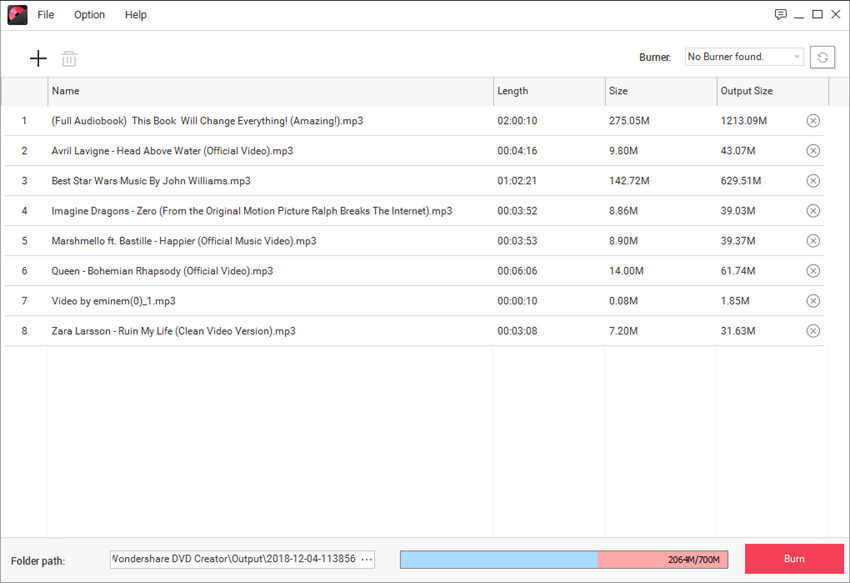
Once you have your FLAC files uploaded, you can arrange the order of the audio files. When the settings are done, you can click the Burn button at the lower right bottom to start burning FLAC files to CD.

Part 2. How to Burn FLAC to CD on Mac
Another way of burning FLAC to CD is to use a Mac computer. The base Mac OS comes with a DVD program. Of course, it’s nothing as fancy as the Wondershare DVD Creator. But it should be able to get the job done in a pinch. We’ve included a tutorial on how to burn FLAC to CD on Mac as well. So, keep reading if that’s something you’re interested in.
How to Burn FLAC to CD on Mac
Step One: New Folder
The first thing that you’re going to have to do, is to create a “New Folder” for your FLAC audio. Right-Click on the desktop screen, select “New Folder”, and then name your FLAC folder accordingly (for our sample, we’ve named ours ‘Music.’)

Step Two: Insert Disc
Next, you’re going to have to make sure that you have a blank CD inserted to a DVD/CD driver connected to your computer. If yes, then this pop-up should appear (refer to the image below.) Don’t worry too much about the options here, simply click “Ignore” to continue.

Step Three: Select your “New Folder”
Getting back to our “New Folder” with the FLAC files. Right-Click the folder you’ve created and then select the “Burn (Folder Name) to Disc…” option.

Step Four: Burn
This pop-up should now appear onto your screen. Make sure to name your disc appropriately. As for Burn Speed, choose one that will suit your needs (lower speed equals better quality and higher speed means a possible risk of quality loss.) Once done, select the “Burn” button to start processing your video.

Part 3. How to Burn FLAC to CD with iTunes
For our third demonstration, we’re going to be breaking down how you might go about burning FLAC files with iTunes. This one is a bit more specialized than the two previous tutorials. For one, iTunes does not accept FLAC files. So, if you want to be able to burn FLAC to CD using iTunes. You’re going to have to convert the FLAC audio to something that iTunes will accept. For this, the most recommended option is iTunes own ALAC (lossless audio.)
How to Burn FLAC to CD with iTunes
Step One: Creating a Playlist
Once you’ve converted your FLAC files to ALAC (there are third-party converters that will allow you to do this), drag and drop those converted files onto your iTunes library. Once the converted FLAC music is in the library, you will need to create a playlist to proceed. Create a new playlist by selecting uploaded audio, right-clicking, and then choosing the following options: Add to Playlist > “New Playlist.”

Step Two: Burn your Playlist
Once your playlist is created, you’ll be able to adjust and organize it as need (add more or delete unwanted audio.) If you’re happy with how it looks, then select the following options: File tab > Burn Playlist to Disc.

Step Three: Burn Settings
The Burn Settings window will pop into view. There are several choices to be made here. For us, we choose the following:
- ● Preferred Speed: Maximum Possible
- ● Disc Format: Audio CD

Part 4. Burn FLAC to CD with Windows Media Player
Similar to our third example, we’re going to be demonstrating how you can burn FLAC to CD with Windows Media Player. Again, this is incredibly similar to the iTunes breakdown. Even down to the fact that you will not be able to use it to directly burn FLAC audio. To burn FLAC to CD with Windows Media Player, you’re going to have to install the FLAC codex first. Which is a very complicated process. Instead, we’d recommend converting your FLAC audio to WMA files (Windows Media Player’s lossless file format — similar to iTunes’ ALAC.)
How to Burn FLAC to CD with Windows Media Player
Step One: Burn
Once you have your FLAC files converted to WMA, you can then drag and drop those converted audio files onto the Windows Media Library. When you’re all set up, click the Burn button on the upper-right-hand corner of the screen to begin.

Step Two: Creating a Burn Playlist
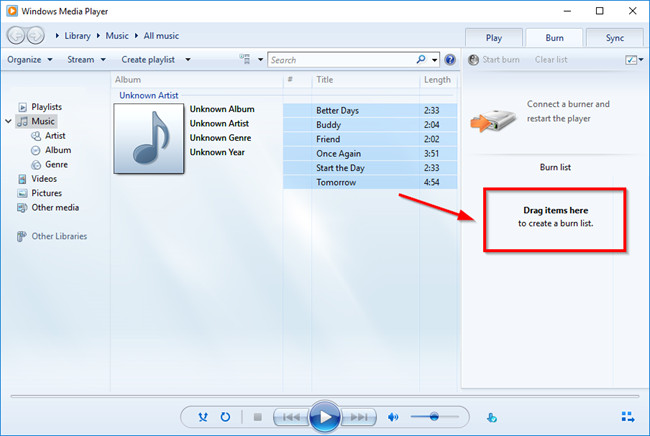
Clicking the Burn button will open up a side-tool bar (as shown in the image below.) There, you can drag and drop media to create a Burn List. Do so, and then move onto the next step.

Step Three: Start Burn
Make sure that you have a blank CD inserted into a DVD/CD driver connected to your computer. That way, you can select “Start Burn” and permanently burn your converted FLAC files to CD

Conclusion:
FLAC files are great for making sure that your audio stays perfectly crisp. However, they’re not very convenient. Many programs refuse to accept FLAC files for viewing — never mind actually burning said files onto a disc. That’s why we have popular programs like iTunes and Windows Media Player ending up so ineffective, requiring you to convert the FLAC first before you can burn it. If you want to skip all that, then we recommend that you check out the Wondershare DVD Creator. Unlike the other programs that we introduced today, it will actually read your FLAC audio and burn it without any need for conversion. Making it, without a doubt, the most helpful method of them all.
Wondershare DVD Creator
- ● CD Conversion of audio files — from MP3, FLAC, AIFF, APE, WMA, and so much more
- ● Media in the form of videos, images, and audio can be processed easily
- ● One-Click DVD Burn for converting FLAC files to CD in an instant
- ● Intuitive programming — to be used by beginners and professionals alike
- ● Built-in Video Editor for media processing and Smart Slideshow Creation available


Christine Smith
staff Editor
Comment(s)