How to Download Music to CD with All Methods
Do you want to learn how to download music to burn to a CD? Well, then you’re in the right place! Down below, we’ve broken up our article into several parts. Starting off with a music downloader that you can use to download music from certain music sites to your computer and then continuing on with a couple of different methods that you can use to burn that downloaded music onto a CD for your own personal use! Give it a scroll and see if our methods will work for you.
Part 1. How to Download Music from Music Sites to Computer
First, as promised, we’re going to be teaching you how you might go about downloading music from certain music websites (and then some.) For this, we recommend downloading and installing a program called Wondershare iTube. It’s very intuitive and very flexible — so you can really use it to suit whatever needs you might have. You’ll see what we mean by that as we break the program down in our step-by-step guide on how to use iTube to download music for your PC!
How to Download Music from Music Sites to Computer
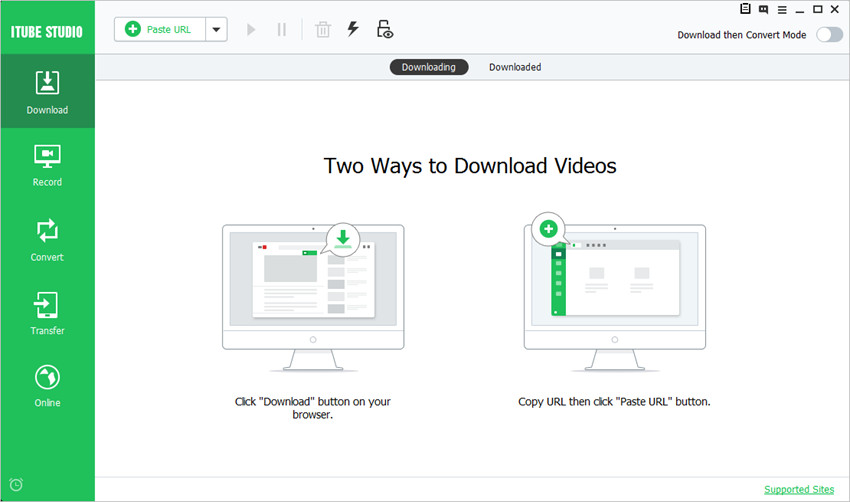
Step One: Launch iTube
Upon launching iTube for the first time, you’ll be met with the option of installing a “Download Button” for your Chrome browser. This is optional, but it goes to show just how flexible this program is. If you want this option, then you need only click “Install” and approve of the new plug-in when Chrome prompts you to. On the other hand, if you want to download your music directly from iTube, you can continue to the next step.
Step Two: Online
On the left-hand sidebar, you’ll find that there are a couple of different options available to you. For now, we’re going to be focusing on the “Online” option in the very bottom. Selecting the “Online” tab will change the activity screen to what is shown in the image below. From here, you can select from a variety of websites to choose where you want to download your music from.

Step Three: Download from Site
iTube will acts as a browser in this case, wherein you can search the web for audio of your choosing. As an example, you can browse YouTube for royalty-free audio. Let the video play for a second and a blue “Download” button will appear on your screen. Click that blue “Download” button and you’re good to go!

Part 2. How to Download Music to CD with Wondershare DVD Creator
Now, let’s go over how you can burn the music you downloaded with iTube onto a disc! For our first method, we’re going to be using a program called the Wondershare DVD Creator. It shares a couple of characteristics with the iTube. Not that it downloads music, but the fact that it is incredibly easy to use and works intuitively with beginners and professionals alike! It offers premium features as well — all of which are designed to give you the best experiences and the most flexibility when it comes to burning CDs and DVDs! A couple of which include:
Wondershare DVD Creator
- ● One-Click Burn Feature — for creating quick and easy DVDs
- ● Processes all types of media and in a variety of file extensions (even the more uncommon ones: MP3, WAV, FLAC, APE, ALAC, etc. to name a few.)
- ● Media can be edited in-application through built-in video editor and slideshow creator
- ● Creates High-Quality CDs, DVDs, and Blu-Ray DVDs
- ● Easy-to-Navigate Design for stress-free Music to CD conversion
How to Download Music to CD with Wondershare DVD Creator
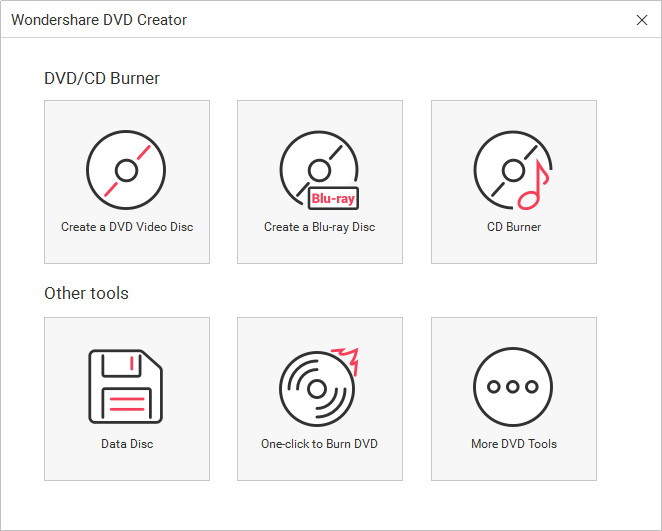
Step One: Choose CD Burner Option
First, you need to launch the Wondershare DVD Creator. Upon doing so, you will be greeted by the welcome menu shown in the image below. This menu will prompt you to choose a type of disc to store your files on. For creating a music disc, you should choose the CD Burner option.
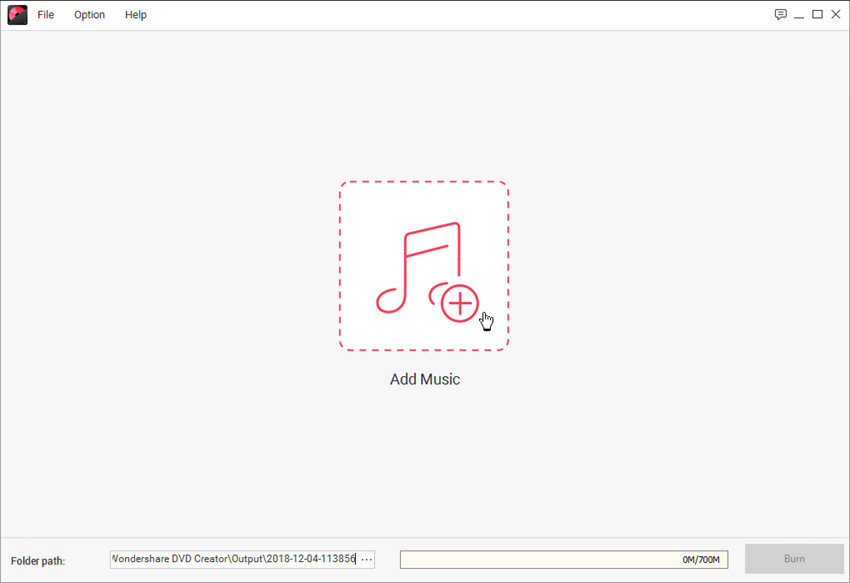
Step Two: Add Downloaded Music to Burn to CD
This is when the music you downloaded with iTube will come into play. You can either click the “+” icon (in which case you’ll be prompted to browse your computer for your downloaded music) OR you can simply use the drag and drop method.
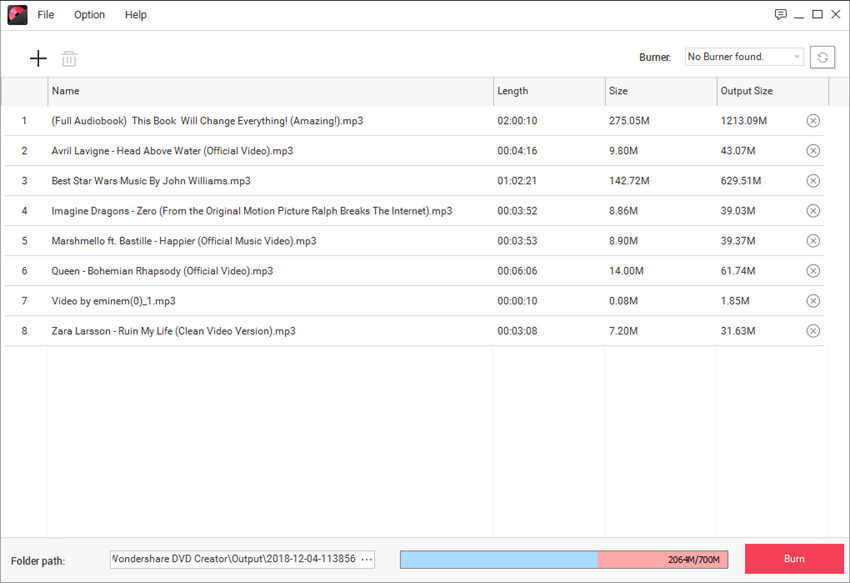
Step Three: Organize Music and Start Burning
After ading the music files to Wondershare DVD Creator, you're allowed to organize the music files by dragging them to the place you want. After that, you can click the Burn button at the lower right bottom to start burning music to CD.
Part 3. How to Download Music to CD with iTunes
For the third part of this how to download music to CD methodology, we’re going to be teaching you how to use iTunes to burn the music you downloaded using iTube. This is not that difficult to do, but it requires a bit of messing about — it’s not as clear-cut or straightforward as the Wondershare DVD Creator method. Nevertheless, we’ve outlined it step-by-step in the breakdown below.
How to Download Music to CD with iTunes
Step One: Create a Playlist for your Downloaded Music
What you need to do, is create a playlist for the music you downloaded! Note, the music you want to burn has to be in its own separate playlist. So, try to be careful of what you put in the playlist. Create a New Playlist with Downloaded Music by importing audio (you can drag and drop audio into the library), selecting said audio, right-clicking, and then locating the “New Playlist” option under Add to Playlist.

Step Two: File Tab
Once you have your playlist ready, you need to locate the Burn Playlist to Disc option in the File tab menu. (As is shown in the image below.) That will prompt the menu shown in the next step.

Step Three: Burn Settings Menu
On the Burn Settings menu, you will be asked to make a couple of choices:
- ● Preferred Speed: How fast do you want your CD to finish burning? When making your decision, keep in mind that slower speeds result in better quality audio.
- ● Disc Format: Choose the Audio CD format if you want hi-fi music (uncompressed — less storage space) OR choose MP3 CD if you want lower-quality music (compressed — more storage space).
Once you’re satisfied with your choices, you can begin the music-to-CD burn by clicking the “Burn” button.

Part 4. How to Download Music to CD with Windows Media Player
As the final portion of this music to CD breakdown, we’re going to be teaching you how to burn downloaded music with the Windows Media Player! This method is actually very similar to the iTunes method. There are only very small differences between the two, but the important part is that it will work for someone who would prefer to use a built-in program (in Windows Computers at least.)
How to Download Music to CD with Windows Media Player
Step One: Import Music to Windows Media Player
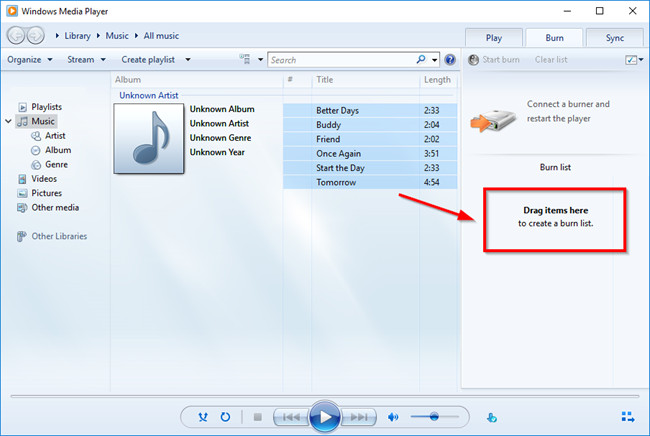
In order to use the music, you downloaded with iTube, you’re going to have to upload it into the Windows Media Player library (which you can do simply by dragging and dropping the files onto the screen.) Once your audio has been imported, click the “Burn” tab, and move onto the next step.

Step Two: Create a Burn List out of your Downloaded Music
Next, drag the downloaded music from the library and drop them onto the Burn List area (highlighted in the image below.) Make sure that you move only the music that you want to burn.
Step Three: Burn Downloaded Music to CD with Windows Media Player
Once you have your Burn List ready, click the “Start Burn” button. That will begin the music-to-CD conversion process!

Conclusion:
That’s really all there is to learn how to download music to CD. We’ve offered quite a few methods of doing so — starting out with the one that we’d most recommend. Which we still insist on now. If you want to ensure that the CDs you create are hi-fi and will work for you for a long time, then you should definitely stick to the Wondershare DVD Creator. It’s definitely, out of the three music-to-CD burning programs we mentioned, the most helpful method of them all.
Wondershare DVD Creator
- ● One-Click Burn Feature — for creating quick and easy DVDs
- ● Processes all types of media and in a variety of file extensions (even the more uncommon ones: MP3, WAV, FLAC, APE, ALAC, etc. to name a few.)
- ● Media can be edited in-application through built-in video editor and slideshow creator
- ● Creates High-Quality CDs, DVDs, and Blu-Ray DVDs
- ● Easy-to-Navigate Design for stress-free Music to CD conversion


Christine Smith
staff Editor
Comment(s)