How to Burn WMA to CD with All Helpful Solutions
Want to learn how to burn WMA to CD? It’s actually not as difficult as you might think. WMA, if you weren’t already aware is an audio format that comes as an extension of and is meant to be used with Windows Media Player. It’s not as accepted as the more common audio formats (MP3 for example), but you will find that there are programs out there that will not only read this type of file extension but will allow you to burn it onto a CD. Continue reading to be introduced to one of those programs, as well as a handful of others that might serve as a possible alternative — depending on your circumstances.
Part 1. Best Way to Burn WMA to CD
The first program on our list is Wondershare DVD Creator. Unlike other DVD/CD Creators, which only process the more common audio formats (MP3 and the like), the Wondershare DVD Creator accepts the processing of WMA audio. You won’t need to go through the trouble of converting it to something more manageable — which is definitely more convenient and time-saving. Of course, that’s not the only thing special about the Wondershare DVD Creator. A couple of its other features include:
Wondershare DVD Creator
- ● Accepts numerous file extensions, including but not limited to MP3, WMA, FLAC, AIFF, APE, and so much more
- ● Multi-media processing in the form of images, videos, and audio
- ● Built-in media editor and built-in Smart Slideshow Creator available for FREE
- ● Intuitive interface for easy navigation, as well as a One-Click DVD Burn Feature to maximize ease of use and beginner-friendliness
- ● Burns CDs, DVDs, Blu-Ray DVDs, and creates Data Discs without any loss of quality
How to Burn WMA to CD with Wondershare DVD Creator
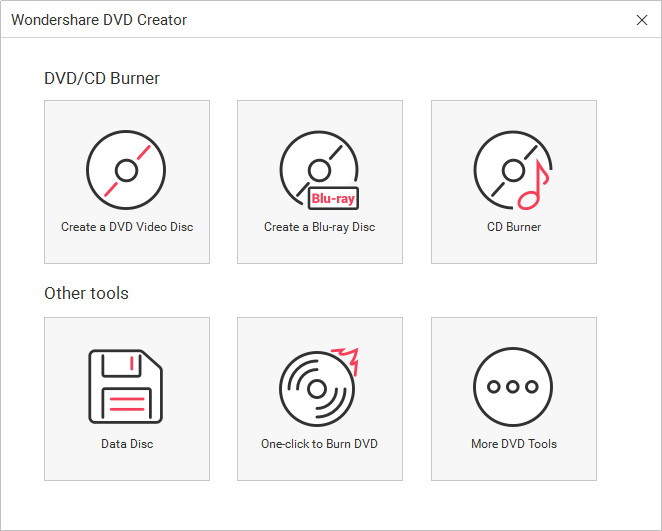
Step One: Select CD Burner
Download and install Wondershare DVD Creator on your computer, then start it. You'll see the welcome menu of the program, and now you should choose the CD Burner option.

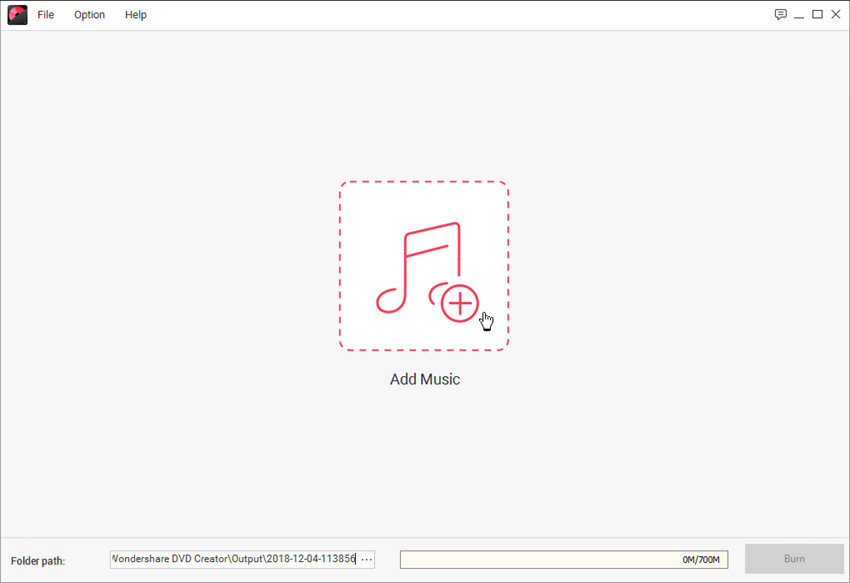
Step Two: Add WMA Audio to Burn
Next, it’s time to add the WMA audio that you want to burn to your CD. As mentioned, you won’t have to convert your files in order to burn it.
- ● Simply drag and drop the WMA files onto the screen
- ● or you can also select the “+” icon and manually browse your computer for the WMA audio that you want to burn

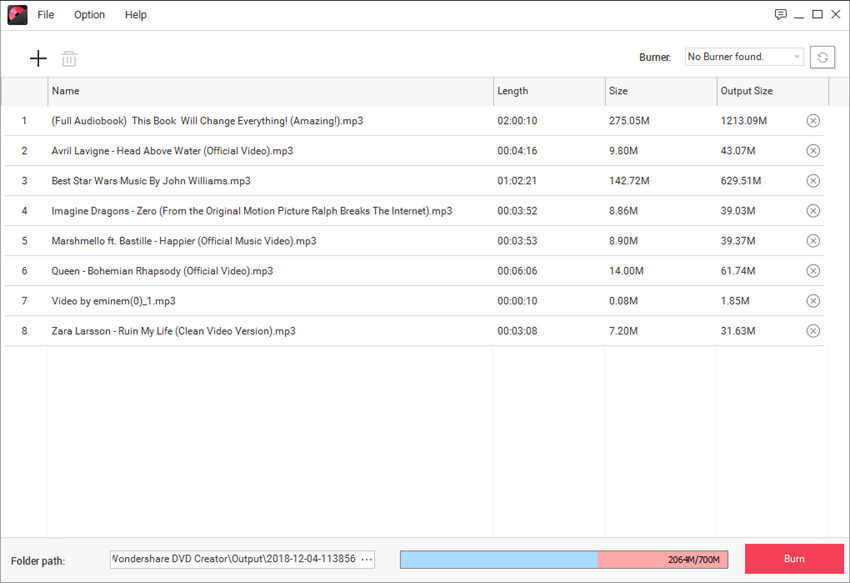
Step Three: Start Burning WMA to CD
After adding the WMA files into the program, you can organize them by dragging them to the place you want. Then you can click the Burn button at the lower right bottom to start burning WMA to CD.

Part 2. How to Burn WMA to CD with Windows Media Player
Of course, we wouldn’t finish off this WMA tutorial without touching up on how you can burn WMA audio using the Windows Media Player. It’s made for the Windows Media Player after all and is — not surprisingly — fully compatible. Continue reading down below to make the best of the situation. Of course, Windows Media Player is a strict Windows OS program. Skip down below if you are more of a Mac user.
How to Burn WMA to CD with Windows Media Player
Step One: Burn
The first step will require that you have audio already uploaded onto your Windows Media Player library. If not, simply drag and drop your WMA audio onto the screen. Once your WMA files are uploaded, click the “Burn” button, and move onto the next step.

Step Two: Creating a Burn List
This part is fairly intuitive. Clicking the “Burn” button should have opened up a side-toolbar. Where, as instructed, you should drag and drop the WMA audio to create a Burn List.

Step Three: Start Burn
Once you have a Burn List filled with your WMA Audio and are happy with how the music has been organized, simply click the “Start Burn” button.

Part 3. How to Burn WMA to CD with iTunes
As promised, this last demonstration is better suited for people who prefer to use Apple products. For this, we’re going to be teaching you how to use iTunes to Burn WMA to CD. A note, the Windows version of iTunes (which is what we’re using for the demonstration) is able to easily process WMA files. However, if you’re on a Mac computer, you might find it necessary to convert your WMA audio to the more iTunes-compatible ALAC file extension.
How to Burn WMA to CD with iTunes
Step One: Create a Playlist
If you are using the Windows version of iTunes, then all you have to do is drag and drop your WMA files onto the iTunes Music Library. If not, then you’ll have to convert it either to MP3 or ALAC before dragging and dropping. What’s most important for this step, is to create a playlist. You can do this by selecting uploaded audio, right-clicking, and then choosing the following options: Add to Playlist > New Playlist.

Step Two: Burn WMA Playlist
You have the opportunity to play around with your playlist here — shuffle it until you’re happy with the order of the audio or name it appropriately. Either way, once you’re satisfied with the way your Playlist looks, click the following options: File tab > Burn Playlist to Disc.

Step Three: Burn Settings > Burn
Finally, the Burn Settings window should appear to you. This is where a lot of the actual burning process occurs. It’s fairly simple, choose the following options to be able to burn WMA to CD:
- ● Preferred Speed: Maximum Speed
- ● Disc Format: Audio CD

Conclusion:
That concludes our breakdown on how to burn WMA to CD. It’s a pretty special file extension. One common enough for regular Windows OS users, but still not as common as its larger competitors (including the MP3 file extension.) Because of that, it makes it difficult to find programs out there that will be able to read it appropriately without risking a loss of quality from conversion. If you really want to burn your WMA audio to CD. Then we recommend checking out the Wondershare DVD Creator. It accepts WMA easily and without needing to convert it.
Wondershare DVD Creator
- ● Accepts numerous file extensions, including but not limited to MP3, WMA, FLAC, AIFF, APE, and so much more
- ● Multi-media processing in the form of images, videos, and audio
- ● Built-in media editor and built-in Smart Slideshow Creator available for FREE
- ● Intuitive interface for easy navigation, as well as a One-Click DVD Burn Feature to maximize ease of use and beginner-friendliness
- ● Burns CDs, DVDs, Blu-Ray DVDs, and creates Data Discs without any loss of quality


Christine Smith
staff Editor
Comment(s)