What's an MP3 CD and How to Burn MP3 to CD?
Want to know what an MP3 CD is and how you can go about making one for yourself? Keep reading and you’ll know everything there is that you should know about MP3 CDs. Including a couple of tips and tricks to get you started and a full-blown tutorial on how you can go about getting one for yourself. So, make sure to keep reading till the end!
Part 1. What's an MP3 CD?
What is an MP3 CD? Well, for one thing, it’s something that you can store your MP3 audio in. That part is fairly straightforward, as you can imagine. Believe it or not though, even if the CD type is called ‘MP3’ doesn’t mean that it’s made up of only that type of music. You can also use it to store a variety of other types of audio.
Tip #1 Storage Space
With normal CDs, the audio isn’t compressed. That means, they tend to take up more space. With those types of CDs, you can get around 80 minutes of playing time. BUT and this is one of the advantages of creating an MP3 CD over an Audio CD, with the MP3 CD you can burn compressed files. That means you can store more files — with an average of around 150 songs.
Tip #2 File Extension
As mentioned, just because the disc type is called MP3 CD doesn’t mean that you can only put MP3 audio inside of it. No, MP3 CDs can take the form of a number of compressed file extensions — the most common of which are WAV and AAC file extensions. The only issue is, you might find that choosing a different format might prohibit certain DVD/CD players from reading your files correctly.
Tip #3 Sound Quality
As much as there are advantages to creating an MP3 CD, there are also disadvantages. The biggest of which is the quality of the audio that you put into it. You might find that by compressing so much audio into one disc that your audio suffers from it. In which case, you might prefer to burn your audio more dispersedly in another disc type.
Tip #4 How to Burn MP3 to CD?
If you want to learn how to burn MP3 to CD, then you can learn more by reading through what we’ve written down below. It’s actually not that difficult to do, there are programs that will allow you to quickly burn your MP3 files onto a disc — a number of which we’re going to be introducing you to as we go along.
Part 2. How to Burn an MP3 CD
The first method of burning MP3 to CD that we’re going to be introducing you to is through a program called the Wondershare DVD Creator. It is, as you can guess from the name, a program created for the purpose of burning DVDs and Discs (unlike the rest of the programs on this list.) With it, you can be certain that your MP3 files are burned in a manner that will preserve quality and ensure maximum efficiency.
Wondershare DVD Creator
- · Convert videos to DVD/Blu-ray Disc/ISO File/DVD Folder/Data Disc with fast speed and high-quality output.
- · Edit videos with features of cropping/trimming/rotating videos, add subtitle, apply effects, and others.
- · Select to DVD menu with 100+ template design from Movie, Memory, to Travel theme.
- · Customize DVD menu with parameters such as background image, music, text, and others.
- · Additional functions including ISO to DVD, Data Disc, Video Editor, Slideshow Maker, DVD to Video, DVD to DVD, One-click to Burn DVD, etc.
- · Both DVD5 and DVD9 disc are available.
- · Supported OS: Windows 10/8/7/XP/Vista, Mac OS 10.14 (Mojave), 10.13 (High Sierra), 10.12, 10.11, 10.10, 10.9, 10.8, 10.7, 10.6.
- ● Quickly burn DVDs with a single click using the One-Click DVD feature
- ● Process all sorts of data — and audio in a variety of forms
- ● Edit media through the built-in editor
- ● Intuitive design created for maximum efficiency
- ● Doubles as DVD and Blu-ray DVD burner
How to Burn an MP3 CD with Wondershare DVD Creator
Step One: Select CD Burner type to burn MP3 to CD
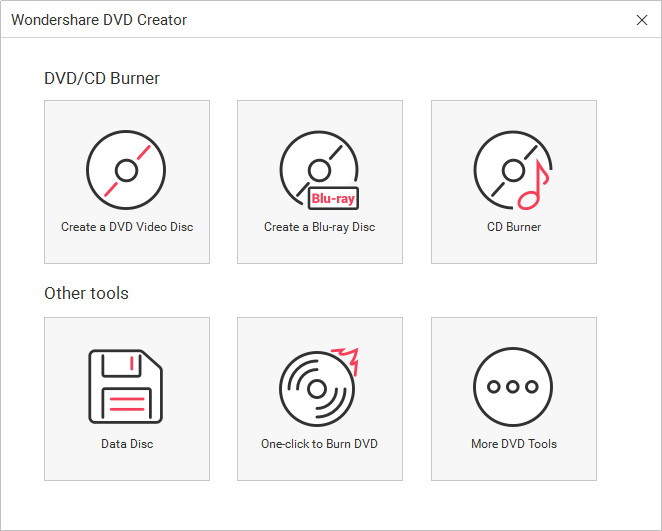
First, launch the Wondershare DVD Creator and select the CD Burner. Doing so will allow you to burn MP3 to CD.

Step Two: Add MP3 Files to Burn
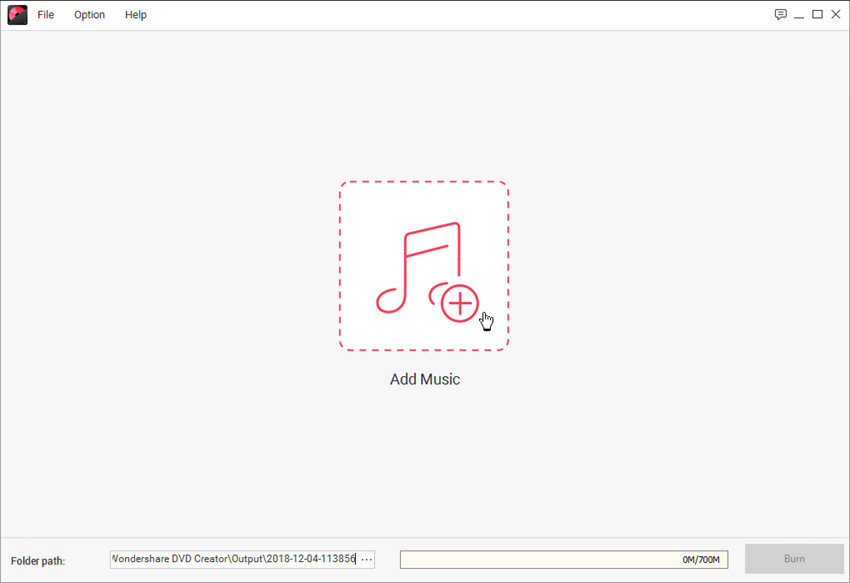
Next up, it’s as simple as dragging and dropping the files onto the screen. Of course, you can also choose the manual route by clicking the "+" icon and uploading your MP3 files from your PC.

Step Three: Burn MP3 to CD
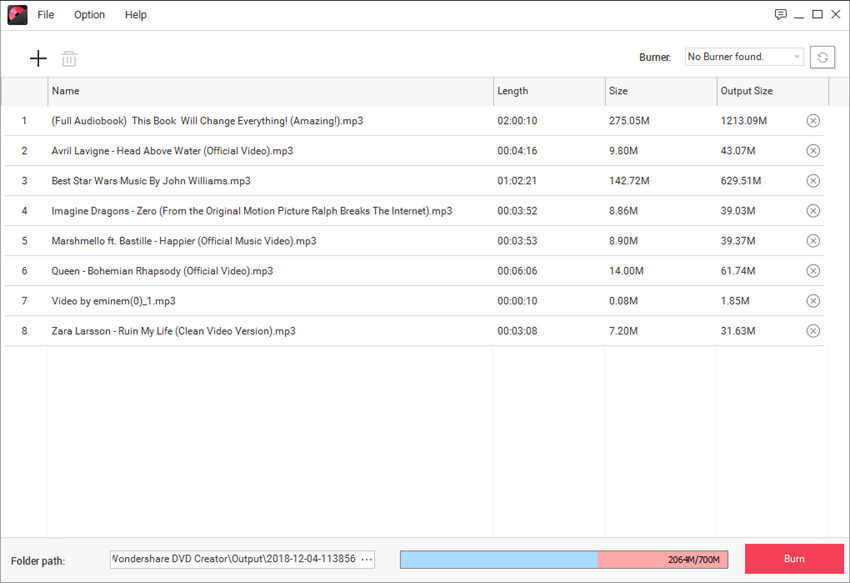
After making up all the settings, you can click the Burn button at the lower right bottom to start burning MP3 to CD.

Part 3. How to Burn MP3 to CD with Other MP3 CD Burners
As a secondary and tertiary option, you can also use the built-in burn features available in media players to burn your MP3 to CD. For our demonstration, we’re going to be demonstrating this fact with iTunes and the base Mac OS program. These are pretty similar in their own right, but there are enough differences that we’ve split them into two different methods — which you can read more about below:
Method 1. How to Burn MP3 to CD with iTunes
Step One: Burn MP3 to CD with iTunes
iTunes is a bit tricky. In that, it only accepts certain file extensions, but if what you’re looking for is to create a CD out of MP3 files, then you should be good to go. To start, you have to create a separate playlist for your chosen MP3 audio. Which you can do by selecting audio, right-clicking, and then selecting the Add to Playlist > "New Playlist" option.

Step Two: File tab
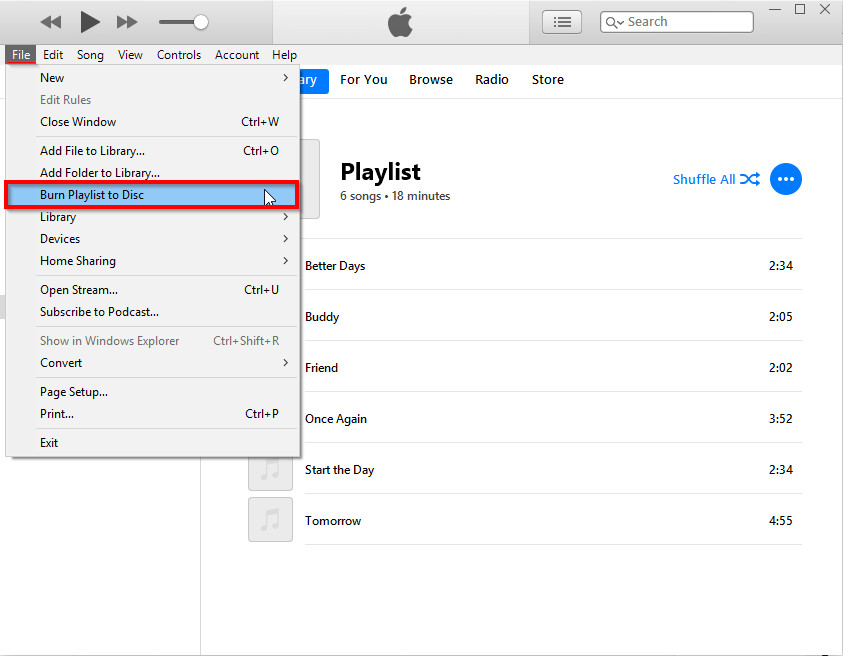
Once you have the playlist prepared, all you have to do next is find the "Burn Playlist to Disc" option under the File tab. Doing this will allow you to move onto the next step.

Step Three: Create Audio or MP3 CD
With this last step, you have some leeway on how you want to burn your MP3 files.
- ● Preferred Speed: You can choose between a number of burn speeds — keeping in mind that faster speeds might result in a loss of quality.
- ● Disc Format: Again, you can choose based on your needs (Audio CD or MP3 CD.) Just remember that MP3 CDs tend to offer more space, but it does skimp a bit in quality.
Once you’ve made your choices, you can finish up by clicking the "Burn" button.

Method 2. How to Burn MP3 to CD with Mac
Step One: Create a New Folder
Much like with iTunes, you have to find a way of separating the audio you want to burn from the rest. The only difference is, rather than creating a playlist you will need to create a New Folder. Do this by right-clicking and choosing the "New Folder" option.

Step Two: Insert Disc
If you want to go further, insert your disc now. A pop-up (like the one in the image below) should appear on your screen. This can be ignored, for the most part, just click "Ignore" and move forward.

Step Three: Select Folder
For step three, we go back to the folder we create in step number one. Make sure you have that folder selected before right-clicking it and choosing the Burn "_(Folder Name)_" to Disc… option.

Step Four: Burn!
You won’t get a choice between what type of CD to burn, but you can choose a name for your disc and select a burn speed (again faster speeds might result in lesser quality sounds.) When you’re ready, you can click the "Burn" button to finish up.

Conclusion:
That’s all there is to know about MP3 CDs and how you can go about making one for yourself. Hopefully, we were able to provide you with some tips as to how you can ensure the best possible experience in creating a CD for your precious audio! Of course, if you want to take away the pressure of finding a program that will work to suit your needs, we advise going with the Wondershare DVD Creator. It’s the most helpful of the three that we introduced and will help you create high-quality disks without any issues.
Wondershare DVD Creator
- · Convert videos to DVD/Blu-ray Disc/ISO File/DVD Folder/Data Disc with fast speed and high-quality output.
- · Edit videos with features of cropping/trimming/rotating videos, add subtitle, apply effects, and others.
- · Select to DVD menu with 100+ template design from Movie, Memory, to Travel theme.
- · Customize DVD menu with parameters such as background image, music, text, and others.
- · Additional functions including ISO to DVD, Data Disc, Video Editor, Slideshow Maker, DVD to Video, DVD to DVD, One-click to Burn DVD, etc.
- · Both DVD5 and DVD9 disc are available.
- · Supported OS: Windows 10/8/7/XP/Vista, Mac OS 10.14 (Mojave), 10.13 (High Sierra), 10.12, 10.11, 10.10, 10.9, 10.8, 10.7, 10.6.


Christine Smith
staff Editor
Comment(s)