How to Burn a CD on Windows Computer with All Ways
Windows OS users don’t miss a lot when it comes to useful programs. That includes there being a multitude of different ways that one can burn a CD! We’ve compiled some of those methods down below. So, if you want to learn how to burn a CD on Windows Computers, continue reading till the very end.
Part 1. Best Way to Burn a CD on Windows Computer
For our fist step-by-step tutorial on how to burn a CD on Windows, we’re going to be using the Wondershare DVD Creator. Which, in reality, is actually a Windows and Mac program all at once. Of course, we’re going to be showing you the Windows method today. You won’t need much to burn files onto a CD with the Wondershare DVD Creator. Just make sure that you have a driver, a disk, and the files that you want to burn ready. A couple of the program’s main features include:
Wondershare DVD Creator
- ● Use the One-Click Feature to create instant DVDs
- ● CD, DVD, and Blu-Ray DVD Creation
- ● Multi-Media processing, compatible with audio, video, and images
- ● Quick editing available via built-in video editor and slideshow maker
- ● Intuitive interface perfect for beginners and professionals alike
How to Burn a CD on Windows Computer with Wondershare DVD Creator
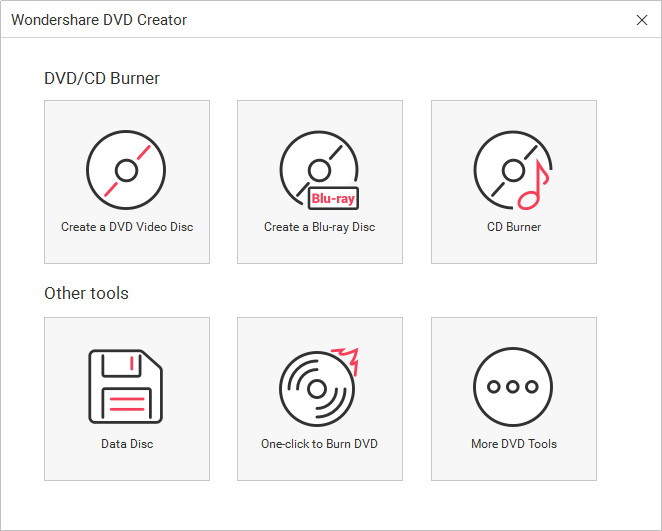
Step One: Select a Disc type to Burn
If you want to burn a CD on Windows computer, you'll have to choose CD Burner option in the welcome screen.

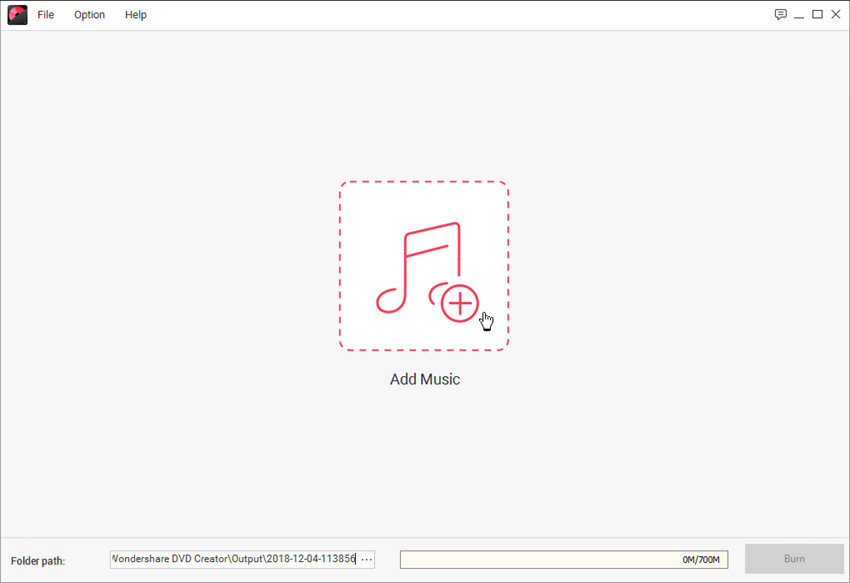
Step Two: Upload Audio Files for your CD
Now you can drag and drop the files that you want to burn into your disc. You can also click the “+” icon if you want to be able to browse your computer and select the files you want to burn by yourself.

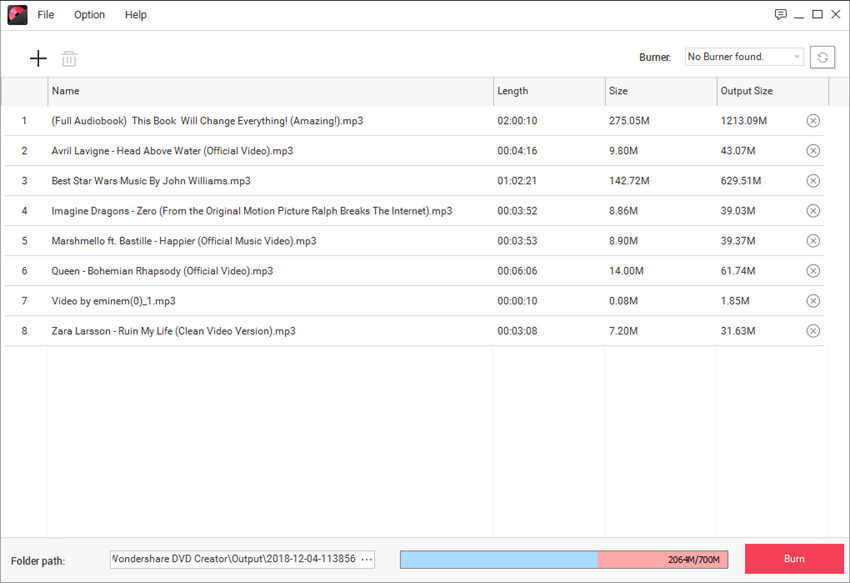
Step Three: Start Burning CD
Now you can click the Burn button at the lower right bottom of the screen to start burning. What's more, you can arrage the order of the songs by dragging and dropping the songs in the oder you want.

Part 2. How to Burn a CD on Windows Computer with Windows Media Player
The next Windows-able program is the Windows Media Player. It’s the base media player for the Windows OS, so you won’t have to download anything. You probably know this already, but it’s not really a DVD/CD burner. It’s better suited for watching videos or listening to music, but if you use it right then you can manage to burn a CD using it. Continue reading our step-by-step break down to get the full story.
How to Burn a CD on Windows Computer with Windows Media Player
Step One: Burn Tab
Windows Media Player doesn’t have its burn feature, you can see the “Burn” button quite clearly as soon as you have the program launched. Click it in order to move onto the next step.

Step Two: Burn List
Activating the “Burn” tab should make a toolbar appear on the right-hand side of your screen. On there, you’ll be able to drop items from your Windows Media Library in order to create a Burn List. This burn list should make up of all the audio you want to burn onto your CD (and only those files).

Step Three: Start Burn
Once you have your burn list already to go, click the “Start Burn” button in order to initiate the permanent copy. The program should do the rest of the work for you.

Part 3. Burn a CD on Windows Computer with iTunes
For our third method, we’re going to be teaching you how to burn a CD on a Windows computer using the iTunes software. Now, iTunes is not traditionally a Windows program, but it will function as one nonetheless. You’re going to have to download it from the Apple website and install it. Do so first before anything else, as it might take a couple of minutes (up to a couple of hours) depending on the speed of your internet.
How to Burn CD on Windows Computer with iTunes
Step One: Create a Playlist
This method is more convenient for people who already use iTunes regularly. That way, you won’t have to go through the trouble of making a new playlist. If you’re not a regular iTunes user, then you have to create a playlist just for the audio that you want to burn. Do this by selecting said audio from your iTunes library, right-clicking, and then clicking Add to Playlist > New Playlist.

Step Two: Start CD-to-DVD Burn with iTunes
Once you have your playlist set up just how you want, you can proceed with the actual burning process. Do so by selecting Burn Playlist to Disc option in the File tab (as shown in the image below.)

Step Three: Speed & Format
We’re almost done here, all that is left to do is decide how fast you want to burn your CD and what kind of format you want the data to be burned.
- ● Preferred Speed: Lower speeds take a lot longer to complete, but you will run the risk of losing quality with higher speeds.
- ● Disc format: Choose Audio CD for burning audio onto a CD.
Click the “Burn” button and wait for the disc to finish burning — remember, it will take longer if you choose lower speeds.

Part 4. How to Burn a CD on Windows with VLC
For our last demonstration on how to burn a CD on Windows, we’re going to be using another popular media player that works on the Windows OS. That is, the VLC Media Player. Which, as you have probably guessed by now, are similar to iTunes and Windows Media Player in that it offers a way of burning audio onto a CD with a quick burn feature. This feature is a little more hidden in VLC, but it’s there if you look for it.
How to Burn a CD on Windows with VLC
Step One: VLC Playlist to Burn
With VLC, you’re going to straight up need to create a Playlist (much like with iTunes.) You can do this by dragging and dropping media onto VLC’s playlist dock. If the Playlist dock is not showing, you can activate it through the “View” tab.

Step Two: Convert/Save… to Burn
VLC’s burn options can be found in “Convert/Save” — which you can select from the Media tab. Do so, before moving onto the next step.

Step Three: Open Media Window
Clicking Convert/Save will prompt the Open Media windows to open. This is where you’ll be able to find the option to burn your playlist onto a disc. Which you can do by following the set of instructions listed down below: Select the Disc tab, choose the “Audio CD” format under Disc Selection, browse for the appropriate driver/burner, and then click the “Convert/Save” button to officially copy your data onto the disc.

Conclusion:
That’s really all there is to burn a CD on a Windows computer. As you’ve learned, there are a variety of programs available for you to use in order to copy data onto a CD. You can try out the media players we introduced — Windows Media Player, iTunes, or VLC if you want a quick fix. However, if you’re looking for a high-quality CD that will last you for a long time then we recommend going with the Wondershare DVD Creator. It’s the best tool for the job.
Wondershare DVD Creator
- ● Use the One-Click Feature to create instant DVDs
- ● CD, DVD, and Blu-Ray DVD Creation
- ● Multi-Media processing, compatible with audio, video, and images
- ● Quick editing available via built-in video editor and slideshow maker
- ● Intuitive interface perfect for beginners and professionals alike


Christine Smith
staff Editor
Comment(s)