All Helpful Ways to Burn Apple Music to CD Effortlessly
Apple Music is a great place for purchasing music of all types. A lot of artists — both those working with a CD label and independent artists, have their songs available for purchase on there. Of course, after you’ve purchased the song from Apple Music, you can always listen to them on your PC or mobile device, but you can also just as easily burn apple music to CD. Continue reading to learn how.
Part 1. Best Way to Get Apple Music on Computer
Of course, the first part in burning apple music onto a CD is to first purchase and then extract said songs. For this, you’re going to need to have the iTunes software installed. The Apple website offers it for FREE, just make sure to reserve some time for downloading and installing it (just that step might take a while.) In any case, continue reading to learn how iTunes works with Apple Music.
How to Get Apple Music on Computer
Step 1: Launch iTunes and Open Store
Once you have iTunes downloaded and installed, you need to launch it. It will be empty at first, of course, you’ll need to purchase the Apple Music for yourself first. Open up the Apple Music store by selecting the Store option.

Step 2: Purchase Songs
You can search navigate the iTunes store to purchase the songs that you want to download. Beside to the song that you want to download, there will be a price tag available. Click that. You’ll have to connect a payment method to pay for the songs, but after the purchase, it will be saved to your library.

Step 3: iTunes Library
You should be able to find the songs that you purchased on your iTunes library (shown in the image below.) To extract those songs, you’ll need to select them from your library, right-click, and then choose Show in Windows Explorer option. That will open the location of the songs that you downloaded.

Part 2. How to Burn Apple Music to CD with Wondershare DVD Creator
Now, using the Apple Music that you extracted from your iTunes library, we’re going to be burning it with the Wondershare DVD Creator. With this, you won’t have to convert the files that you extracted. It will also burn your CDs at an appropriate speed, ensuring that your CDs are hi-fi. Of course, as a premium DVD/CD creator, it offers a lot more than just the tools that we’re going to be demonstrating. Like, for example:
Wondershare DVD Creator
- ● A One-Click DVD Burn feature for efficiently creating DVDs out of videos, slideshows, audio, images, etc.
- ● ISO, DVD, Blu-Ray DVD, CD, and Data Disc Burner
- ● Accepts a variety of file extension formats (including iTunes lossless ALAC format)
- ● Built-in Editor and Slideshow Maker for processing media
- ● Beginner-Friendly interface that maximizes ease of use
How t oBurn Apple Music to CD with Wondershare DVD Creator
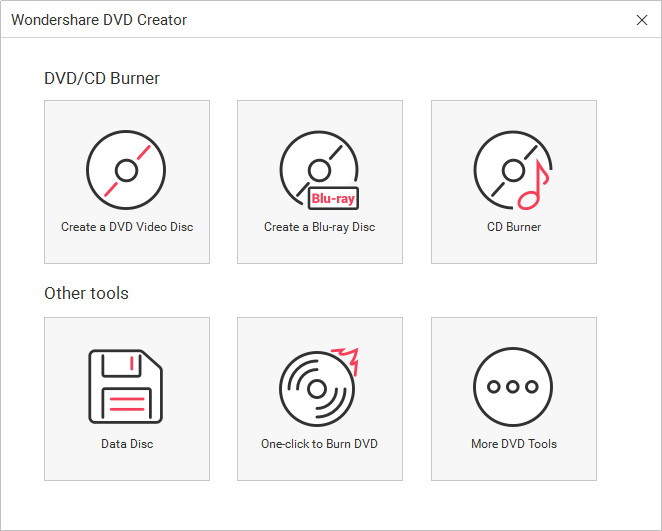
Step 1: Open Wondershare DVD Creator & Select Data Disc
Open up the Wondershare DVD Creator and you’ll be greeted by a welcome menu screen (shown in the image below.) On there, you can choose a variety of different disc types. For burning your Apple Music to CD, you need to select CD Burner option.

Step 2: Add Apply Music
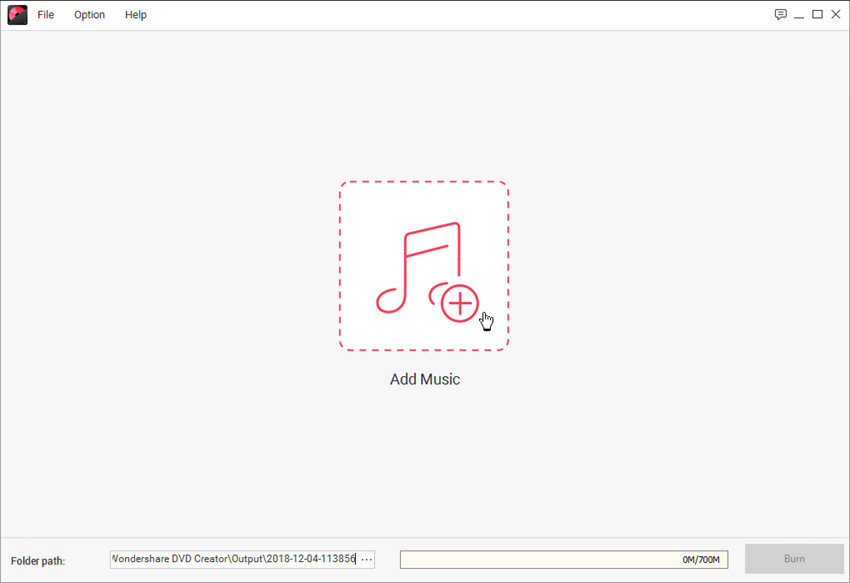
Next, you’ll need to move the Apple Music you extracted from iTunes library to Wondershare DVD Creator program window.
- ● Add it to the Wondershare DVD Creator either by dragging it from the location and dropping it onto the screen
- ● OR, you can click the (“+”) add options and browse your computer for the location of your Apple Music.

Step 3: Organize Songs and Start Burning
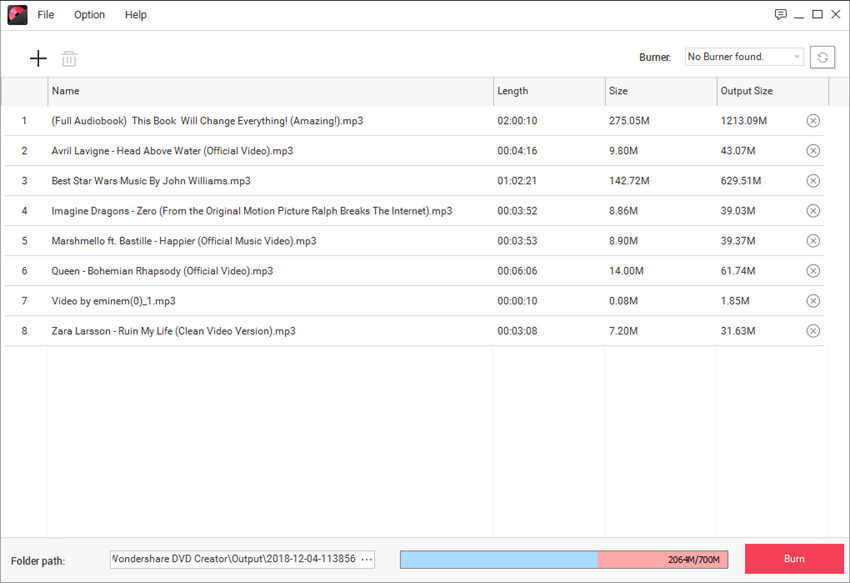
After adding the music files to the program, you can organize the music files by dragging them to the place you want. When you've finished making up all the settings, you can click the Burn button at the lower right bottom to start burniong music to CD.

Part 3. How to Burn Apple Music to CD on Mac Computer
Of course, if you’re a general Apple user, then you might favor a Mac solution. For this, we’re going to be teaching you how to use the built-in CD-burning feature available on all Mac OS computers to burn your Apple Music onto a disc. If you’re not a Mac user, then you can always skip to the first or last method that we introduced.
How to Burn Apple Music to CD on Mac
Step 1: Create a New Folder with your Apple Music
First, you’re going to have to put the Apple Music you want to burn onto a disc into its own folder. That’s easy enough to do, just copy them from the download location and paste them onto a New Folder. Create a New Folder by right-clicking on the desktop screen and choosing the New Folder option.

Step 2: Insert Disc
Next, you need to insert the disc you want to burn your Apple Music onto. In a couple of seconds, a pop-up (shown in the image below) should appear. You can Ignore this pop-up and move straight to the next step.

Step 3: Select Apple Music Folder
Referring back to the New Folder that you created in the first step, you’re going to have to right-click it and choose Burn “_(Folder Name)_” to Disc… option on the drop-down menu that appears (shown in the image below.)

Step 4: Burn Apple Music to CD with Mac
Almost done, just give your disc a name by filling in the Disc Name box. You can also choose a Burn Speed for processing your disc (slower speeds = higher quality music). When you’re ready, click the Burn button to finish burning the Apply Music to CD with your Mac OS computer.

Part 4. How to Burn Apple Music to CD with Windows Media Player
For this final method, you’re going to have to first convert the files that you downloaded. That’s because the Windows Media Player, the CD burner that we’re going to be using, does not readily accept ALAC (iTunes’ file.) A good alternative is Windows Media Player’s own file extension, the WAVE file. Still, despite this initial inconvenience, it should be able to burn your Apple Music to CD similarly to the Mac method that we introduced previously.
How to Burn Apple Music to CD with Windows Media Player
Step 1: Burn Tab
To start, you’re going to have to click the Burn tab located on the right-hand side of the screen. That will open up a tool sidebar — which you will see in the next step.

Step 2: Burn List
On the tool sidebar that appears, there is a dock called Burn List where you will be able to drop files from your Windows Media Player library. The items dropped onto this Burn List will make up the audio that will be burned onto your disc, so be careful with the audio you choose.

Step 3: Start Burning Apple Music to CD
Almost done. When you’re happy with your burn list, you can click the Start Burn button (highlighted in the image below) to initiate the official music to CD burn.

Conclusion:
That concludes our tutorial on helpful methods to burn Apple Music to CD. In the end, Apple Music is a good source for all of the popular songs. You can be assured that all the songs that come from it will be high-quality and legal (if purchased correctly.) After that, it’s just as easy as using an intuitive program like the Wondershare DVD Creator to be able to burn the Apple Music you extracted from the store.
Wondershare DVD Creator
- ● A One-Click DVD Burn feature for efficiently creating DVDs out of videos, slideshows, audio, images, etc.
- ● ISO, DVD, Blu-Ray DVD, CD, and Data Disc Burner
- ● Accepts a variety of file extension formats (including iTunes lossless ALAC format)
- ● Built-in Editor and Slideshow Maker for processing media
- ● Beginner-Friendly interface that maximizes ease of use


Christine Smith
staff Editor
Comment(s)