

Burn Music to CD Using iTunes quickly with ease
Want to learn how to burn music to CD using iTunes? All that — and then some — is broken down for you below. It’s actually not as difficult as you might think, better still if you use your iTunes account regularly for listening to music. We’ve chosen to introduce you to a couple of other alternatives as well. Including a DVD/CD program that is actually made to burn music to CDs and two others that work similarly to how one might use iTunes to burn music.
Part 1. How to Burn Music to CD Using iTunes
As promised, we’re going to be teaching you how to burn music to CD using iTunes — first and foremost. This method is convenient for people who use iTunes regularly and/or already have their audio files converted into a format that iTunes readily accepts. Either way, we’re going to be jumping straight into the process and going through the whole thing step-by-step.
How to Burn iTunes Music Library to CD
Step One: Create a New Playlist for your Music
The first step is to basically have a playlist ready for the music that you want to burn. It has to be a separate playlist — you can work with one you already have set up, but remember that everything on that playlist will be burned into the disc. Create a New Playlist on iTunes by choosing audio from your library, right-clicking on said audio, and then click Add to Playlist > New Playlist.

Step Two: Burn Selected Playlist
Assuming that you have your playlist ready with all the songs that you want to burn into your disc (and no more than that), click the File tab and select the “Burn Playlist to Disc” option.

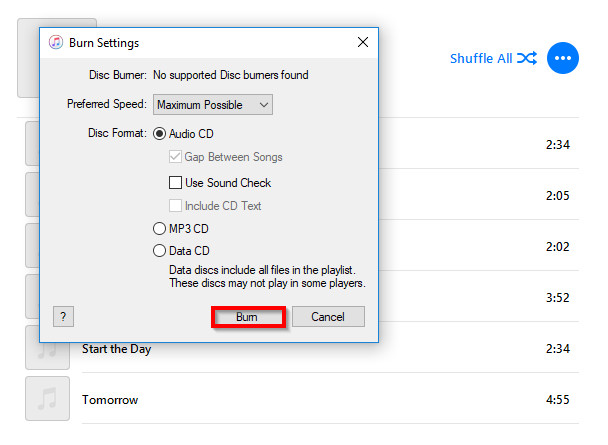
Step Three: Burn Music to CD Using iTunes
After the previous step, the Burn Settings window will pop-into your screen. This is where you’ll be able to make a couple decisions as far as how you want your CD to burn. Such as:
- ● Preferred Speed: This refers to how fast you want your disc to be burned (note: faster speeds are risky in that they might potentially cause damage to your music.)
- ● Disc Format: iTunes allow for several types of disc type burning, for our purposes today, we’ve chosen to stick to the regular Audio CD format.
When you’re ready, all you have to do is click the “Burn” button on the bottom right-hand corner of the screen in order to permanently scribe your music onto the disc.
Part 2. A Better Solution to Burn Music to CD
This second method is definitely going to be a bit different from just using iTunes to burn your music. For one, the Wondershare DVD Creator is a fully-integrated DVD/CD software. You won’t go wanting with this program. With it, you can produce high-quality Audio CDs without the risk of quality loss or messing up some time in the process. It’s much too simple for that — everything is clear-cut, despite it being a professional premium program, ensuring that it works just as well for you as it will for everyone else. A couple of its key features include:
Wondershare DVD Creator
- · Convert videos to DVD/Blu-ray Disc/ISO File/DVD Folder/Data Disc with fast speed and high-quality output.
- · Edit videos with features of cropping/trimming/rotating videos, add subtitle, apply effects, and others.
- · Select to DVD menu with 100+ template design from Movie, Memory, to Travel theme.
- · Customize DVD menu with parameters such as background image, music, text, and others.
- · Additional functions including ISO to DVD, Data Disc, Video Editor, Slideshow Maker, DVD to Video, DVD to DVD, One-click to Burn DVD, etc.
- · Both DVD5 and DVD9 disc are available.
- · Supported OS: Windows 10/8/7/XP/Vista, Mac OS 10.14 (Mojave), 10.13 (High Sierra), 10.12, 10.11, 10.10, 10.9, 10.8, 10.7, 10.6.
How to Burn Music to CD with Wondershare DVD Creator
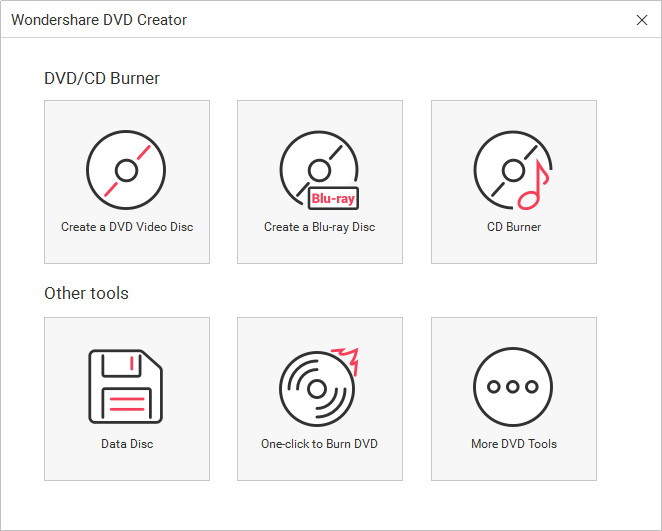
Step One: Choose a Disc Type
We start off by launching the Wondershare DVD Creator. Immediately, we’re given a choice on what kind of disc we are looking to create. Of course, with the intention of burning music in mind, we’ve chosen the CD Burner option. Do so as well and move onto the next step.
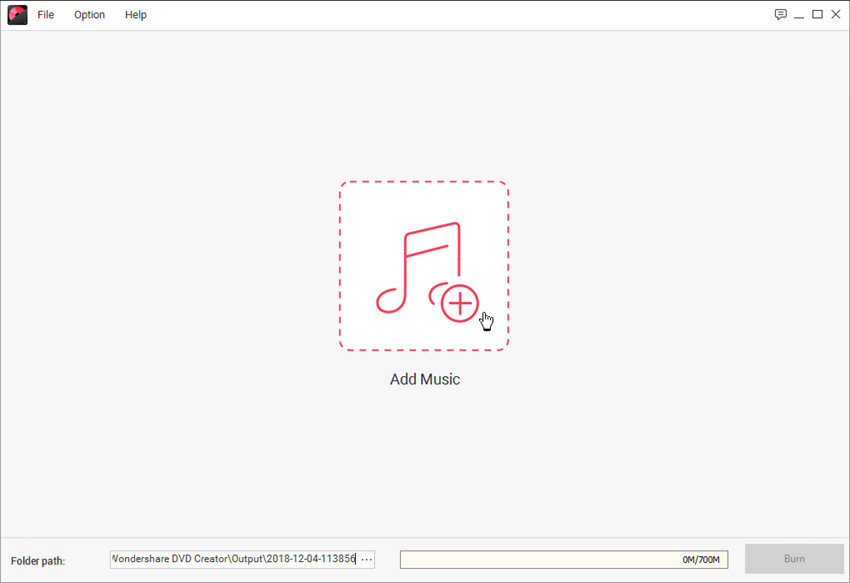
Step Two: Add Music to Burn
Unlike iTunes, the Wondershare DVD Creator accepts audio formats of all kind. You won’t have to worry about converting anything. Simply drag and drop the audio files you want to burn onto the screen OR click the “+” icon and manually add your files by browsing through your PC.
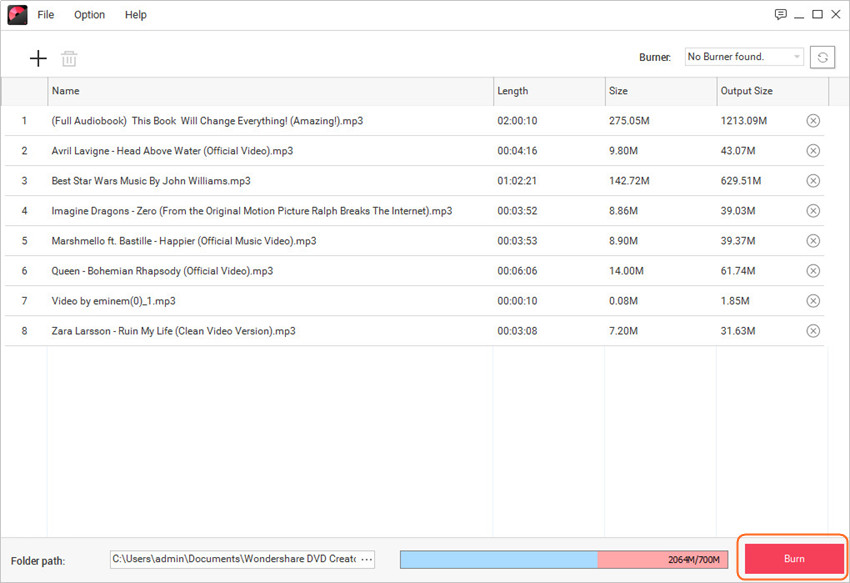
Step Three: Organize the Songs and Start Burning
After adding the music files into the program, you're allowed to organize the songs by dragging the songs to the place you want. When all the settings are finished, you can click the Burn button at the lower right bottom to start burning iTunes music library to CD.
Part 3. Another 2 Methods to Burn Music to CD
This final portion will be covering the last two methods all at once. That is the Windows Media Player and the VLC Media Player. Both of which, much like iTunes, are used primarily for listening to music and watching videos but provide the ability to burn music to CD as one of their features. The process for these two programs is pretty similar to the iTunes process — see for yourself as you go through it.
How to Burn Music to CD Using Windows Media Player
Step One: Import Audio & Burn
The first step in burning a CD with the Windows Media Player is to import the audio that you want to burn. All you have to do is drag and drop the audio onto the Windows Media Player library (keeping in mind that some audio formats may need converting). Once you have your audio important into the Windows Media Player, click the “Burn” button in the top-right-hand corner of the screen.

Step Two: Create a Burn List
Similar to the iTunes method — where we made a playlist, you need to create a Burn List in order to use the Windows Media Player appropriately. Do this by dragging and dropping music from your Windows Media Player Library onto the Burn List dock at the right-hand side of the screen (highlighted in the image below).

Step Three: Start Burn
Once your Burn List is set to go, click the “Start Burn” button to initiate the process and wait for your CD to finish processing.

How to Burn Music to CD Using VLC
Step One: Create a VLC Playlist
Again, we’re going to have to create a playlist in order to use VLC to burn music to CD. This is fairly simple, all you have to do is drag and drop the music onto the Playlist Dock.
Tip: If your screen doesn’t look like the image below, activate the Playlist dock through the “View” tab.

Step Two: Convert/Save
The burn features in VLC are not directly advertised as such, you’ll have to find them in Media tab’s “Convert/Save…” option (you can also press the Ctrl + R keys on your keyboard.)

Step Three: Burn Music to CD Using VLC
This is where it might get a little tricky. But if you follow the instructions as listed below, then you should do alright: Activate the Disc tab, choose “Audio CD” under Disc selection, browse your PC for the DVD/CD Driver with your blank disc under Disc Device, and then finally click “Convert/Save” button.

Conclusion:
That’s all we have for how to burn music to CD using iTunes. Which, as you probably already learned, is really not all that hard. It’s fairly basic stuff, but it will work if what you’re looking for is a convenient solution to burning your iTunes music to a CD. Now, if you want something a little more sophisticated than that, we advise that you use the Wondershare DVD Creator instead. Especially for projects where you want to ensure no quality loss.
Wondershare DVD Creator
- · Convert videos to DVD/Blu-ray Disc/ISO File/DVD Folder/Data Disc with fast speed and high-quality output.
- · Edit videos with features of cropping/trimming/rotating videos, add subtitle, apply effects, and others.
- · Select to DVD menu with 100+ template design from Movie, Memory, to Travel theme.
- · Customize DVD menu with parameters such as background image, music, text, and others.
- · Additional functions including ISO to DVD, Data Disc, Video Editor, Slideshow Maker, DVD to Video, DVD to DVD, One-click to Burn DVD, etc.
- · Both DVD5 and DVD9 disc are available.
- · Supported OS: Windows 10/8/7/XP/Vista, Mac OS 10.14 (Mojave), 10.13 (High Sierra), 10.12, 10.11, 10.10, 10.9, 10.8, 10.7, 10.6.


Christine Smith
staff Editor
Comment(s)