

How to Burn a CD with All Ways
Want to learn the best way to burn a CD? It’s really not that difficult of a process. It’s just a matter of finding a program that works for you and running with it! Down below, we’re going to be teaching you how to burn a CD using a variety of programs. Each of the programs will be unique in their own ways, the first one even more so. Give it a scroll and see what we mean.
Part 1. Best Way to Burn a CD
As mentioned, the first program that we’re going to be introducing you to is definitely the most unique. Compared to the other “CD Burners” on this list, the Wondershare DVD Creator is the most premium. By that we mean, it’s a professional-level DVD/CD burner that will allow you to create high-quality CDs quickly. Fortunately, unlike some professional programs, it’s actually pretty easy to use as well. A couple of its main features includes:
Wondershare DVD Creator
- ● Can Burn DVDs, CDs, Blu-Ray Discs, and Data Disc
- ● Convenient One-Click feature for quick DVD burn
- ● Burn Discs with Videos, Images, and Audio (accepts a variety of different formats)
- ● Highly-Intuitive, made for beginners and professionals alike
- ● Built-in Editor for quick Video alteration and Slideshow Creation
How to Burn a CD with Wondershare DVD Creator
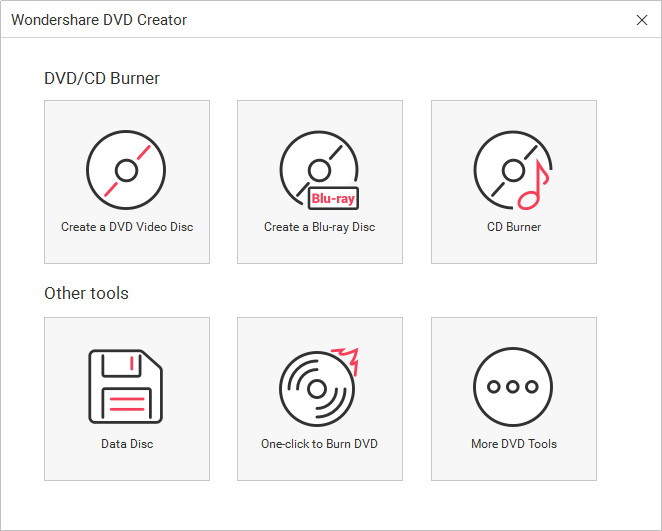
Step One: Select CD Burner
To burn a CD with the Wondershare DVD Creator you have to choose CD Burner option after you started the program on your computer.
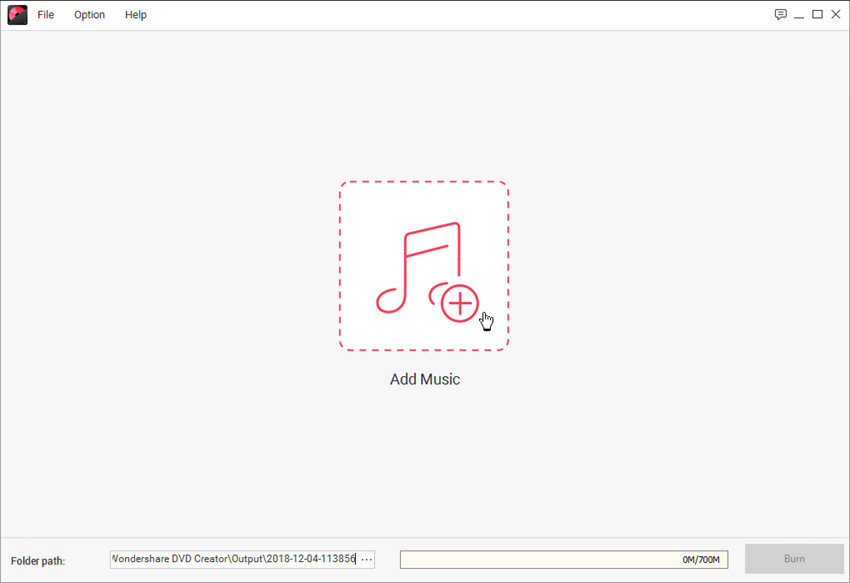
Step Two: Add Audio Files to Burn
Next, the program will ask you to add the files that you want to burn onto the CD — you can upload audio files to the program window with the following methods:
- ● Drag and Drop the audio files onto the screen to upload.
- ● Click the “+” icon in order to manually browse your computer for the files you want to upload.
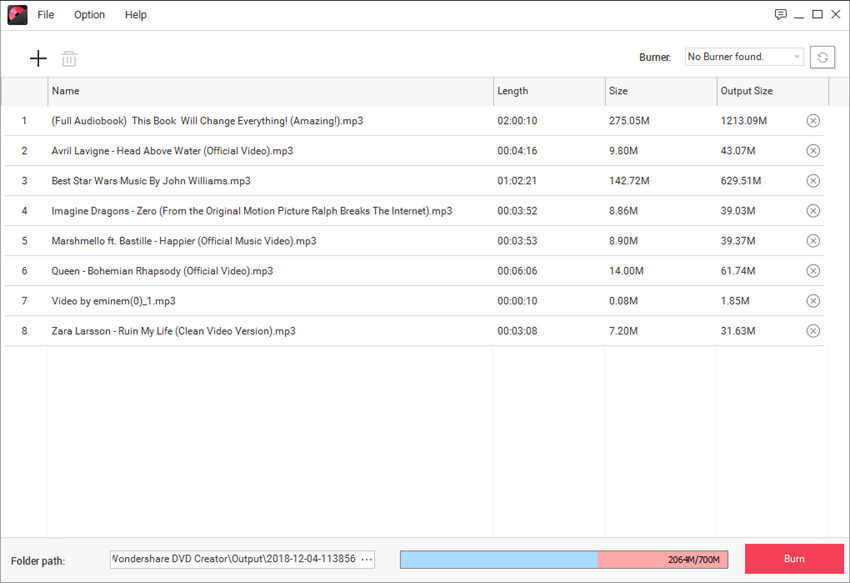
Step Three: Start Burning CD
After adding the audio files into the program, you're able to organize the songs by dragging the songs to the order you want. After that, you can click the Burn button at the lower right bottom to start burning CD.
Part 2. How to Burn a CD with Mac Computer
For our next how to burn a CD tutorial, we’re going to be using just a regular Mac computer! So, anyone with a Mac would benefit from this. You won’t have to download or install a separate program, because all we’re going to be using to make our CD is the built-in software that the Mac OS offers! Of course, this method of burning a CD is a lot more specific than others — if you have a Windows computer, then this is a section that you probably would be better off skipping.
How to Burn CD with Mac Computer
Step One: Create a New Folder
If you want to burn a CD using your Mac computer, then you’re going to have to create a folder with the data that you want to burn. Now, the most important part here is that your files are in its own separate folder — anything in that same folder will be burned as well, so keep that in mind. Create a New Folder on a Mac computer by right-clicking and selecting “New Folder.”

Step Two: Insert a Blank Disc
Before we go any further, you have to make sure that you have a blank disc inserted into your computer’s DVD driver (or a CD/DVD burner connected to your PC). Upon doing so, this pop-up (refer to the image below) will appear on your screen. Ignore it, just click “Ignore” and move onto the next step.

Step Three: Select Data Folder
Going back to the folder that you created in the first step, select it, right-click, and then choose the Burn “_(Folder Name)_” to Disc… option. Doing that will lead you to the next step.

Step Four: Finish Burning CD with Mac
This is the final pop-up window that you have to deal with (refer to the image below.) On there, you will have to make the following decisions:
- ● Disc Name: What name would you like your CD to have? (Fill in the Disc Name box to give your CD a name.)
- ● Burn Speed: How fast do you want your CD to burn? (Note: faster speeds might result in scratchy sounds in audio — or other forms of quality loss.)
When you’re ready, click the “Burn” button and wait for your CD to finish being copied.

Part 3. How to Burn a CD with iTunes
For our third step-by-step tutorial, we’re going to be introducing you to how you can burn a CD with the iTunes software. You’re probably more familiar with this software as a media player, but it does offer a music-to-CD burn feature. Of course, much like the Mac method, this tutorial is targeted to a specific audio — people who regularly use iOS devices and have their own library full of iTunes music! In any case, you can learn more about it down below.
How to Burn a CD with iTunes
Step One: Create a Playlist for your Data
Much like how we had to create a separate folder for the data that we wanted to burn on the Mac, you’re going to have to create a separate playlist for the music that you want to burn using iTunes. Create a New Playlist on iTunes by selecting audio from your iTunes library, right-clicking, and clicking Add to Playlist > “New Playlist.”

Step Two: Burn Playlist to Disc
Next, select the File tab and click the “Burn Playlist to Disc” option. Doing that will lead you to the next step.

Step Three: Burn Settings
We’re almost done here, all you need to do is make a couple of decisions.
- ● Preferred Speed: How fast do you want your CD to burn? (Choosing faster speeds might result in a loss of quality).
- ● Disc Format: What kind of disc do you want to create? For our purposes today, we’ve chosen the Audio CD format.
Once done, click the “Burn” button in the bottom right-hand corner of the screen and wait for your CD to finish processing.

Part 4. How to Burn a CD with Windows Media Player
If you’re not much of a Mac or iTunes user, then you might be interested in using this third option — that is, the Windows Media Player program. The way to burn a CD with Windows Media Player is actually similar to iTunes. You’ll see that for yourself as we go through our step-by-step. For this, it’s also best to have your blank disc inserted immediately (in order to avoid any loss of progress).
How to Burn a CD with Windows Media Player
Step One: “Burn” tab
If you’re a regular Windows Media Player user, then you no doubt already have a library filled with songs. If not, then you can just as easily drag and drop files onto the screen. Click the “Burn” button at the top right-hand side of the screen to open the sliding toolbar that you see in the next step.

Step Two: Add Songs to Burn List
The “Burn” toolbar is where you can drag items from your Windows Media Library and then drop them onto the Burn List dock (highlighted in the image below) to create a pseudo-playlist of the audio that you want to burn onto the CD.

Step Three: Start to Burn
Once you have your burn list already to go, all that’s left to do is click the “Start Burn” button and the program will do the rest.

Conclusion:
That concludes all the different ways you can burn a CD on your PC! Hopefully, we were able to teach you how to burn a CD in a way that will suit your needs. Whether you are a Mac, iOS, or Windows user — there are individual programs that you can use. Of course, if you want to skip past all the finicky little nuances those programs come with, then the one we’d recommend to you is the Wondershare DVD Creator software. It is, after all, the most premium of the programs we have available.
Wondershare DVD Creator
- ● Can Burn DVDs, CDs, Blu-Ray Discs, and Data Disc
- ● Convenient One-Click feature for quick DVD burn
- ● Burn Discs with Videos, Images, and Audio (accepts a variety of different formats)
- ● Highly-Intuitive, made for beginners and professionals alike
- ● Built-in Editor for quick Video alteration and Slideshow Creation


Christine Smith
staff Editor
Comment(s)