Burn Music to CD with All Helpful Ways
Want to learn how to burn music to CD? Down below is a compilation of all the different methods available for copying your favorite tracks onto a CD that can be played in your car or any available DVD/CD player! Continue reading till the very to be introduced to each of the five unique programs that you can use in order to copy music onto a CD.
Part 1. How to Burn Music to CD with Wondershare DVD Creator
The first method of burning music onto a CD that we’re going to be teaching you will be through the Wondershare DVD Creator Program. It’s a program that was made for this purpose — creating DVDs and CDs, unlike the other programs on our list. Which tend more towards media players and the like. Because of that, you can expect a lot more than just the usual haphazard CD burning — it’s a lot more sophisticated. Offering you the premium features listed below — and then some!
Wondershare DVD Creator
- · Convert videos to DVD/Blu-ray Disc/ISO File/DVD Folder/Data Disc with fast speed and high-quality output.
- · Edit videos with features of cropping/trimming/rotating videos, add subtitle, apply effects, and others.
- · Select to DVD menu with 100+ template design from Movie, Memory, to Travel theme.
- · Customize DVD menu with parameters such as background image, music, text, and others.
- · Additional functions including ISO to DVD, Data Disc, Video Editor, Slideshow Maker, DVD to Video, DVD to DVD, One-click to Burn DVD, etc.
- · Both DVD5 and DVD9 disc are available.
- · Supported OS: Windows 10/8/7/XP/Vista, Mac OS 10.14 (Mojave), 10.13 (High Sierra), 10.12, 10.11, 10.10, 10.9, 10.8, 10.7, 10.6.
How to Burn Music to CD with Wondershare DVD Creator
Step One: Burn Music to CD
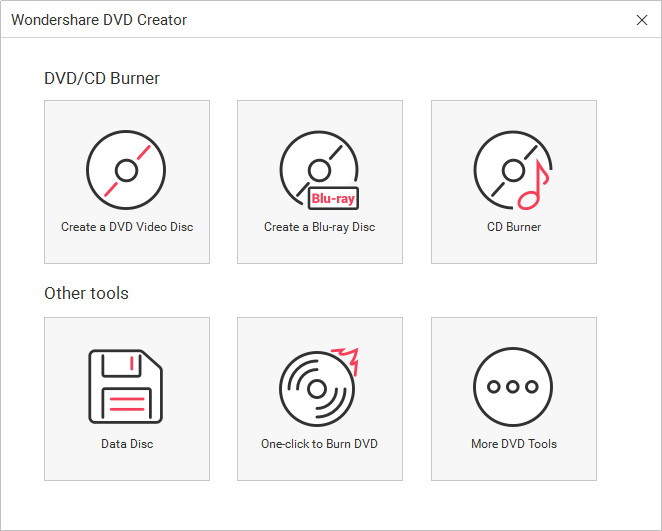
The first thing you need to do is launched the Wondershare DVD Creator. In doing so, you will be given a chance of selecting the type of disc that you want to create. Keeping in mind that we want to burn Music to CD, we’ve chosen the Data Disc option.

Step Two: Add Music to Burn to CD
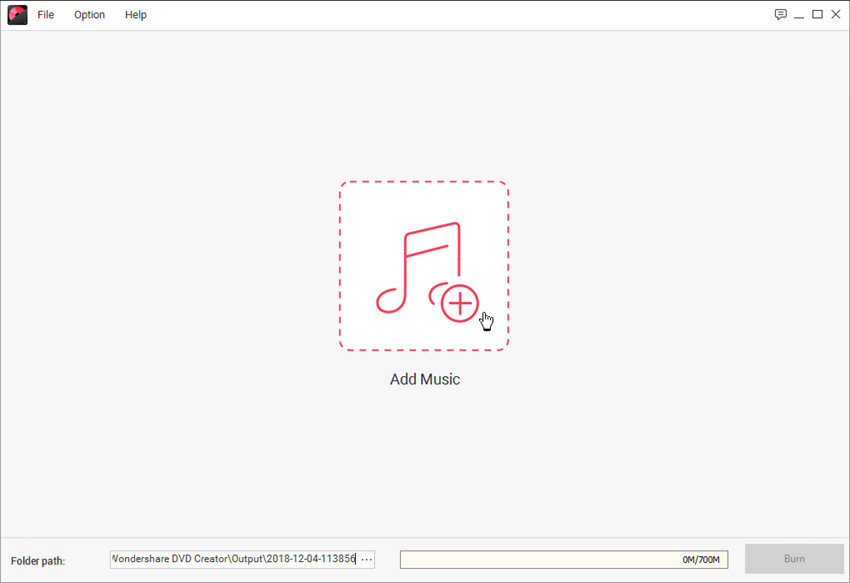
This part is fairly intuitive. Drag and Drop the music that you want to burn onto a CD. The Wondershare DVD Creator reads and processes a bunch of different file extension formats — including the following: MP3, WAV, AIFF, APE, WMA, FLAC, etc.

Step Three: Add or Delete Music
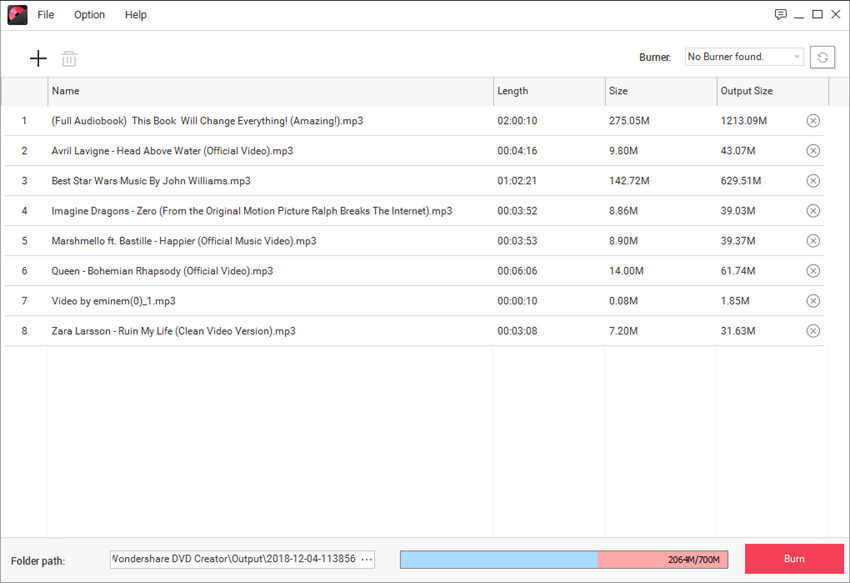
This third step is fully optional. Something that you can do to organize the way your CD is read when inserted into a DVD/CD player.
- ● Add or Delete audio by using the “+” and “Trash Can” icons respectively.
- ● Remember to also give your disc a name — by filling in the Disc Label box.

Step Four: Select Burner & Burn Music to CD
Finally, the last thing you need to do is select the appropriate CD/DVD burner. That is the one that has a blank CD in which you can burn the music onto.
- ● Select a Burner on the drop-down menu at the right-hand corner of the screen.
- ● THEN, click the “Burn” button to initiate the copying process.
Part 2. How to Burn Music to CD with Mac Computer
This second method is very targeted to a specific audience — as it teaches you how to burn Music to CD with a Mac Computer. For this, we’re going to be using the default CD processing software built into the Mac OS, so you won’t be able to follow these instructions on a Windows Computer (even though Windows does offer a similar software.) In any case, continue reading if you have a Mac computer that you want to use to try and burn your music.
How to Burn Musci to CD with Mac Computer
Step One: Create a Folder for your Music
The first thing you need to do is make sure that your Music is in its own separate folder. If that’s not the case, then make a new one. Creating a folder on Mac is as simple as right-clicking on a blank surface of the screen. That should activate the drop-down menu shown in the image below. There, select the “New Folder” option.

Step Two: Insert a Blank CD
The next step requires that you insert a blank CD into your computer’s DVD/CD drive (or into a DVD/CD Burner connected to your device.) In doing so, a pop-up should appear on your screen. This pop-up can be ignored for the most part. Just click the “Ignore” button and move onto the next step.

Step Three: Select Folder > Burn “Music” to Disc...
For our third step, we’ve selected and right-clicked the folder that we created in the first step. This prompts a drop-down menu where we are given a couple of choices. In order to initiate the burning process, select the following option: Burn “_(Folder Name)_” to Disc...

Step Four: Burn Music to CD with Mac
Finally, we’ve made it to the last step! We have another pop-up window to deal with. With the following elements to consider:
- ● Disc Name: Fill in the box appropriately with a name for your disc.
- ● Burn Speed: Select a speed that will work for you (note: faster speeds might result in a higher risk for quality loss.)
Click the “Burn” button when you’re ready to initiate the copying process!

Part 3. How to Burn Music to CD with Other Ways
This third part will introduce the rest of the programs all in one go. Including iTunes, Windows Media Player, and VLC. For the most part, these programs are similar. They’re better suited for media playing than CD-burning, but they offer the feature nonetheless! Again, these three are pretty similar — process-wise as well. Whatever differences they might have will be introduced in the individual step-by-step demonstrations we have for each media player.
Method 1: Burn Music to CD with iTunes
Step One: Create a Playlist
If you want to use iTunes to burn Music to CD. Then you’re going to need a Playlist. You might already have one available on your iTunes library, if so, then you can skip this step. If not, create a New Playlist by selecting the music you want to burn to your CD, right-clicking, and then choosing the following options: Add to Playlist > “New Playlist.”

Step Two: Burn Playlist to CD
You can arrange your Playlist however you want. Just be wary of how much music you include (it has to fit in the available disc storage space.) When you’re ready to burn your music to your disc, click the following options: File tab > “Burn Playlist to Disc”.

Step Three: Prepare for Burning
There’s just one more thing for you to do, and it involves the Burn Settings window (something that should have popped up after the previous step.) Here, you can:
- ● Preferred Speed: Choose a preferred speed for Music to CD processing — just note, that faster speeds can also equate to higher quality loss risks.
- ● Disc Format: Choose the Audio CD option for basic Music to CD burning.
Once you’re satisfied, click the “Burn” button to move forward.

Method 2: Burn Music to CD with Windows Media Player
Step One: Burn
Much like with the iTunes demonstration, we start off with media already imported in our Windows Media Player library. We’re going to have to create a playlist with the Windows Media Player as well — in a dock that will be opened after clicking the “Burn” button.

Step Two: Burn List
Rather than a regular playlist, the Windows Media Player calls it a Burn List. Create a Burn List by dragging music from your Music library and dropping it onto the highlighted area under the Burn menu.

Step Three: Start Burning your Burn List!
At this point, you should already have inserted a blank disc into the DVD drive of your computer. Then, and only then, will you be given the “Start Burn” option. Which you can click to initiate the copying of your Burn List.

Method 3: Burn Music to CD with VLC
Step One: Create a Playlist
For the third time, we’re going to have to create a playlist. With VLC, this process is fairly intuitive. Simply drag and drop your music onto the area specified (as highlighted in the image below.)
Tip: If you are not seeing the Playlist dock, then activate it through the View tab.

Step Two: Covert/Save
If you want to burn your VLC playlist to a disc, click the Media tab, and select the “Convert/Save” option OR you can also press the Ctrl + R keys on your keyboard.

Step Three: Open Media
This part is a bit tricky, but you can get through it by selecting the following: Disc tab > Disc Selection: Audio CD > Disc Device, and browse for the DVD/CD Drive with the blank disc inside of it. Finally, click the “Convert/Save” option to initiate the permanent copy of your music onto the blank CD.

Conclusion:
That concludes our rather lengthy breakdown of the numerous methods that you can use to burn Music to CD. For the most part, there’s not much that is different from one method to the other. However, there is no denying that some might be better suited for you than others. Like, for example, the Wondershare DVD Creator — which is beginner-friendly and capable of creating high-quality CDs that will last you for a very long time! Try it for yourself and see just how easy learning how to burn music to CD can be!
Wondershare DVD Creator
- · Convert videos to DVD/Blu-ray Disc/ISO File/DVD Folder/Data Disc with fast speed and high-quality output.
- · Edit videos with features of cropping/trimming/rotating videos, add subtitle, apply effects, and others.
- · Select to DVD menu with 100+ template design from Movie, Memory, to Travel theme.
- · Customize DVD menu with parameters such as background image, music, text, and others.
- · Additional functions including ISO to DVD, Data Disc, Video Editor, Slideshow Maker, DVD to Video, DVD to DVD, One-click to Burn DVD, etc.
- · Both DVD5 and DVD9 disc are available.
- · Supported OS: Windows 10/8/7/XP/Vista, Mac OS 10.14 (Mojave), 10.13 (High Sierra), 10.12, 10.11, 10.10, 10.9, 10.8, 10.7, 10.6.


Christine Smith
staff Editor
Comment(s)