All Helpful Ways to Burn CD in Windows 10 Computer
Want to learn how to burn music to a CD on a Windows 10 computer? Continue reading to be introduced to the most common and helpful methods available for creating rocking mixtapes with all the music you could ever want! These three methods are each unique in their own ways, but we’ve included individual demonstrations to lead your way.
Part 1. Easiest Way to Burn Music to CD on Windows 10
The easiest and most effortless way to copy music onto a CD using your Windows 10 PC or Desktop, is to use the Wondershare DVD Creator program. This is a very effective DVD creator that will allow you to do a multitude of different things involving DVD/CD burning and editing. This intuitive DVD creator also offers the following features to help you along the way:
Wondershare DVD Creator
- · Convert videos to DVD/Blu-ray Disc/ISO File/DVD Folder/Data Disc with fast speed and high-quality output.
- · Edit videos with features of cropping/trimming/rotating videos, add subtitle, apply effects, and others.
- · Select to DVD menu with 100+ template design from Movie, Memory, to Travel theme.
- · Customize DVD menu with parameters such as background image, music, text, and others.
- · Additional functions including ISO to DVD, Data Disc, Video Editor, Slideshow Maker, DVD to Video, DVD to DVD, One-click to Burn DVD, etc.
- · Both DVD5 and DVD9 disc are available.
- · Supported OS: Windows 10/8/7/XP/Vista, Mac OS 10.14 (Mojave), 10.13 (High Sierra), 10.12, 10.11, 10.10, 10.9, 10.8, 10.7, 10.6.
Key features of Wondershare DVD Creator
- ● Burn Images, Videos, and Audios in a variety of different formats onto DVDs and CDs
- ● One-Click feature to Burn DVDs easily
- ● Edit & Customize Videos, Images, and Audio before burning into DVD with Video Editor
- ● Create Smart Slideshows before burning into DVD
- ● Create Data Discs for storing files without any loss of quality
How to Burn CD on Windows 10 with Wondershare DVD Creator
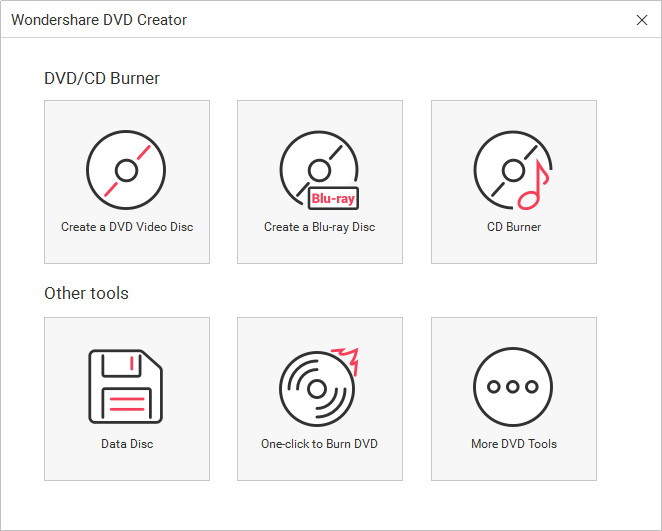
Step One: Choose CD Burner
For our purposes today, we’re going to be creating a data disc that will allow us to burn MP3 files into a CD using our Windows 10 computer. To do this, simply select the CD Burner option on the Wondershare DVD Creator Welcome Menu.
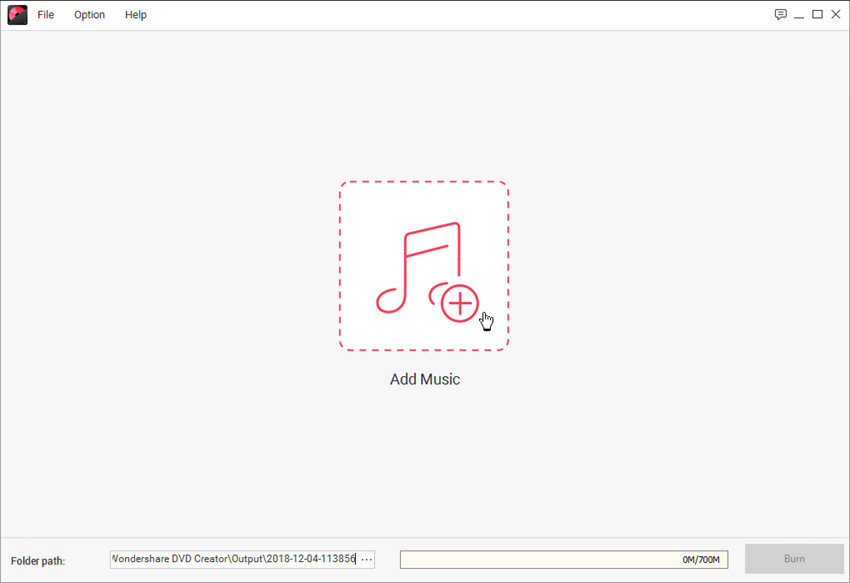
Step Two: Add Audio to Burn
Next, we’re going to be adding the MP3 files that we want to burn. To do this, simply drag and drop MP3 files onto the screen, or select the “+” or “Add Pictures or Videos or Audios” options to browse audio files on your Windows 10 computer manually.
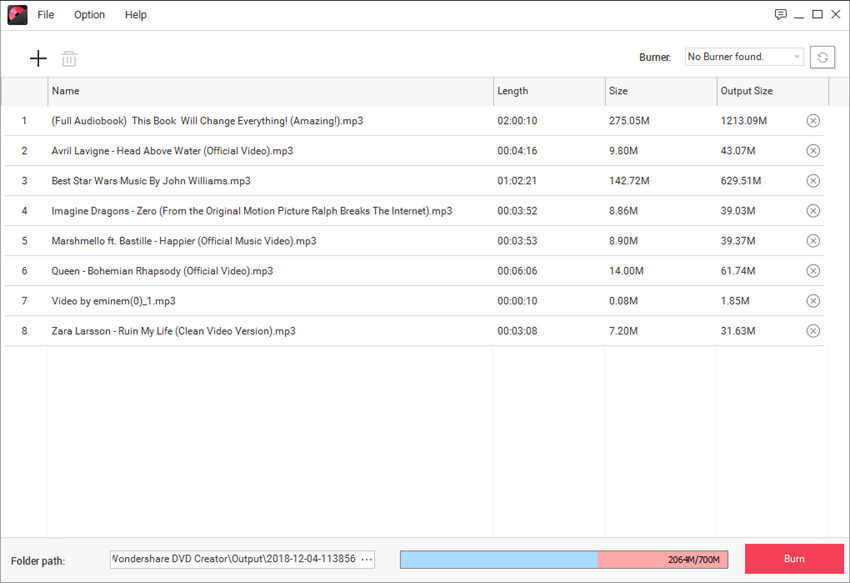
Step Three: Start Burning Music to CD
Once you’ve made the necessary changes, it’s time to burn the MP3 files into your CD! You only need to click the Burn button at the lower right bottom of the main interface to start burning the music files to CD.
Part 2. How to Burn Music to CD on Windows 10 with Windows Media Player
Another way of copying music onto a CD is to use the Windows Media Player. This is the default media player pre-installed in computers running the earlier versions of the Windows Program. It is still available in Windows 10, but you’ll have to activate it from the start menu! Once you’ve done that, you’ll be able to follow along with the demonstration below to burn CDs using the Windows Media Player!
Detailed Guide on How to Burn Music to CD with Windows Media Player
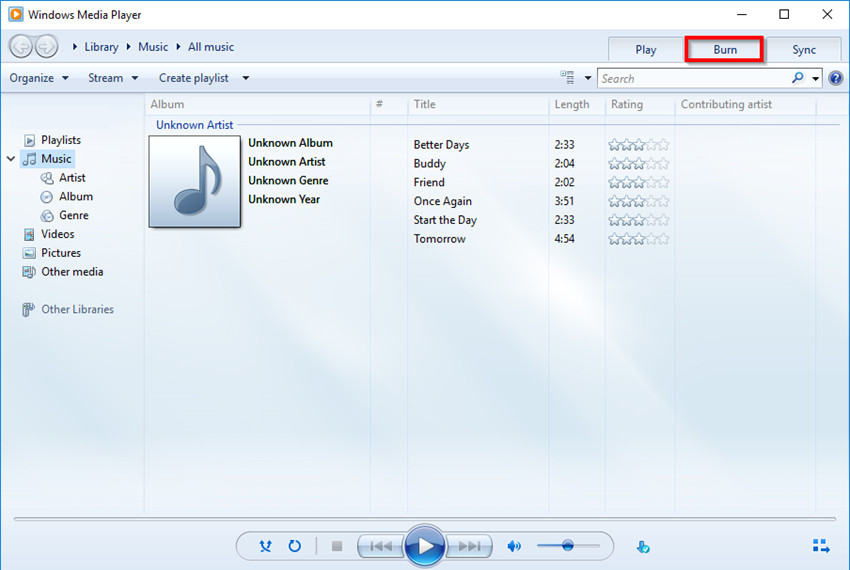
Step One: Burn
The first step is to launch the Windows Media Player. The program itself has not changed much over the years, and it looks the same in the Windows 10 version. You should be able to find the Burn option on the right-hand side of the screen (as shown in the image below.) Click that and proceed.
Step Two: Create a Burn List
Selecting Burn will open up a sidebar menu on the right-hand side of the screen. There, you will find a space for dragging and dropping music from your music libraries. The playlist you create on this “Burn List” will serve as your guide to how your audio will appear when burned into a CD.
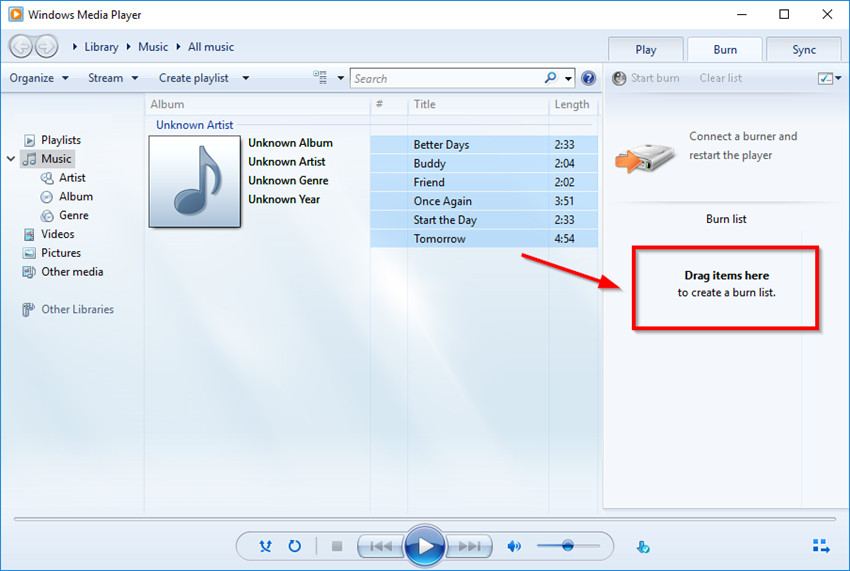
Step Three: Start Burn
If you have a blank CD inserted into a working DVD driver, then you’ll be able to burn your music onto your CD simply by selecting the “Start Burn” button on the top left-hand corner of the Burn tools menu.

Part 3. Burn Music to CD on Windows 10 with iTunes
If you have music set up in your iTunes account, then you might find it easier to burn your audio from there. On the other hand, you might also find it more difficult to use iTunes for burning music to CDs if you don’t have your music already set up on the program. It takes a lot longer as well, if not because downloading, installing, and setting up iTunes can take a while. Nevertheless, we’ve outlined all you need to do in the step-by-step down below.
How to Burn Music to CD with iTunes on Windows 10 Computer
Step One: Create a Playlist
The first step in burning audio to a CD using iTunes is to create a playlist. You can use pre-made playlists from your account if you’d like, but you can select audio, right-click, and choose “Add to Playlist” > “New Playlist”.

Step Two: File > Burn Playlist into a Disc
You can play around with your playlist as you like by adding more songs, organizing uploaded songs, and removing unwanted songs. Once you’re happy with your playlist, select the File menu and then the “Burn Playlist to Disc” option.

Step Three: Burn
Finally, a pop-up menu title Burn Settings should appear on your screen (as shown below.) On here, you can choose the burn speed and choose the format you want your disc to be. For our purposes, we choose the Maximum Possible speed and the Audio CD option before clicking the Burn button to finish the CD.

Conclusion:
CDs are great for making mixtapes filled with your favorite songs! And, despite how it might appear at first, it’s actually pretty easy to do. All you really need to have to start is the music you want to burn onto the CD and a trustworthy DVD creator program like the Wondershare DVD Creator! The process itself, as you saw in our three separate tutorials, goes pretty quickly. Give it a try, you might find it more enjoyable than some of the more modern options of listening to music!
Wondershare DVD Creator
- · Convert videos to DVD/Blu-ray Disc/ISO File/DVD Folder/Data Disc with fast speed and high-quality output.
- · Edit videos with features of cropping/trimming/rotating videos, add subtitle, apply effects, and others.
- · Select to DVD menu with 100+ template design from Movie, Memory, to Travel theme.
- · Customize DVD menu with parameters such as background image, music, text, and others.
- · Additional functions including ISO to DVD, Data Disc, Video Editor, Slideshow Maker, DVD to Video, DVD to DVD, One-click to Burn DVD, etc.
- · Both DVD5 and DVD9 disc are available.
- · Supported OS: Windows 10/8/7/XP/Vista, Mac OS 10.14 (Mojave), 10.13 (High Sierra), 10.12, 10.11, 10.10, 10.9, 10.8, 10.7, 10.6.


Christine Smith
staff Editor
Comment(s)