

3 Helpful Ways to extract audio from CD
If you were around before the time MP3 players existed, it is likely that you will have a selection of CDs lying around your house or stored away in your loft. Rather than leaving your favorite CDs to gather dust, why not convert them into digital files that you will be able to play on your smartphone and other devices? Here we will explain three simple ways to extract audio from CDs.
Part 1: Using Windows Media Player
Using Windows Media you can extract the audio from your CDs in just a few simple steps. Below we have outlined the steps for you to follow in order.

Step 1 First you will need to go to the Start Menu on your Windows PC or laptop and in the 'All Programs' section, select Windows Media Player.
Step 2 Wait for the software to open and then insert your CD into the disk drive. From here, Windows Media will automatically read the disk and display the track names.
Step 3 Go to 'Rip Settings' at the top of the Windows Media Player window. Select 'Format' and then 'MP3.' Whilst you are in 'Rip Settings' you will also need to select 'Audio Quality.' This enables you to choose the bitrate at which the MP3 files will be ripped. The higher the bitrate, the better quality the MP3 will be. It is worth keeping in mind that higher bitrates create bigger files.
Step 4 If there are certain songs on the album that you do not like or do not want to rip, simply uncheck the boxes next to the tracks. Next press the Rip CD button found at the top of the Windows Media Player window.
Step 5Before ripping your audio files, Windows will ask you whether you want to add 'Copy Protection.' This is basically a form of Digital Rights Management technology that restricts the PCs and devices that can play the files. Choose yes or no and then press OK to begin the extraction.
Step 6You can stop the rip at any time by pressing the 'Stop Rip' button (red icon) found at the top of the window. Once the player has finished extracting the audio files from your CD, they will be added to your Windows Media Player library. You will then be able to plug in your smartphone or MP3 player, go to your music library, found under 'Documents' and transfer your new MP3 audio files to your device.
Part 2: Using iTunes
If you do not have a Windows PC or do not use Windows Media Player, you can extract audio from your CDs using iTunes. Follow our step by step guide below for more information.

Step 1Launch iTunes and go to 'Preferences.' You will find it by clicking the iTunes menu at the top of the window.

Step 2In the box that pops up you will see 'When you insert an Audio CD: Ask to import CD.' Click on the button next to this that says import settings.

Step 3From the drop down list in the pop up box, select 'MP3 Encoder.' You then need to select 'High Quality (160 kbps)' from the settings drop down menu below. This is the optimal bit setting to use as it offers a good balance between quality and file size.

Step 4You will then need to load your CD into the disk drive. Providing iTunes is your default player, the CD will automatically load and its track list will appear in your iTunes window. The little check boxes next to the track list allow you to uncheck any songs that you do not want to extract from the CD.
Step 5Click on the 'Import CD' button. Your songs will then begin to extract and convert into MP3 files. Once the import is complete, the songs will appear in your iTunes and you will be able to load them onto your iPod, iPad and iPhone.
Part 3: Using Max
If you are a music connoisseur and are looking to use a tool that supports higher quality audio extraction, we recommend using Max. This open source software is free to download and is suitable for Mac users. It supports high quality formats, allowing you to extract and convert the audio from your favourite CDs into many different audio formats.
Step 1First you will need to download the software. Type Max audio extractor and the link will come up. It will download as a zip file, so you will need to extract the content to a new folder, before opening it.
Step 2Once it has finished extracting, open up the software and it will take you to the main screen. When you insert a CD, the software should automatically retrieve the track titles and information. If it does not, click the 'Query' button.
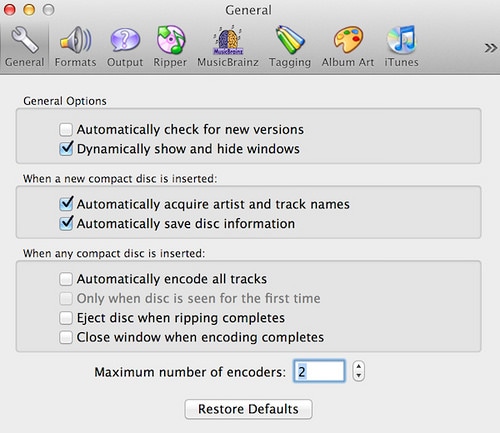
Step 3Click on 'Max' in the top, left hand side of the window and then select 'Preferences.' Here you will be able to set your audio parameters. In the 'General' panel, check the tick boxes for:
- Dynamically hide and show windows
- Automatically acquire artists and track names
- Automatically save disc information

Step 4In the same panel, click on 'Formats.' Here you can choose from the list of available output formats. You can select the formats you require by using the + button. This will add them to the 'Configured output formats' list. You then need to click on 'Encoder Settings' so you can set the audio parameters.
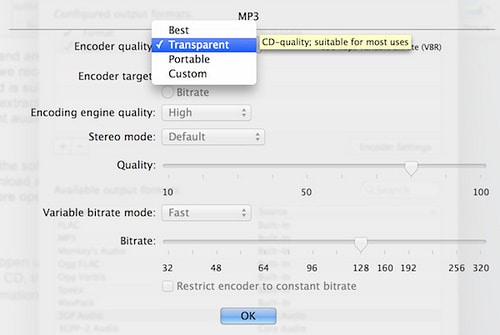
Step 5In 'Encoding Settings' you can choose the encoder quality. You can either choose from 'best,' 'transparent,' or 'portable' and the program will automatically set the other parameters, or you can choose custom, where you will be able to customise your own audio settings. Once you have done this, click OK to apply the settings.

Step 6Go to the 'Output' tab next. Here you can set the destination folder in the location box. You also have the option to customise the output file name by ticking 'using a custom format for output file naming.'

Step 7Next go to the 'Ripper' tab so you can choose the ripper mode you want to use. Basic ripper is designed for those who want the ripping to complete quickly. If you want a more balanced result between ripping speed and extraction accuracy, choose 'comparison ripper.' If accuracy is your priority choose 'cdparanoia.' Close the window and return to the main screen.
Step 8Make sure that all of the tracks that you want to extract have a tick next to them and then press extract. Once extraction is complete, your new files can be found in the destination folder you chose.
| Feature: | Windows Media | iTunes | Max | |
| Free | X | X | X | |
| Windows | X | X | No | |
| MAC | No | X | X | |
| Different audio formats (apart from MP3 and WAV) | No | No | X | |
| Download | Free Trial Free Trial |
Part 4(Bonus): Recommend way to Burn Audio to CD Easily
Here we recommend another Wondershare's hot product DVD Creator. It is a special utility toolkit which can convert the DVD to MP4, AVI, MOV, MKV, WMV, and other video formats. Besides, this magic tool also could burn any video/audio file to CD with one click. The following are more features of DVD Creator:

Wondershare DVD Creator
- · Convert videos to DVD/Blu-ray Disc/ISO File/DVD Folder/Data Disc with fast speed and high-quality output.
- · Edit videos with features of cropping/trimming/rotating videos, add subtitle, apply effects, and others.
- · Select to DVD menu with 100+ template design from Movie, Memory, to Travel theme.
- · Customize DVD menu with parameters such as background image, music, text, and others.
- · Additional functions including ISO to DVD, Data Disc, Video Editor, Slideshow Maker, DVD to Video, DVD to DVD, One-click to Burn DVD, etc.
- · Both DVD5 and DVD9 disc are available.
- · Supported OS: Windows 10/8/7/XP/Vista, Mac OS 10.14 (Mojave), 10.13 (High Sierra), 10.12, 10.11, 10.10, 10.9, 10.8, 10.7, 10.6.
Watch Video Tutorial to Learn How to Burn Audio file to CD Easily and Quickly
Steps to Use Wondershar DVD Creator to Burn Music to CD Easily
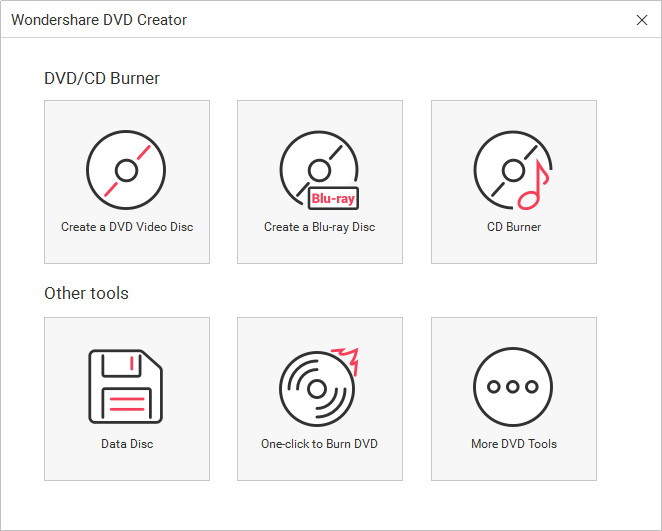
Step 1Select CD Burner Option
After launching the Wondershare DVD Creator, you’ll be greeted with this menu screen (refer to the image below.) If you want to use the Wondershare DVD Creator to convert MP3 files to a readable CD format, then you need to select the CD Burner option.
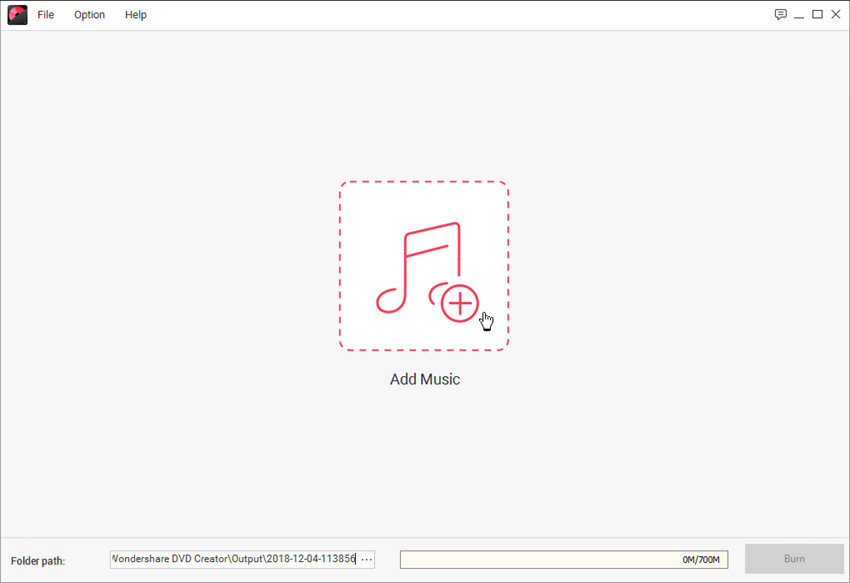
Step 2Add MP3 Files
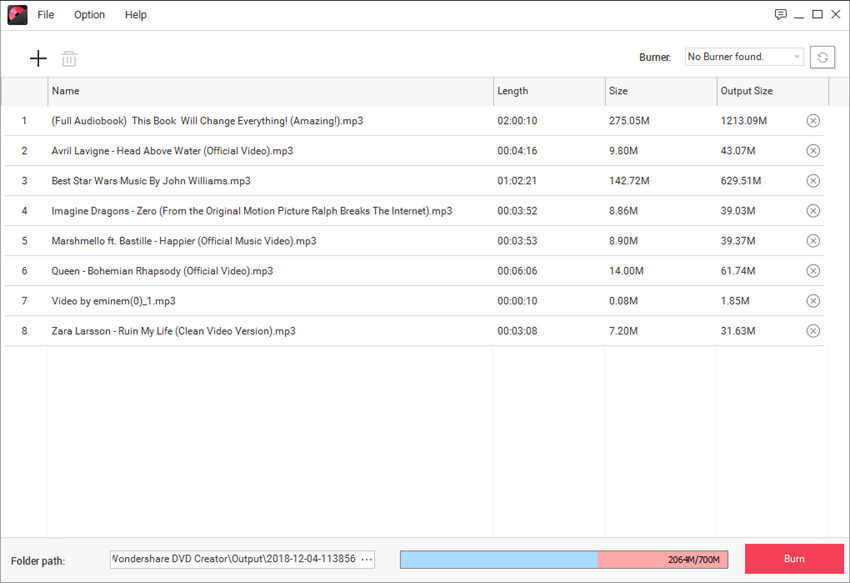
Now you can drag and drop the music files into the program window, and the program will add the music files and convert the music files to CD-supported format. You can also click the big Music icon in the middle of the program window to add the songs.
Step 3 Burn Audio Files to CD
When you finish adding music into the program, you can organize the order of the songs. After that, you only need to click the Burn button at the lower right bottom to start burning music to CD.
If you're looking for options on how to burn video to DVD on Mac? Use Wondershare DVD Creator for Mac and files will be burned at super fast speed.
Conclusion
Whilst many people send their CDs to professional companies to be converted into MP3s, you can actually save a lot of money by doing it yourself. Providing you have the software featured above, extracting audio from CDs is easy - even for any technophobes out there!


Christine Smith
staff Editor
Comment(s)