

All Helpful Tips to Burn CD in Windows 7 Computer
Do you want to learn how to burn files on a CD in Windows 7? In truth, there’s really not all that much of a difference between Windows OS versions, but there are advancements made in Windows 8 and 10 that are not necessarily present in Windows 7. That includes the ability to use a built-in software to copy files to a CD. However, there are still programs that you can use for this purpose. Continue reading to learn more!
Part 1. Best Way to Burn Audio CD in Windows 7
First, we’re going to be teaching you the best way to burn an audio CD with Windows 7 with Wondershare DVD Creator. If you want to follow along, you can download the FREE trial version of the Wondershare DVD Creator. It is, as the name suggests, a program made specifically for creating DVDs and CDs. It’s a premium product, one that ensures that there is no quality loss in the conversion of your audio to a CD.
Wondershare DVD Creator
- · Convert videos to DVD/Blu-ray Disc/ISO File/DVD Folder/Data Disc with fast speed and high-quality output.
- · Edit videos with features of cropping/trimming/rotating videos, add subtitle, apply effects, and others.
- · Select to DVD menu with 100+ template design from Movie, Memory, to Travel theme.
- · Customize DVD menu with parameters such as background image, music, text, and others.
- · Additional functions including ISO to DVD, Data Disc, Video Editor, Slideshow Maker, DVD to Video, DVD to DVD, One-click to Burn DVD, etc.
- · Both DVD5 and DVD9 disc are available.
- · Supported OS: Windows 10/8/7/XP/Vista, Mac OS 10.14 (Mojave), 10.13 (High Sierra), 10.12, 10.11, 10.10, 10.9, 10.8, 10.7, 10.6.
Key features of Wondershare DVD Creator
- ● Quick and Easy One-Click Burn feature for the Instant creation of DVDs/CDs
- ● Built-in Media Editor for personalizing videos
- ● Built-in Smart Slideshow Creator for presenting precious pictures and memories
- ● Processes audio files in a variety of formats (MP3, FLAC, ALAC, APE, AIFF, WAV, and so much more)
- ● Easy-to-Use and Easy-to-Navigate design for maximum intuitiveness for beginners and professionals alike
Burn Audio CD in Windows 7 with Wondershare DVD Creator
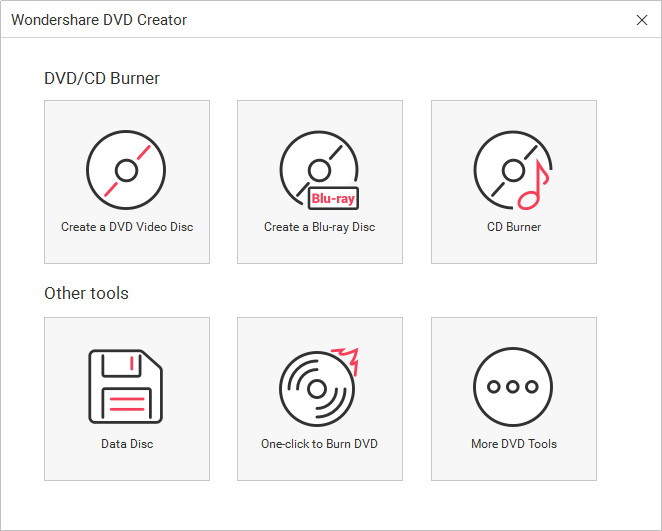
Step One: Launch Wondershare DVD Creator & Choose Disc Type
When you first run the Wondershare DVD Creator, you will be led to this screen — see image below. There, you will be given a choice as to what kind of project you want to work on (be it a DVD, Blu-Ray DVD, Data Disc, etc.) Because we’re looking to burn audio into a CD, we will have to select CD Burner.
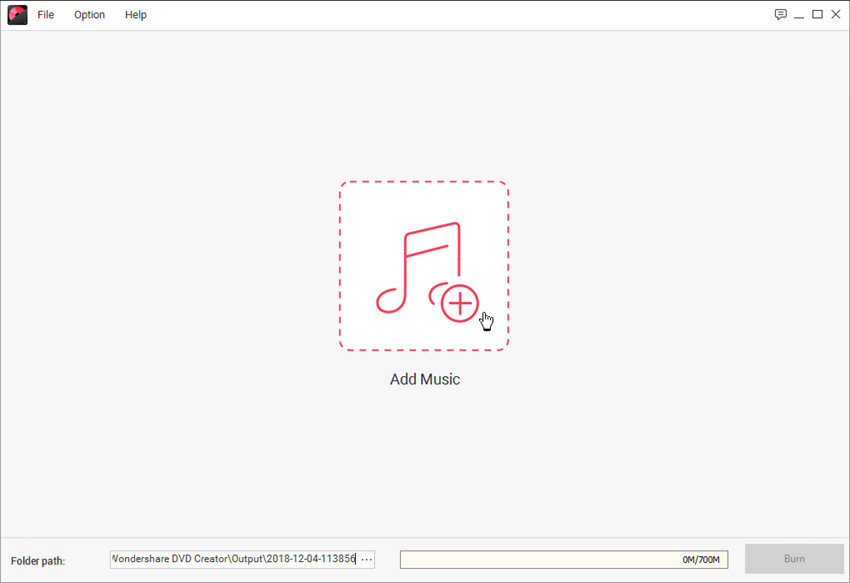
Step Two: Add Songs to CD Burner
Next, we will be moved to the actual activity screen. On here, you can add the files that you want to copy to your CD. To do this, either drag and drop media onto the activity screen or select the “+” marks on the screen. Doing the latter will bring up a Windows pop-up where you will be prompted to browse your PC for the files you want to burn.
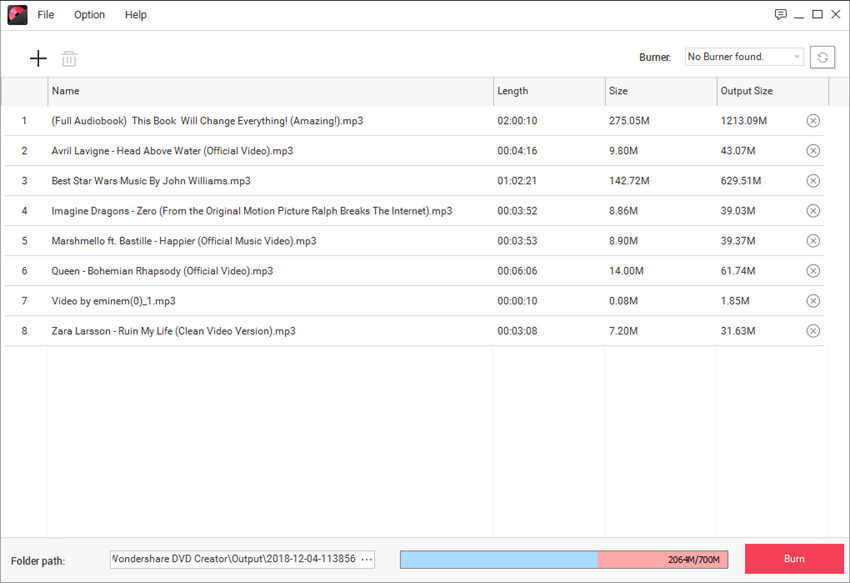
Step Three: Burn CD in Windows 7 Computer with Wondershare
Once you have made up all the settings, you can click the Burn button at the lower right bottom to start burning your songs to CD disc.
Part 2. How to Burn Music to CD in Windows 7 with Windows Media Player
This next portion of our methodology demonstration is a little closer to home. Windows Media Player, after all, is a built-in software in even the more recent Windows OS computers. You’re probably more familiar with it as what it technically is — a media player, but it can be easily used to burn Music to CD in your Windows 7 PC as well! The only catch is, you might want to be mindful about the files that you import into the software. Conversion might be necessary if Windows Media Player does not accept the file extension of your music. In any case, let’s proceed with the step-by-step.
Burn Music to CD in Windows 7 with Windows Media Player
Step One: Import Audio
The first thing you have to do in order to use Windows Media Player to burn music onto a CD is to upload your music. This you can do simply by dragging and then dropping your files onto the library area. Once you have your music in the Windows Media Player library, click the “Burn” button, and you’ll be able to move onto the next step.

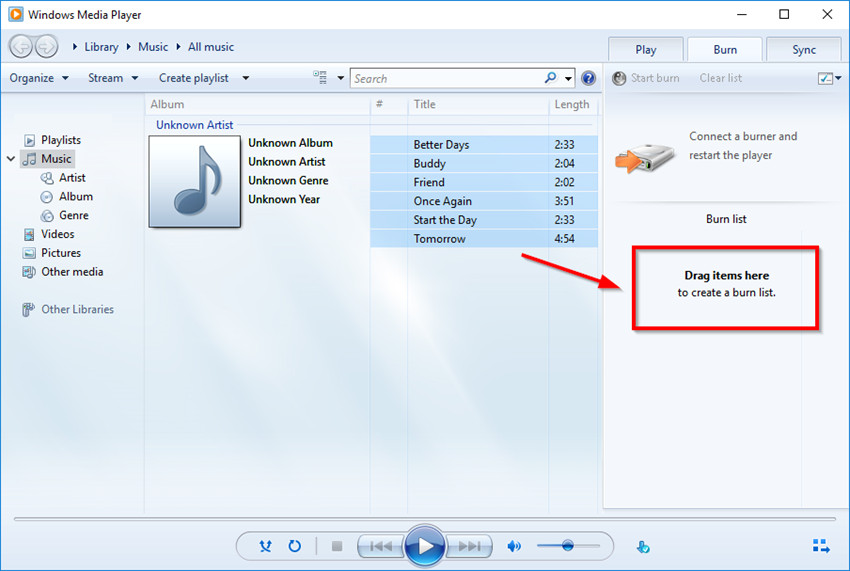
Step Two: Create a Burn List
With Windows Media Player, you’re going to have to make something called a Burn List in order to move forward. To do this, you need to drag items from your Windows Media Player Library and then drop them onto the area highlighted in the image below.
Step Three: Copy Music to CD in Windows 7 using Windows Media Player
Once you’re done with creating your burn list, you can then proceed with the burning of your CD! To do this, click the “Start Burn” button.

Part 3. Burn Music to CD in Windows 7 with iTunes
iTunes will be the third and final program that we’re going to be introducing to you today. It is, similar to the Windows Media Player, better known for its ability to act as a media player. It’s also a lot more finicky than the Windows Media Player. As in, you will almost definitely need to convert a couple if your files. In any case, the process for burning CDs with iTunes is almost identical to the Windows Media Player method. So, you shouldn’t have too much of a problem following this next step-by-step.
Burn Music to CD in Windows 7 with iTunes
Step One: Create a Playlist
Of course, you’re going to first have to upload your music to the iTunes library. This is simple — so long as the file extension is compatible, then all you need to do is drag and drop it into place. Once that’s done, then you have to put them in a separate playlist to be burned. Create your playlist by selecting your uploaded audio, clicking the right-button of your mouse, and then finding the Add to Playlist > New Playlist option.

Step Two: File Tab
You’ll have to locate and select the Burn Playlist to Disc option next. This can be found under the File tab — which is shown in the image below.

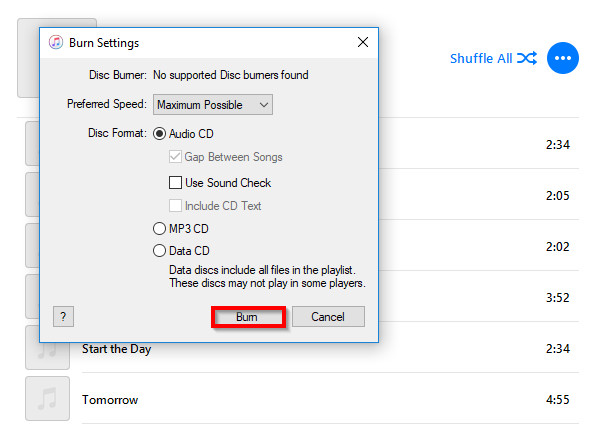
Step Three: Finish it Up
It’s time to wrap up this process by making a couple of choices:
- ● Preferred Speed: This is wholly up to you. Just remember that slower speeds tend to result in better quality discs.
- ● Disc Format: Again, wholly up to you. You can choose Audio CD for better quality discs, MP3 CD for lower quality disc (but you can store more audio), or you can choose Data Disc (in which case certain files from your playlist might make it incompatible with certain CD/DVD players.
Once you’ve made your choice, you can click the “Burn” button to initiate the permanent copy of your music to your CD.
Part 4. Comparison
| Wondershare DVD Creator | Windows Media Player | iTunes | ||
|---|---|---|---|---|
| Burning Speed |  |
|
|
|
| Output Quality | |
|
|
|
| Supported Formats | More than 150 formats | Popular video & audio formats | Popular video & audio formats | |
| Audio Editing Features | Support, built-in audio settings | No support | No support | |
| Volume Adjustment | Support | No Support | No Support | |
| Personalized Settings | Support | No Support | No Support |
Conclusion:
That does it for our quick tutorials on how to burn files to a CD in Windows 8! As you’ve learned, there are a lot of ways to do it. All of which are surprisingly really easy! Of course, we recommend trying it out yourself, using a trustworthy program like the Wondershare DVD Creator. You’ll find that it really isn’t as hard as it might appear at first!
Wondershare DVD Creator
- · Convert videos to DVD/Blu-ray Disc/ISO File/DVD Folder/Data Disc with fast speed and high-quality output.
- · Edit videos with features of cropping/trimming/rotating videos, add subtitle, apply effects, and others.
- · Select to DVD menu with 100+ template design from Movie, Memory, to Travel theme.
- · Customize DVD menu with parameters such as background image, music, text, and others.
- · Additional functions including ISO to DVD, Data Disc, Video Editor, Slideshow Maker, DVD to Video, DVD to DVD, One-click to Burn DVD, etc.
- · Both DVD5 and DVD9 disc are available.
- · Supported OS: Windows 10/8/7/XP/Vista, Mac OS 10.14 (Mojave), 10.13 (High Sierra), 10.12, 10.11, 10.10, 10.9, 10.8, 10.7, 10.6.


Christine Smith
staff Editor
Comment(s)